Enswitch - The Remote Access Menu Feature
Discover the Remote Access feature of the Enswitch web platform and the three different ways it can be utilized.

Written by Val Campos
Updated at July 19th, 2024
Table of Contents
What is the Remote Access Feature?
The remote access feature allows users to call in to the system and have the system call out to another number. The main remote access menu will reference remote access accounts that are created on the Remote Access page of the web portal.
✔ One way the remote access feature is commonly used is to have the phone system place a long-distance call that connects back to a user's phone number.
Implement the Remote Access Menu
To allow your users to use the Remote Access Menu, the following must be completed:
- A remote access account must be created for the main Remote Access Menu feature to reference.
- A feature code or phone number must route to the main remote access menu feature so that the created remote access accounts can be used.
Step 1: Create a Remote Access Account
The Remote Access feature references the different remote access accounts that are created for your account through the web portal.
The different types of remote access accounts that can be created are the Remote access menu, Call back to the callerid, and Dial the called number accounts.
Remote Access Menu
The Remote Access Menu is an automated menu that allows the user to dial a phone number to call. This menu can also be set up to automatically dial a specific phone number instead of giving users the option to dial a phone number of their choosing.
✔ This is the most common type of remote access account created as it allows any user to dial out via the remote access menu.
Create This Type of Remote Access Account
1. Navigate to Features → Remote access.
2. In the Remote access accounts page, click the New >> button. 
3. In the Account settings section of the menu, fill in the following information: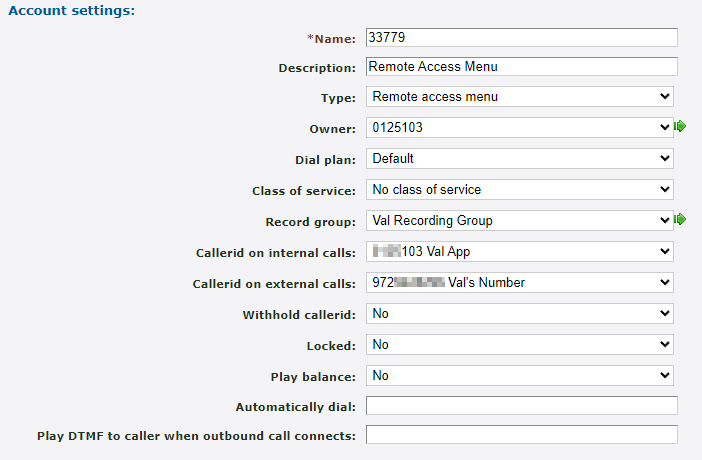
| Setting | Description |
|---|---|
| * Name | A unique series of numbers to use to identify this remote access menu. By default, the system will provide a random series of numbers. |
| Description | Type a brief note describing the purpose of this remote access menu. |
| Type | Select “Remote access menu” to use the automated menu version of the remote access feature. |
| Owner | If needed, select a user that should be able to view and edit this remote access menu. |
| Dial plan |
Used for outbound calls when the system is configured for dial This option is not usually adjusted. |
| Class of service | If needed, restrict the calls that can be made through this remote access menu. Your options include: • No class of service • Allow International • Forbid International • internal only |
| Record group | If these calls should be recorded, select a recording group that should record these calls. |
| Callerid on internal calls | If needed, select the extension number or telephone number to show for internal calls. |
| Callerid on external calls | If needed, select the telephone number to show for external calls. |
| Withhold callerid | Select whether or not to show the caller ID of |
| Locked | If this remote access menu should not be in use, select Yes to lock this menu. |
| Play DTMF to caller when outbound call connects |
If needed, type a DTMF sequence that should be relayed to the caller. This option is not usually adjusted. |
4. In the Require all of the following section, set up any needed options to help secure this remote access menu. 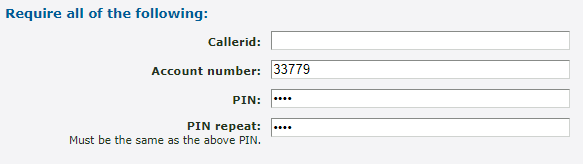
Note: For this type of remote access, the Account Number option is required.
| Option | Description |
|---|---|
| Callerid | If needed, type a phone number that the user's caller ID must match. |
| * Account number |
Type a series of numbers that the menu will prompt the user to enter to gain access. Note: This Account Number will be asked for by the remote access menu when it is called. |
| PIN & PIN Repeat | If needed, type a PIN that the caller will be prompted to input by the menu. |
5. When you are ready, click the Save button. 
Call Back
The Call Back to the Callerid option allows a user calling from a specific extension number or phone number to be called back. This user will receive a call back from the Remote Access Menu so that they can dial a phone number as needed. This menu can also be set up to automatically dial a specific phone number instead of giving users the option to dial a phone number of their choosing.
✔ This remote access account option is sometimes used if only a specific user or desk phone should be making calls using the remote access menu.
Create This Type of Remote Access Account
1. Navigate to Features → Remote access.
2. In the Remote access accounts page, click the New >> button.
3. In the Account settings section of the menu, fill in the following information: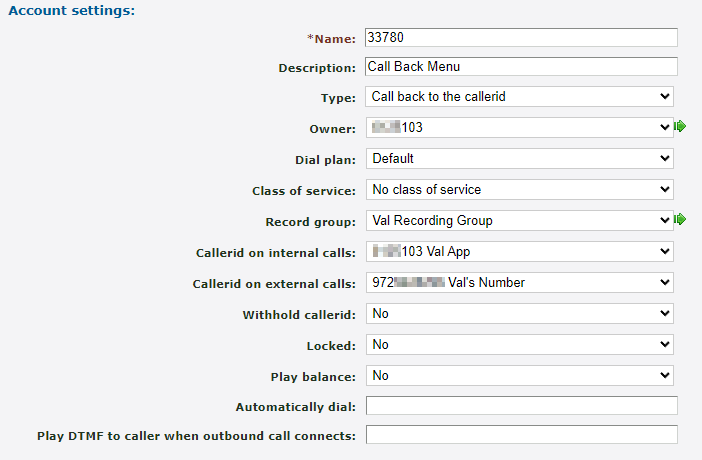
| Setting | Description |
|---|---|
| * Name | A unique series of numbers to use to identify this remote access menu. By default, the system will provide a random series of numbers. |
| Description | Type a brief note describing the purpose of this remote access menu. |
| Type | Select “Dial the called number” to use the remote access feature to dial a set phone number. |
| Owner | If needed, select a user that should be able to view and edit this remote access menu. |
| Dial plan |
Used for outbound calls when the system is configured for dial This option is not usually adjusted. |
| Class of service | If needed, restrict the calls that can be made through this remote access menu. Your options include: • No class of service • Allow International • Forbid International • internal only |
| Record group | If these calls should be recorded, select a recording group that should record these calls. |
| Callerid on internal calls | If needed, select the extension number or telephone number to show for internal calls. |
| Callerid on external calls | If needed, select the telephone number to show for external calls. |
| Withhold callerid | Select whether or not to show the caller ID of |
| Locked | If this remote access menu should not be in use, select Yes to lock this menu. |
| Play balance | Select whether or not to play your phone system account's balance while accessing this menu. This option is not usually used. |
| Automatically dial |
By default, the menu will ask you to dial a phone number. If only a specific phone number should be dialed, type the phone number in this box. |
| Play DTMF to caller when outbound call connects |
If needed, type a DTMF sequence that should be relayed to the caller. This option is not usually adjusted. |
4. In the Require all of the following section, set up any needed options to help secure this remote access menu. 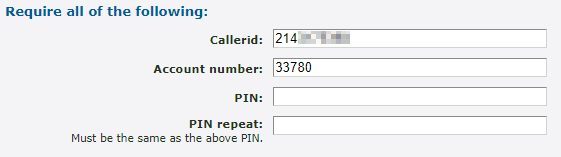
Note: For this type of remote access, the Callerid option is required.
| Option | Description |
|---|---|
| * Callerid | Type the 7-digit extension number or phone number that the user's caller ID must match. |
| Account number |
Type a series of numbers that the main remote access menu will prompt the user to enter to gain access to this specific menu. Note: This Account Number will be asked for by the remote access menu as a method of authentication. |
| PIN & PIN Repeat | If needed, type a PIN that the caller will be prompted to input by the menu. |
5. When you are ready, click the Save button.
Dial Called Number
This niche option of the remote access menu allows callers that do not use normal SIP authentication to place calls to your users' SIP devices using a secret prefix. This prefix is stripped off while the outbound call is being received and authenticated.
Note: This feature is not usually needed, so it is not normally implemented.
If you would like to learn more about this option, it is recommended to contact our technical support team to see if this is a feature that is needed and should be implemented.
Step 2: Route Calls to the Main Remote Access Feature
Once a Remote Access Menu has been created, it will not be immediately reachable. To allow users to call into the main remote access menu, one (or both) of the following will need to be done:
- Create a Feature Code that can dialed on a SpectrumVoIP device to reach the remote access menu.
- Set a phone number to forward calls to the remote access menu.
Feature Code
A feature code can be created that internal user can dial on their desk phones to call into the remote access menu. If this feature code is set to allow callers to enter this code into auto attendants and IVR menus, then outside callers can dial this feature code as well.
Once the user accesses the remote access menu, the menu will ask for the Account Number of the specific remote access feature to use.
To create a feature code that should route calls to the remote access menu…
1. Navigate to Features → Feature codes.
2. On the Feature codes page, scroll down and click the New >> button. 
3. In the New feature code menu, fill out the following information in the Feature code settings section: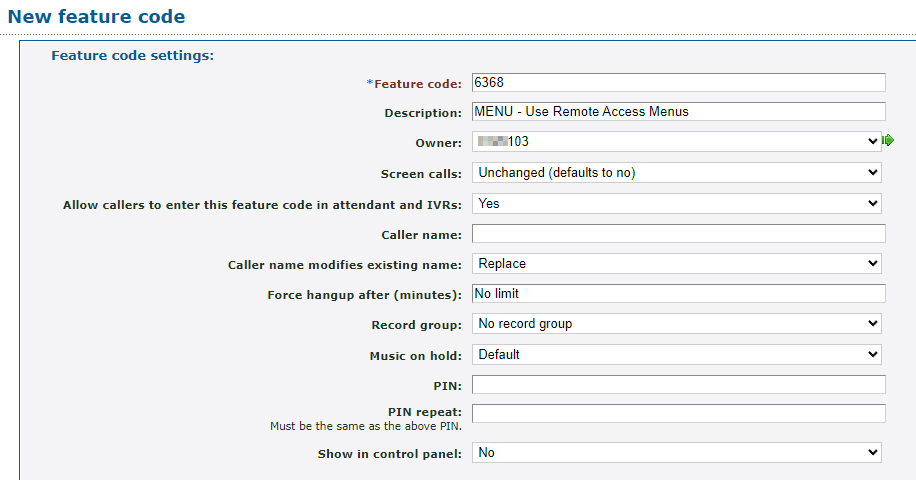
| Option | Description |
|---|---|
| * Feature Code |
Type a unique series of numbers that users should dial on their desk phone to reach the remote access menu. Quick Tip: Some users use 6368 (MENU) or 736683 (REMOTE) as the feature code. |
| Description | Type a note describing what this feature code is used for. |
| Owner | If needed, select a user that should be able to view and edit this feature code in the web portal. |
| Allow callers to enter this feature code in attendant and IVRs | Select whether or not callers in auto attendants or IVR menus should be able to dial this code. |
| Show in control panel |
Select whether or not this feature code should be shown on the Control Panel page. Quick Tip: Showing this feature code will allow users that use the Control Panel to drag and drop calls onto this feature code for transferring. |
4. In the Route calls to section, use the Default destination dropdown to select Remote access menu:
5. Click the Save button.
✔ You should see that new feature code listed in the Feature Codes page.

6. Place a test call to this feature code on a desk phone to confirm that you can access the remote access menu.
Direct Phone Number
A phone number can be set to direct calls to the remote access menu. This can make it easy for users to dial into the remote access menu for remotely placing calls.
To update a phone number's destination to the remote access menu…
1. Navigate to Features → Numbers.
2. Click the phone number that should be dedicated to the remote access menu.
3. Scroll down to the Route calls to section and use the Default destination dropdown to select Remote access menu.
4. Click the Save button.
✔ You should see the phone number listed with remote access menu shown as the destination.

5. Place a test call to this phone number to confirm that you can access the remote access menu.
Use the Remote Access Feature
Once you have created remote access accounts and a way to contact the main remote access menu, you can call into the remote access menu to use the “Remote access menu” or "Call back to the callerid" features.
Use the following sections to learn more about the process of using these different options:
Remote Access Menu
Requirements: In order to use the Remote Access Menu, a remote access menu account must be created, and a feature code or phone number must route to the main remote access menu feature.
1. Dial the feature code or phone number associated with the main remote access feature.
2. When prompted, input the Account Number set for the remote access menu account. 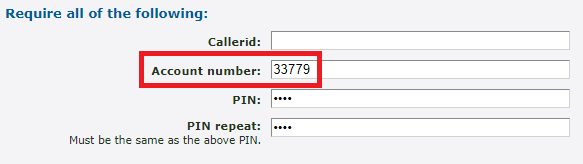
3. If you have set up a PIN, input the PIN when prompted.
4. Once the menu accepts the account number and the optional PIN, dial the phone number when prompted.
5. Handle the phone call as needed.
Call Back to the Callerid
Requirements: In order to use the Remote Access Menu, a remote access menu account must be created, and a feature code or phone number must route to the main remote access menu feature.
1. Dial the feature code or phone number associated with the main remote access feature from an extension number or phone number assigned to a “Call back to the callerid” account.
2. Once the call starts ringing, hang up the call.
2. The system will call the extension number/phone number back. Answer the call back.
3. Once you answer, the menu will prompt you to dial a phone number to call. Dial the number you need to call.
4. Handle the phone call as needed.