Grandstream HT812 User Guide
Learn more about your Grandstream HT812 ATA and how you can connect and use it.

Written by Val Campos
Updated at November 30th, 2023
Table of Contents
Overview
The Grandstream Handy Tones HT812 is a 2-port analog telephone adapter (ATA) that allows users to create a high-quality and manageable IP telephony solution for their residence and office. The HT812's ultra-compact size, voice quality, and auto provisioning options allow users to utilize VoIP on analog phones and fax machines. The HT812’s includes an integrated NAT router and dual 10/100/1000Mbps Ethernet WAN and LAN ports to facilitate a shared broadband connection between multiple Ethernet devices while passing VoIP services to analog phones.
Technical Specifications
| Interfaces | Description |
|---|---|
| Universal Power Supply |
Input: 100-240VAC, 50-60Hz Output: 12V/0.5A |
| Environmental Requirements |
Operational: 32o – 104oF or 0º – 40ºC. Storage: 14o – 140oF or -10º – 60ºC. Humidity: 10 – 90% Non-condensing. |
| Dimensions and Weight |
Dimensions: 28.5 x 130 x 90 mm (H x W x D). Weight: 353.33g |
| Compliance | FCC/CE/RCM. |
| Factory Reset Button? | Yes |
| Telephony Features | Caller ID display or block, call waiting, flash, blind or attended transfer, forward, hold, do not disturb, 3-way conference. |
| Voice Codecs | G.711 with Annex I (PLC) and Annex II (VAD/CNG), G.723.1, G.729A/B, G.726, iLBC, OPUS, G722, dynamic jitter buffer, advanced line echo cancellation. |
| Fax over IP | T.38 compliant Group 3 Fax Relay up to 14.4kpbs and auto-switch to G.711 for Fax Pass-through |
| Provisioning and Control | FTP, FTPS, HTTP, HTTPS, SSH, Telnet, TFTP, TR-069, secure and automated provisioning using TR069, syslog |
| Media Security | SRTP |
| Security Control | TLS/SIPS/HTTPS/HTTP/SSH/Telnet |
| Management | Syslog support, SSH, Telnet, remote management using web browser. |
| Network Protocols | TCP/IP/UDP, RTP/RTCP, HTTP/HTTPS, FTP/FTPS, ARP/RARP, ICMP, DNS, DDNS, DHCP, NTP, TFTP, SSH, Telnet, STUN, SIP (RFC3261), SIP over TCP/TLS, SRTP, TR-069 |
| QoS |
Layer 2 (802.1Q VLAN, SIP/RTP 802.1p) Layer 3 (ToS, Diffserv, MPLS) |
| DTMF Methods | In-audio, RFC2833 and/or SIP INFO |
Features
Some major features of the Grandstream HT812 include:
- Support 2 SIP profiles through 2 FXS ports for HT812 and 4 FXS port for HT814 and dual 10/100/1000Mbps Ethernet port for HT812
- Support 3-way voice conferencing.
- Support wide range of caller ID formats.
- Support advanced telephony features, including call transfer, call forward, call-waiting, do not disturb, message waiting indication, multi-language prompts, flexible dial plan and more.
- Support T.38 Fax for creating Fax-over-IP.
- TLS and SRTP security encryption technology to protect calls and accounts.
- Automated provisioning options include TR-069 and XML config files.
- Failover SIP server automatically switches to secondary server if main server loses connection.
- Use with Grandstream’s UCM series of IP PBXs for Zero Configuration provisioning.
- GR-909 Line Testing Functionalities.
The HT812's Ports
On the back of your HT812 device, there will be ports that facilitate different types of connections to allow the HT812 ATA to function.
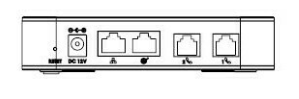
| Port | Description |
|---|---|
| Ports 1 and 2 | Connect analog phones or fax adapters to the ATA using RJ-11 telephone cables. |
WAN 
|
Connects the ATA to your router, switch or modem using an Ethernet RJ45 network cable to provide the ATA with a stable internet connection. |
LAN 
|
Connect the ATA to a PC, analog phone, or switch using an RJ45 ethernet cable to have the ATA pass along an internet connection through daisy chaining. |
| DC Power | Connect the ATA to a power supply unit (12V – 0.5A). |
| Reset | Press this button for 7 seconds to reset the ATA to factory default settings. |
The HT812's LEDs

| LED Light | Status |
|---|---|
| Power LED |
ON: Device is powered on. Flashing: Device is booting up. OFF: Device is disconnected to power. |
| WAN LED | Device is connected to an internet network through the WAN port. |
| LAN LED | Device is connected to a device through the LAN port. |
| Phone LED 1&2 | The phone LED 1 & 2 indicates the status of a respective FXS port connected to a phone on the back panel. OFF: Unregistered. ON: Registered and available. Blinking every 500 ms: Off-hook or Busy. Slow Blinking: Indicates that a connected FXS phone has a mail. This function may not be available for certain devices. |
Connect Your HT812

The components of your Grandstream HT812 include:
- The HT812 ATA device.
- A 12V power supply unit.
- An RJ45 ethernet cable.
Connect an HT812 Using the WAN Port

- Insert a standard RJ11 telephone cable into the HT812's Port 1
 .
. - Connect the other end of the telephone cable to a standard touch-tone analog telephone or fax machine.
-
Connect the WAN
 port of the HT812 to a router, switch or modem using an RJ45 Ethernet cable.
 - Insert the 12V power adapter into the HT812's DC power port.
-
Plug the other end into a wall outlet.
✔ The Power, WAN and Phone LEDs will be solidly lit when the HT812 is ready for use.
- Once the HT812 is powered on and the LEDs are solidly lit, contact our technical support team to have the HT812 provisioned and registered.
Connect a Device to an HT812 Using the LAN Port
A Grandstream HT812 can be daisy chained to another IP device so that it can pass its internet connection along. This can be handy if you have a limited number of ports available for devices to be connected to your internet equipment.
To connect another IP device to your HT812 ATA…
- Insert a standard RJ11 telephone cable into the HT812's Port 1 .
- Connect the other end of the telephone cable to a standard touch-tone analog telephone or fax machine.
-
Connect a computer or switch to the LAN port of the HT812 using an RJ45 Ethernet cable.
- Insert the 12V power adapter into the HT812's DC power port.
- Plug the other end into a wall outlet.
✔ The Power, WAN and Phone LEDs will be solidly lit when the HT812 is ready for use.
Use the Interactive Voice Prompt Response Menu
| Menu Option | Voice Prompt | Options |
|---|---|---|
| Main Menu | “Enter a menu option” | Press “*” for the next menu option. Press “#” to return to the main menu. Enter 01-05, 07, 10, 12-17, 47 or 99 for menu options. |
| 01 |
“DHCP Mode” “Static IP Mode” “PPPoE Mode” |
Press “9” to toggle a selection. If using “Static IP Mode”, configure the IP address information using menus 02 to 05. If using “Dynamic IP Mode”, all IP address information comes from the DHCP server automatically after reboot. If using “PPPoE Mode”, configure PPPoE Username and Password from the web GUI to get IP information from your ISP. |
| 02 | “IP Address” + IP Address | The current WAN IP address is announced. If using “Static IP Mode”, enter 12-digit new IP address. You need to reboot your HT812 for the new IP address to take Effect. |
| 03 | “Subnet” + IP Address | Same as menu 02. |
| 04 | “Gateway” + IP Address | Same as menu 02. |
| 05 | “DNS Server” + IP Address | Same as menu 02. |
| 07 | Preferred Vocoder | Press “9” to move to the next selection in the list: PCM U / PCM A iLBC G-726 G-723 G-729 OPUS G-722 |
| 10 | “MAC Address” | Announces the MAC address information of the unit. Note: The device has two MAC addresses. One for the WAN port and one for the LAN port. The device MAC address announced is the address of LAN port. |
| 12 | WAN Port Web Access | Press “9” to enable/disable. Default is disabled. |
| 13 | Firmware Server IP Address | Announces the current Firmware Server IP address. Enter 12-digit new IP address. |
| 14 | Configuration Server IP Address | Announces the current Config Server Path IP address. Enter 12-digit new IP address. |
| 15 | Upgrade Protocol | Upgrade protocol for firmware and configuration update. Press “9” to toggle between TFTP / HTTP / HTTPS/ FTP/FTPS. Default is HTTPS. |
| 16 | Firmware Version | Announces Firmware version information. |
| 17 | Firmware Upgrade | Firmware upgrade mode. Press “9” to toggle among the following three options: Always check. Check when pre/suffix changes. Never upgrade. |
| 20 | “Check Device Individual Certificate Information” | Use the IVR system to obtain specific details about the device’s certificate type. |
| 47 | “Direct IP Calling” | After the dial tone. enter the target IP address to make a direct IP call to. |
| 86 | Voice Mail | Access voice mails messages. |
| 99 | “RESET” | Press “9” to reboot the device. Enter MAC address to restore to factory default settings. |
| 71-74 | Phone calls between different ports of the same HT812 device | HT81x supports inter-port calling from voice menu. 7X (X is the port number) |
| “Invalid Entry” | Automatically returns to the main menu. | |
| “Device not registered” | This prompt will be played immediately after off hook if the device is not registered, and the option Outgoing Call without Registration is set to NO. |
- * = Shift down to the next menu option.
- # = Return to the main menu.
- 9 = Functions as the ENTER key in many cases to confirm or toggle an option.
- All entered digit sequences have known lengths – 2 digits for menu options and 12 digits for IP addresses. For IP addresses, add a 0 before the digits if the digits are less than 3 (i.e. – 192.168.0.26 should be key in like 192168000026. No decimal is needed).
- Key entries cannot be deleted but the phone may prompt an error once it detects one.
- Dial *98 to announce the extension number of the port.
Use an Analog Phone Connected to a HT812
When you have an analog phone connected to the HT812 to use VoIP services, you will find that there are new features you use through the HT812 ATA.
Call Feature Codes
When there is an analog phone connected to one of the Phone ports, your Grandstream HT812 will allow certain dialable codes to be used to do certain things.
Here is a list of the codes that can be used, and the features supported by each code:
| Code | Call Features |
|---|---|
| *02 | Forcing a Codec (per call) *027110 (PCMU), *027111 (PCMA), *02723 (G723), *02729 (G729), *027201 (iLBC). |
| *03 |
Disable LEC (per call) Dial “*03” +” number”. No dial tone is played in the middle. |
| *16 | Enable SRTP |
| *17 | Disable SRTP |
| *30 | Block Caller ID (for all subsequent calls) |
| *31 | Send Caller ID (for all subsequent calls) |
| *47 |
Direct IP Calling Dial “*47” + “IP address”. No dial tone is played in the middle. |
| *50 | Disable Call Waiting (for all subsequent calls) |
| *51 | Enable Call Waiting (for all subsequent calls) |
| *67 |
Block Caller ID (per call) Dial “*67” +” number”. No dial tone is played in the middle. |
| *82 |
Send Caller ID (per call) Dial “*82” +” number”. No dial tone is played in the middle. |
| *69 |
Call Return Service Dial *69 and the phone will dial the last phone number that sent an incoming call. |
| *70 |
Disable Call Waiting (per call) Dial “*70” +” number”. No dial tone is played in the middle. |
| *71 |
Enable Call Waiting (per call) Dial “*71” +” number”. No dial tone is played in the middle. |
| *72 |
Unconditional Call Forward Dial “*72” and then the forwarding number followed by “#”. Wait for dial tone and hang up. (dial tone indicates a successful forward) |
| *73 |
Cancel Unconditional Call Forward To cancel an “Unconditional Call Forward”, dial “*73”, wait for dial tone, then hang up. |
| *74 |
Enable Paging Call Dial “*74” and then the destination phone number you want to page. |
| *78 |
Enable Do Not Disturb (DND) When enabled all incoming calls are rejected. |
| *79 |
Disable Do Not Disturb (DND) When disabled, incoming calls are accepted. |
| *87 | Blind Transfer |
| *90 |
Busy Call Forward Dial “*90” and then the forwarding number followed by “#”. Wait for dial tone then hang up. |
| *91 |
Cancel Busy Call Forward To cancel a “Busy Call Forward”, dial “*91”, wait for dial tone, and then hang up. |
| *92 |
Delayed Call Forward Dial “*92” and then the forwarding number followed by “#”. Wait for dial tone then hang up. |
| *93 |
Cancel Delayed Call Forward To cancel a Delayed Call Forward, dial “*93”, wait for dial tone, and then hang up. |
| Flash/Hook | Toggles between active call and incoming call (call waiting tone). If not in conversation, flash/hook will switch to a new channel for a new call. |
| # | Serves as a Re-Dial key. |
Place a Phone Call
With your analog phone connected to the Grandstream HT812 device, your analog phone can place outbound calls using VoIP.
To place a call to someone…
- Pick up the handset of a connected phone.
- Do one of the following to dial a call:
- Dial the number and wait 4 seconds.
- Dial the number and press #.
Check Your Voicemail
The HT812 indicates that there are new voice mail messages waiting by using its Phone LEDs and a Stutter Tone.
- The Phone LEDs on the HT812 will start blinking slowly when a new voice mail message is available on corresponding account.
- When you pick up the handset of a phone connected to the HT812, a stutter tone will be played the first few seconds followed by dial tone.
Access Your Voicemail
If your HT812 is signaling that there is a voicemail to be checked, you can access your voicemail by…
- Pick up the handset of a connected phone.
- Press *** to access the IVR menu.
- Wait until you hear “Enter the menu option.”
- Press 86 and enter your configured password to access the voicemail menu.
Reset the HT812 to Factory Default Settings
In some situations, it may be necessary to factory reset your Grandstream HT812. This may need to be done to troubleshoot issues with the device or clear out an incorrect configuration.
WARNING: Restoring the Factory Default Settings will delete all configuration information on the phone.
If needed, please backup or print all the settings before you restore to the factory default settings.
Use the Reset Button
- Unplug the ethernet cable.
- Locate the reset hole on the back panel of your HT812.
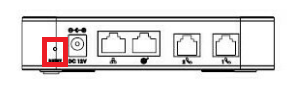
- Insert a pin in this hole and press it for about 7 seconds.
-
Take out the pin.
✔ Your HT812 ATA should now be reset back to its factory default settings.
From here, it can be reconfigured with the help of one of our technical support team members.