Making Sense of Call Routing: A Visual Routing Admin Guide
Explore common routing setups that can be configured in the Stratus web portal.

Written by Val Campos
Updated at September 16th, 2025
Table of Contents
Check a Phone Number's Routing
The best place to start learning call routing in Stratus is the Inventory page.![]()
On this page, you can view the list of phone numbers available to your business, the way those numbers are treated, and their next immediate routing Destination.

Commonly Used Routing Methods
There are many different ways that a business can route calls for their different phone numbers.
The most commonly used methods are the following:
- Route calls to an Inbound Routing User for time-of-day routing.
- Route calls to a Caller ID Router user to utilize Caller ID Routing for a phone number.
- Route calls directly to a user by designating a phone number as a user's DID.
- Route calls directly to a Call Queue that dispatches calls to multiple agents.
- Route callers to an Auto Attendant that allows callers to choose where their call should be forwarded.
Inbound Routing Users
“I want callers to ring to different destinations depending on what time and date it is.”
In your Account, you may notice a special type of user called an “Inbound Routing User” (IRU). A Routing User is an empty extension that acts as a virtual switchboard operator. An IRU will send callers to certain destinations depending on the time and day the call is received.

An Inbound Routing User is usually the first destination for callers that call into a location's main phone number. The IRU references its Answering Rules to determine where a call should be routed depending on when a Time Frame is active.
To view and manage an inbound routing user…
- Navigate to the Inventory page.

- Find the phone number and ensure that the number is routing to the correct user.

-
If the phone number is not routing to the correct routing user, click the phone number or the Edit
 icon and make changes as needed:
- Treatment - To have a routing user do time-of-day routing for the phone number, select User.
- User - Type and select the name or extension number of the routing user for your business or a specific location.
- Caller ID Prefix - If needed, add a series of letters to prepend to the beginning of caller's Caller ID when they call this phone number.
- Notes - Add a brief description about this phone number and its purpose.
- Click the Save button.

- Navigate to the Users page.

- Use the search bar to find the routing user that needs their answering rules adjusted.

- Click the Edit icon next to the routing user and select Answering Rules.

- Confirm that the Answering Rules will be routing calls to the correct destination depending on the Time Frame in use.

- If needed, click the Edit
 icon next to a rule to modify its destination.
- Navigate to the Time Frames page.

- Click Domain or click the Edit
 icon to pull up a list of the time frames for your whole business.
- Click the Edit icon next to a time frame that needs to be edited.

-
Edit the time frame as needed.

- Click the Save button.
Note: To learn more about answering rules and time frames, read our Basic Inbound Call Routing Guide.
Caller ID Routing
“I want callers with specific phone numbers or area codes to route to specific destinations.”
To make managing the calls of your company easier, caller ID routes can be created. These routes can send calls to a particular destination based on a caller's phone number listed for their Caller ID (CID). Using this method of call routing can be a boon for companies that need to separately route local calls and prioritize specific callers.

IMPORTANT: To start using caller ID routing for your account, you will need to call or submit a request to enable this feature with our Technical Support team.
Before caller ID routes can be created, a phone number will need to be dedicated to the Caller ID Router user (x768837). This will ensure that calls to that phone number is routed differently depending on the caller's area code or phone number.
- On the Inventory page, go to the Phone Numbers tab.

- Click the phone number or the Edit
 icon next to the phone number.
- In the Edit Phone Number menu, do the following:

- Treatment - Select User.
-
User - Type and select “Caller ID Router”.
NOTE: If you do not see “Caller ID Router” listed as an option, log out of Stratus and log back in.
You can also try clearing your browser's stored cookies and cache by pressing Ctrl + Shift + Delete (for Windows users) or Command + Shift + Delete (for Mac users).
If you are still experiencing issues seeing this user listed, please contact our Technical Support team for further assistance.
- Notes - If needed, add any special notes about the phone number, such as its purpose or the date it was updated.
- Click the Save button.

Now that a phone number or user is directing calls to the Caller ID Router user, caller ID routes can be created. This can be done on the new Caller ID Routing tab of the Inventory page.
- On the Caller ID Routing tab of the Inventory page, click the Add New Route button.

- In the Add New Caller ID Route menu, input the following:

-
Call From - Select what kind of numbers the system will apply this route to.Your options include:
Note: The caller ID routes you add go by priority.
Routes that look for a 10-digit Phone Number are the highest priority, followed by Area Code routes, and lastly Any Number routes. If none of the routes apply to a call, the Default route will be followed.For example… If you add a caller ID route for a 10-digit phone number that shares an area code used in a different route, that phone number's call will follow the 10-digit number caller ID route since it has a higher priority.
-
10 digit number - Select this if this route will apply to a specific phone number that calls in.
- Routes for 10-digit phone numbers have the highest priority.
-
Area code - Select this if this route will apply for any callers who have a specific area code.
- Routes for area codes are prioritized over any number routes, but 10-digit number routes have higher priority.
-
Any number - Select this if this route will apply to any caller.
- Routes for any or all numbers are the lowest priority.
-
10 digit number - Select this if this route will apply to a specific phone number that calls in.
- Call From # - Type either a 10-digit phone number or 3-digit area code for system to search for.
-
Call To - Select one of your phone numbers that would be called by the caller following this route.

Note: If you want this to apply to all numbers that use the Caller ID Router user, select Any.
If you do not see a specific phone number listed, make sure that number has the Caller ID Router set as its destination in the Phone Numbers tab.

-
Treatment - Select the type of function that will receive the call from this route, such as a user, voicemail, call queue, auto attendant, or phone number.
Quick Tip: If you need this route to send calls to another location on your account that has its own time-of-day routing, you can set the destination as that location's inbound routing user.
- Forward To - Type the specific extension number or name of the function/user receiving this route's calls. If you selected PSTN number, type the external 10-digit phone number callers will be sent to.
- Notes - Type any special notes about this caller ID route to make identifying it more convenient.
-
Call From - Select what kind of numbers the system will apply this route to.
- Click the Add button.

- On the confirmation message that appears, click the OK button.

- Repeat steps 3-5 for each needed caller ID route.
- Place a test call to these phone numbers to confirm your call is following the default caller ID route or any special routes you set for an area code or your cellphone's phone number.
Note: To learn more about caller ID routes, read our Caller ID Routing guide.
Direct Inward Dial (DID) Numbers
“I want a user's phone to ring when I call a certain phone number.”
Some users may have a phone number that they share with clients so that these people can directly contact them. These phone numbers are called Direct Inward Dialing (DID) numbers. DIDs allow callers to directly reach a user without having to follow a business' main call routing.

As a Stratus admin, you can set a user as the destination for a phone number. To do so…
- Navigate to the Inventory page of the web portal to reference your list of phone numbers.
- Find the phone number and ensure that the number is routing to the correct user.

-
If the phone number is not routing to the correct user, click the phone number or the Edit icon and make changes as needed:

- Treatment - For a DID, make sure User is selected.
- User - Type and select the name or extension number of the user.
- Caller ID Prefix - If needed, add a series of letters to prepend to the beginning of caller's Caller ID when they call this phone number.
- Notes - Add a brief description about this phone number and its purpose.
- To check what happens when that number rings that user, navigate to the Users page.
Quick Tip: When opening new pages in Stratus, you can click with the middle mouse button to open each page as a new tab, making it easier to backtrack if necessary.
- Use the search bar to find the user by their extension number or name.

- Click the Edit icon next to the user and select Answering Rules.

- Confirm that the user's Answering Rules are routing calls as intended.

Update the Destination of a User's Answering Rule
If the user wants a different/particular phone to ring…
1. Click the Edit icon.
2. In the Call Forwarding section, select Always and use the box to type and click the user's name or extension number.
3. To have the call go elsewhere if the call is not answered in time, select Unanswered and type the user's extension number.Note: If a certain phone for the user should ring, make sure to select the extension number with the correct letter at the end.
For example…
– 100 (without any letters) would be the desktop (physical) phone of the user.
– 100sp would be the desktop app of the user.
– 100i would be a mobile app of the user.
– 100m would be a mobile app of the user.4. Click the Save button.

- To verify the voicemail of that user is configured properly, navigate to the Voicemail tab of the user's settings.

- Scroll down to the Greetings section to play or edit what the caller hears if the call goes to voicemail.

- If the greeting needs to be updates, click the Manage
 icon and edit the greeting as needed.
- Once you have completed making the changes, click the Save button.

Call Queues
"I want Multiple Phones to ring when someone calls this number."
A Call Queue, also known as a hunt group, is a function that dispatches calls to multiple agents. These call queues can ring agents simultaneously or in a specific order. There are different types of call queues that can be used to ensure agents are receiving and handling calls as intended.
Once a call queue reaches its Queue Ring Timeout (the set amount of a time a call will ring all agents, the call is marked as unanswered. Unanswered calls can be set to either stay in the queue, go to the queue's own voicemail, or forward to a different destination using its If Unanswered setting. Callbacks can be set up for call queues if needed.

To set a phone number's destination for callers to be a call queue…
-
Navigate to the Inventory page of the web portal to reference your list of phone numbers.
- Find the phone number and ensure that the number is routing to the correct call queue.

-
If the phone number is not routing to the correct call queue, click the phone number or the Edit icon and make changes as needed:

- Treatment - To have calls for this phone number go directly to a call queue, select Call Queue.
- Call Queue - Type and select the name or extension number of the call queue for this phone number.
-
Announcement for callers - For direct call queue numbers, announcements can be added for callers to hear when they first enter the queue. These options include:
- No announcement - Do not play an announcement and have callers immediately queued.
- Announce number of callers in queue - Announce the number of callers currently in the queue.
- Announce average expected wait time - Announce the average wait time for callers waiting in this queue for the day.
- Caller ID Prefix - If needed, add a series of letters to prepend to the beginning of caller's Caller ID when they call this phone number.
- Notes - Add a brief description about this phone number and its purpose.
- To view that call queue's information, navigate to the Call Queues page.

- To check which users are ringing for calls in the queue, click the number
 in the Agents column or the Edit Agents
  icon next to the call queue.
 - I needed, use the Remove Agent icon or the Add Agent button to adjust which users will ring in the call queue.

- To save changes to the queue's agents, click the Done button.

- If needed, edit the call queue's settings.
Modify a Call Queue's Settings
To edit a call queue's settings…
1. Click the name of the queue or the Edit
icon next to the queue needing adjustment.
2. On the Basic tab, the following are some of the most common settings that are adjusted:
• Name - If needed, you can update the name of the call queue.
• Department or Site - Sort the queue into a specific Department or Site.Quick Tip: Adding a Site to a queue will allow a Site Manager of the site to view and manage the queue.
• Type - If needed, you can change the type of the queue to adjust how the queue dispatches calls to agents.

• Record Calls - If calls in this queue should be recorded, select Yes.
• Statistics - If call center reports will be pulled for calls from this call queue, select Yes.3. On the In Queue Options tab, confirm that the following settings meet your needs:

•out (sec) - Select the total amount of time (in seconds) that the queue should ring agents before counting the call as unanswered and forwarding the call according to the If unanswered and Forward Destination settings.
• Agent Ring Timeout (sec) - Only visible for Linear Hunt, Linear Cascade, Round-Robin, and Tiered Round-Robin queues.
Select how long (in seconds) each agent or group of agents should ring before moving on to the next agent/group.IMPORTANT: The Queue Ring Timeout and Agent Ring Timeout settings must mathematically make sense with each other. Queue Ring Timeout = Agent Ring Timeout * # of Agents
If the Queue Ring Timeout is too short, agents may report that their calls stop ringing too quickly or that calls do not ring for them at all.
For example… If a linear hunt group has 5 agents that ring for 10 seconds each (Agent Ring Timeout), the Queue Ring Timeout must be set as 50 seconds.
• Forward if unanswered - Select if the queue should keep callers in the queue (Stay in queue) or forward the caller to a different destination (Forward to destination) after the Queue Ring Timeout is met.

• Forward Destination - If the If unanswered setting is set to Forward to destination, type and select the user, call queue, auto attendant, or phone number to have unanswered calls forwarded to.
Quick Tip: Many companies will route unanswered calls for a queue to a voicemailbox, a different call queue, an auto attendant, or the phone number of an answering service.
4. Click the Save button.

Note: To learn more about call queues and the options you have for editing them, read our Call Queue user guide.
Auto Attendants
“I want callers to use a menu to hear a message and select where their call should go.”
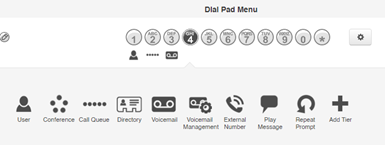
A phone number can have an Auto Attendant as a destination. Using an auto attendant allows callers to listen to a greeting and select where their call should be routed using the dial pad menu of their phones.

The dial pad menu options of the auto attendant can route callers to users, call queues, voicemailboxes, external telephone numbers, other auto attendants, and conference bridges. Auto attendants can also play an audio message and repeat its greeting.
To route a telephone number to an auto attendant that has been created…
- Navigate to the Inventory page of the web portal to reference your list of phone numbers.
- Find the phone number and ensure that the number is routing to the correct auto attendant.

-
If the phone number is not routing directly to an auto attendant as intended, click the phone number or the Edit icon and make changes as needed:

- Treatment - To send callers directly to an auto attendant, select Auto Attendant.
- User - Type and select the name or extension number of the auto attendant.
- Caller ID Prefix - If needed, add a series of letters to prepend to the beginning of caller's Caller ID when they call this phone number.
- Notes - Add a brief description about this phone number and its purpose.
- To check the auto attendant's routing, navigate to the Auto Attendants page.

- Click the auto attendant's name or the Edit
 icon.
icon.
- In the Dial Pad Menu section, click the number of an option to see what function it routes callers to.

Quick Tip: You can view all possible routing options by clicking an unused button.
- If you changed or added dial pad menu options, you can update the greeting of the auto attendant to match these changes.
To update the greeting, click the Manage Audio icon in the pt section.
- Use the Manage Audio menu to update the greeting using the text-To-Speech, Upload, or Record options.

- To edit the extra settings of the auto attendant, click the Options button.

- In the Options menu, the three most commonly used settings include the following:

- Enable Dial by Extension- Dial by Extension allows callers to interrupt the auto attendant's greeting by dialing a user's extension number to dial them directly. If callers should not be able to do this, you can uncheck this checkbox.
-
If no key is pressed - Select how a call should be handled if the caller does not press a dial pad menu option.
✔ Many companies will have callers routed to a call queue, user, or mailbox for this option.
-
If unassigned key is pressed - Select how a call should be handled if the caller presses an unassigned option.
✔ Many companies prefer to have the auto attendant repeat its greeting.
- Click the Save button.

Note: To learn more about creating and managing auto attendants, read our Auto Attendant guide.