Basic Features for Yealink Desk Phones
Yealink's phone models all behave in a similar way. While each model will have variances in some of the advanced phone features, the basics are the same. The following is a list of Basic Phone Usage Features for Yealink Phones.

Written by Adrian Angwenyi
Updated at July 2nd, 2026
Table of Contents
View and Download a Yealink User Guide
Explore Our Yealink T43U and T46U Tutorial
Explore Our Yealink T53W and T54W Tutorial
Place a Call
You can do one of the following to start a call:
- Start dialing the number you want to call using the keypad.
- Pick up the handset to enter the Dial screen.
- Press the Speakerphone key to enter the Dial screen.
- Press the History softkey to find a previous caller to talk to.
- Press the Redial button twice to call the last person you dialed.
- Press the Directory softkey to call a contact you have created,
Answer Calls
When there is an incoming call for your phone, there are multiple ways to answer:
- Take the handset off the hook by picking it up.
- Press the Answer softkey that appears when the phone is ringing.
Quick Tip: Doing so with the handset on the hook will start the call on speakerphone. Pick up the handset to move the call off speakerphone.
If you are already on a call, you can press the Answer softkey that appears to answer the second call. Doing so will place the original caller on hold automatically.
- Press the Headset key to answer the call on a connected headset.
- Press the Speaker key to answer the call on speakerphone.
Hold and Resume Calls
You can place an active call on hold and resume the call when you are ready. When you place a call on hold, the caller will be listening to music until their call is resumed.
Place an Active Call on Hold
While speaking with someone, you can place their call on hold by pressing the Hold softkey or button. A call that is on hold will be indicated with a blinking green light next to their call.
Any time you initiate an action (e.g., swapping calls, transferring, or conferencing), the call you were on will automatically be put on hold.
Swap Between Held Calls
Do one of the following to swap between active and held calls:
- Press the Swap softkey.
- Press the Line Appearance Key with a blinking, green light where their call is held.
- Press the Up or Down navigation button to hover over a caller and press the Resume softkey.
Resume a Call That is on Hold
If you are ready to begin speaking with a caller you placed on hold, you can resume that call by pressing the Resume softkey.
If you have multiple calls on hold, you can do the following to resume one of the calls:
- Use the Up and Down navigational buttons to select a call on hold.
- Press the Resume softkey.
Park and Retrieve Calls
Parking allows calls to be placed on Hold that can be picked up from other devices.
Dynamic Parking
To place an active call on Park dial *** during your call. Do NOT press send. The phone will place the call on the 1st available universal holding positions and announce the location. After hearing the destination, you can hang up your call.
Calls can be retrieved on any phone by pressing the corresponding Park 1, Park 2, or Park 3 key. Alternatively, you can call the corresponding Park Number, 701, 702, or 703.
Static Parking
To place an active call on Park, press the Park button where you would like to Park the call. Park 1, Park 2, or Park 3.
Available Parking Spots are noted with a green light. Red lights indicate a caller is currently parked in that spot.
Calls can be retrieved on any phone by pressing the corresponding Park 1, Park 2, or Park 3 key. Alternatively, you can call the corresponding Park Number, 701, 702, or 703.
Transfer Calls
While handling a call, it may be necessary to pass the phone call along to a user, call queue, or an external phone number. This can be done through transferring.
While handling a call on your Yealink desk phone, there are three different types of transfer that can be utilized depending on how exactly the call needs to be transferred and handled:
- Blind Transfer - Transfer a call directly to another person without talking to that second person. This is sometimes referred to as a “cold” or "unassisted" transfer.
- Attended Transfer - Speak with the person being transferred to before completely transferring the call. This is sometimes referred to as a “warm” or “assisted” transfer.
- Voicemail Transfer - Transfer a caller directly to a general mailbox or the voicemailbox of another user.
Use the module below to view step-by-step instructions about how you can perform these different transfers:
Blind Transfer
When you use a blind transfer, you transfer a call without speaking to the party that the call will be transferred to.
To perform a blind transfer…
1. While on an active call, press the Transfer key.
Note: The caller will be placed on hold automatically where they will listen to music on hold.
2. On the Dial screen, do one of the following:
• Dial the extension or phone number you want to send the call to.
• Press the speed dial or BLF button of the person that should receive the transfer.
3. Press the Transfer key again to complete the transfer.
Attended Transfer
Perform an attended transfer if you want to talk to the person receiving the transfer. This can be a great way to check that the person being transferred to is actually ready to receive a transfer.
Quick Tip: If you decide you do not want to talk to the person you are transferring to, you can perform a semi-attended transfer. To do so, you can press the Transfer softkey or the TRAN button a second time while the call is still ringing.
To perform a warm transfer…
1. While on an active call, press the Transfer key.
Note: The caller will be placed on hold automatically where they will listen to music on hold.
2. On the Dial screen, do one of the following:
• Dial the extension or phone number you want to send the call to.
• Press the speed dial or BLF button of the person that should receive the transfer.
3. Wait for the second person to answer and talk to them as needed.
4. Press the Transfer key again to complete the transfer.
Quick Tip: If the receiving party does not want to accept the call, press the soft End Call key and then the Resume soft key to retrieve the original call from hold.
Transfer to Voicemail
In some instances, a caller may need to reach out to a user that is not able to accept a transfer at the moment. If this is the case, the caller can instead be transferred to a user's voicemailbox to leave a message.
To transfer a caller to a user's voicemailbox…
1. While on an active call, press the Transfer key.
Note: The caller will be placed on hold automatically where they will listen to music on hold.
2. On the Dial screen, do one of the following:
• Dial 03 and the mailbox's extension number.
• Dial 03 and press the BLF button of a coworker.
For example… To transfer the caller to the mailbox of user 100, dial 03100. To transfer the caller to general mailbox 500, dial 03500.
3. To complete the transfer, press the B Transfer button.
Quick Tip: If you press Call or the dialing times out, you can press Transfer a second time to complete the transfer.
Check Voicemails
Over time, your voicemailbox may receive voicemails from customers and coworkers. With your Yealink desk phone, you have a variety of ways that you can check voicemail messages for yourself and your coworkers:
- Press the Message
 button on your desk phone.
 - Use the Message option of the Main Menu.
- Dial a code to either call your own mailbox or the mailbox of another user.
Use the module below to explore these different methods for checking voicemails on cordless handsets:
Message Button
On your desk phone, you can check your voicemail messages at any time.
1. Press the Message button on your phone.
Note: Depending on the model of your phone, the Message key will be in a different location.
Yealink T2 Series: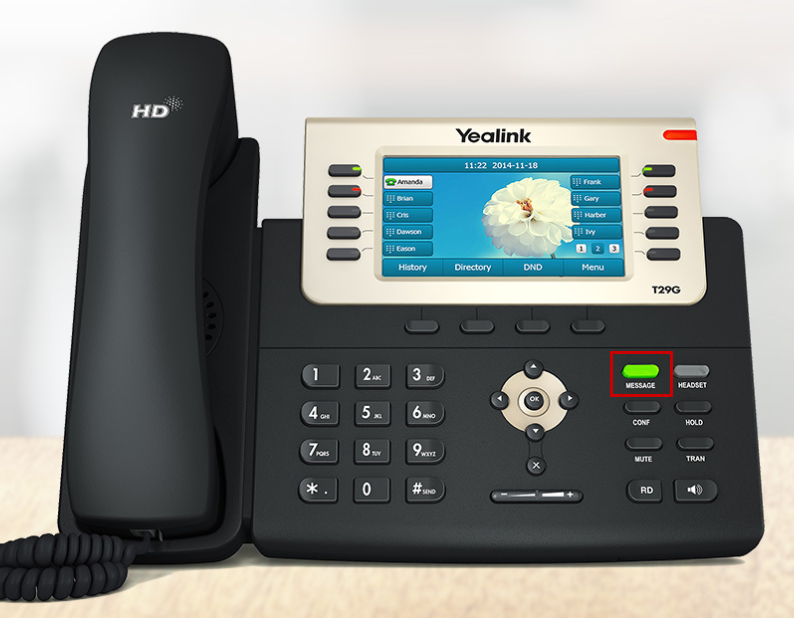
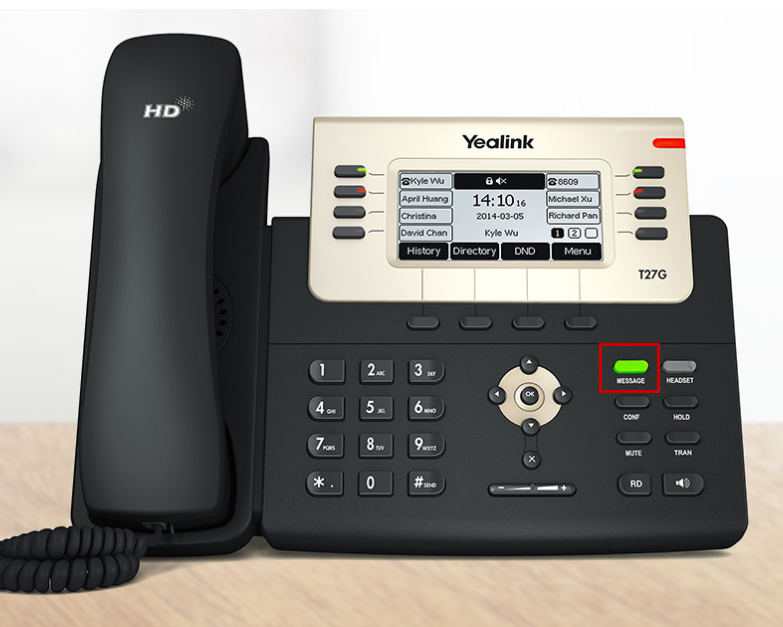
Yealink T4 Series:
2. Enter your voicemail PIN and press the # key.
✔ Once the voicemail menu accepts the PIN, the voicemail can be managed and adjusted using the Menu Options.
There will be audio prompts for you to navigate through the voicemail menu to check your voicemail messages and edit the voicemailbox's settings.
To learn more about the voicemail menu options available for voicemail management, feel free to check out this article.
Message Menu
To check the activity of your own mailbox, press the Menu button and select Message → 1. Voice Mail → 1. View Voice Mail. From here you can press the OK button or the Connect button to check your messages.
Dial a Code
You can dial a code to access your own mailbox so that you can check its messages and manage it using the menu options. The way to do this will depend on the platform you are using.
For Stratus Users
As a Stratus user, there are many default codes that you can dial to perform different actions. Three of these codes are:
1. 5001 - Call the mailbox assigned to the extension number of the phone you are dialing on.
2. 03 - Dial 03 and a user's extension number to call a specific user's mailbox.
3. 5000 - Call an automated menu that you can use to find a specific mailbox.
Use the module below to learn more about the differences between these codes and how they can be used:
The 5001 Code
When 5001 is dialed on a phone, you can call the voicemailbox of the extension number assigned to the phone you are dialing on.
Fun Fact: The way the Message button works is by automatically dialing 5001.
Once 5001 is dialed, you will be prompted to enter your voicemail PIN. Once your PIN is entered, you can check your voicemails or use the mailbox's menu options to manage your mailbox.
The 03 Code
One of the dialable codes that can be used on desk phones, the StratusHUB desktop app, and the Stratus mobile app is 03.
When 03 is dialed in front of an extension number, your call would be forwarded to that extension number's voicemailbox. While the mailbox's greeting is playing, you can press star (*) to interrupt the greeting and enter the user's voicemail PIN.
For example… If a user needs to leave a voicemail for extension 100, they can dial 0-3-1-0-0 from their desk phone to be taken directly to x100's mailbox. They can wait for the greeting to stop playing to leave a message.
If a user needs to check extension 100's mailbox for them, they can dial 0-3-1-0-0. Once they hear the mailbox's greeting, they can press star (*) to interrupt the greeting and enter x100's voicemail PIN when prompted.
The 5000 Code
If you are a Stratus user, you can dial 5000 to access an automated menu that can route you to your own or another user's voicemailbox.
To access this menu…
1. Dial 5000 on another SpectrumVoIP phone.
2. When asked for an Account Number, dial your own or another user's extension number.
3. When prompted for a Password, dial the il PIN and press #.
✔ From here, you can review the mailbox's voicemails and use the menu options to manage the mailbox's settings.
For Enswitch Users
If you are an ES user, you can dial another user's mailbox code to access that user's mailbox.
To do so…
1. Dial your or the other user's mailbox code on another SpectrumVoIP phone.
Quick Tip: Most accounts use 1+EXT (e.g., 1103 for dialing extension 103's mailbox) as the code for dialing into the mailboxes of other users.
Find Your Mailbox's Dialable Code
If you are not sure what your mailbox's feature code is, you can check this and the other feature codes you are set as the Owner for by logging into the ES web portal as a basic user.
To find your mailbox's feature code…
1. Log into the ES web portal.
2. Navigate to Features → Feature codes.
3. Take note of the Feature Code shown that is marked for your extension's Mailbox. 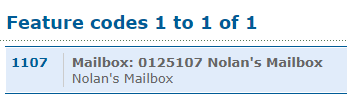
Reference the Feature Codes for Your Users as an Admin
Admins of the ES web portal can check the Feature Codes shown for all of their users using the web portal.
To check the feature codes for the whole account…
1. Log into the ES web portal.
2. Navigate to Features → Feature codes.
3. View and take note of the feature codes for your users.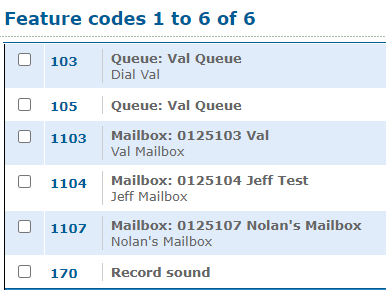
4. If needed, click the Export as .csv button to download this list of feature codes as a spreadsheet that you can keep record of and share with your team.
If you do not have access to the ES web portal, feel free to contact our technical support team to learn more about the dialable codes you can use. You can also read this article to learn how you can create a code for dialing a mailbox.
2. When you hear the mailbox's greeting, press *.
3. When asked for the Mailbox, dial the user's 7-digit extension number and press #.
4. When asked for your PIN, enter the mailbox's il PIN and press #.
✔ From here, you can review the mailbox's voicemails and use the menu options to manage the mailbox's settings.