Set Up a Grandstream Phone for the First Time
Review how you can assemble and connect your Grandstream desk phone so that you can start placing and receiving calls.

Written by Val Campos
Updated at October 24th, 2025
Table of Contents
Assemble the Phone
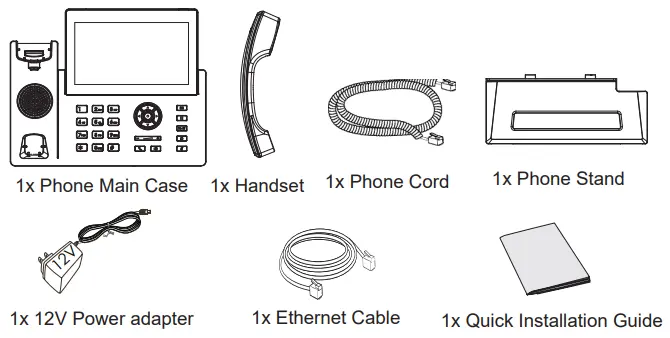
The first step to setting up a Grandstream phone is assembling it. In the packaging your Grandstream phone arrives in, you will have the phone itself, a handset, a phone cord for connecting the handset, the phone's stand, a power adapter, and an ethernet cable.
The phone itself will have the following ports on the back of it that the cabling will need to be connected to: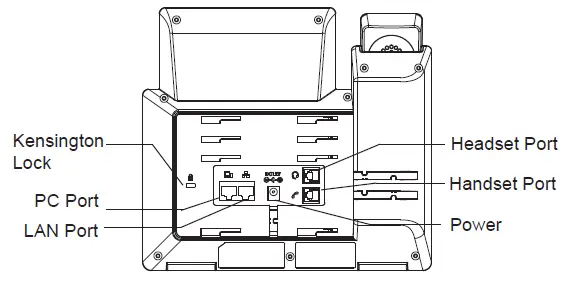
- PC Port - If you are daisy-chaining this phone to another IP device, you can connect an ethernet cable here to do so.
- LAN Port - If you are not connecting the phone using Wi-Fi, plug an ethernet cable into this port.
- DC12V Power Port - If you are not using PoE (Power over Ethernet), plug the provided DC 12V power adapter into this port.
- Headset Port - If you have a wired headset that uses an RJ9 cable, you can plug its cable into this port.
- Handset Port - Connect the provided handset of the phone to this port using the included phone cable.
Attach the Stand
The stand piece can attach to the back of the Grandstream phone to allow the phone to be placed at an angle on a desk. There are two slots that the stand can be inserted into.
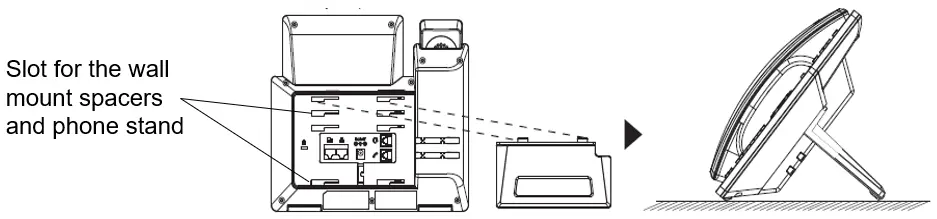
Insert the stand into back of the phone at your desired angle level.
Connect the Handset
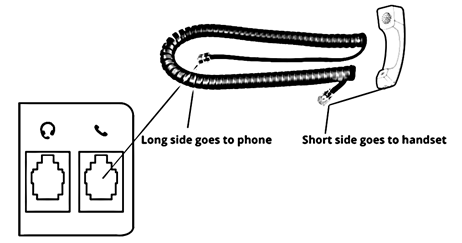
In order to use the handset with the phone, the handset needs to be connected.
- Plug the short side of the handset cable into the handset.
- The longer side should be plugged into the handset port that is marked with a phone icon.
To help keep the cable in place, insert the cable behind the cable management tabs.
Power and Connect the Phone
Since these phones are computing devices, they will require a supply of power and a robust, stable connection to the internet.

Power Up the Phone
There are two ways a Grandstream IP phone can be connected to a power supply:
- PoE (Power over Ethernet) – Requires a PoE Switch or equivalent and an ethernet cable.
- AC power – Requires a Power Adapter (DC 12V)
Note: Your system administrator can advise you on which to use.
Method 1: Power over Ethernet (PoE)
An IP phone can be powered from a PoE-capable switch or hub with a regular ethernet cable.
To do so…
- Connect the ethernet cable to the LAN port of the phone

- Plug the other end of the cable into an available port of the PoE-capable switch.
Method 2: AC/DC Power Adapter
If Power over Ethernet (PoE) cannot be utilized, a power adapter can be used. Plug the 12V power adapter into an electrical power outlet and the circular end into the DC12V port.

Get Connected to the Internet
To place calls or update itself, the phone will need to be connected to the internet. Grandstream IP phones can receive an internet connection through ethernet, Wi-Fi, and daisy chaining.
WARNING: After following these steps, do NOT remove the power source (Power Adapter or Ethernet Cable using PoE) from the phone while it updates its firmware and configuration.
Method 1: Connect with Ethernet Cables
To connect a phone to the network using ethernet, connect an ethernet (RJ45) cable to the Internet port of the phone and then connect the other end of the cable to a source of internet.

Quick Tip: The source of internet can be an ethernet port in the wall, router, switch, PC, and even another IP phone.
Method 2: Use Wi-Fi to Connect
When it is not possible to use ethernet cables to connect a phone to the internet, Wi-Fi can be used on the phones.
- Press the OK key to access the Menu.
- Navigate to System → Wi-Fi Settings.
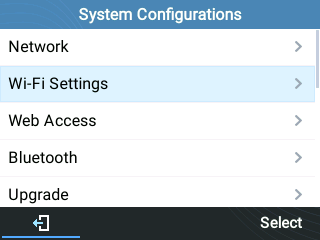
- Ensure that the Wi-Fi option is Enabled.

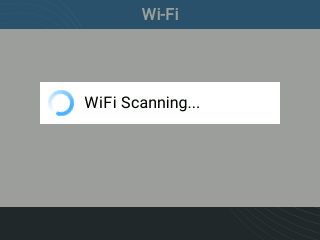
- Select Scan to scan for Wi-Fi networks to connect to.
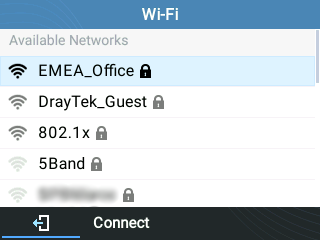
- In the Available Networks list, select your Wi-Fi network's SSID and press the Connect softkey.
- When prompted, enter your Wi-Fi network's password and press the OK key or softkey.
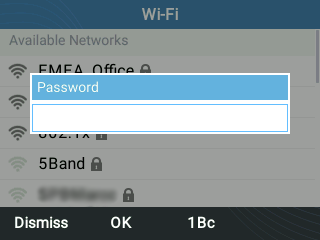
Quick Tip: You can change the format of your typing using the 1Bc softkey. The input methods that you can switch between include the following:
• 123 - Numbers only
• abc - Lowercase letters
• ABC - Uppercase letters
• 1Bc - Numbers, lowercase letters, and uppercase lettersTo get the letter you need, press the number on the dial pad that is associated with that letter until you see that letter pop up.
• For example, if your password starts with an uppercase “V”, you will want your input mode to be set to ABC before pressing the number 8 on the dial pad 3 times.For any special characters, you will need to press the 1 button on the phone's dial pad until you enter the needed symbol.
• For example, if there is a dash in the password, the 1 button would need to be pressed 10 times. - If the password is correct, you should see a confirmation message.

On the Home screen, you should see a Wi-Fi symbol, which indicates that the phone is connected.
Note: If you see an error message that a connection could not be established, it is recommended to check that the password is being entered correctly.

Method 3: Use a Daisy Chain
Our phones can pass along a network connection to another IP device (such as a computer or another phone) through Daisy Chaining.
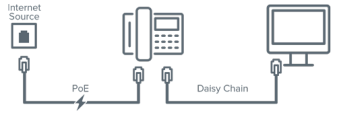
Daisy chains are used for connecting devices when there is only one point of connection to the network available. This technique is handy when a router or switch has all of its ports full or a room that is missing an ethernet port in the wall.
To daisy chain devices together…
- Plug an extra ethernet cable into the PC port of the connected phone.

Note: The PC port may appear with an icon that looks like a computer instead of saying “PC”.
- Plug the other end of the ethernet cable into the LAN port of the second phone.

WARNING: The second phone/device will need a power adapter connected since the first phone will not be able to pass along a PoE connection.