Enswitch - Call Forwarding Feature Codes
Discover how you can use the Enswitch web portal to configure feature codes that set call forwarding.

Written by Val Campos
Updated at January 29th, 2026
Table of Contents
Scope: Only Enswitch admin users will be able to create new feature codes.
Configure Call Forwarding Feature Codes
It can be useful to have codes that can be dialed that activates and deactivates different forwards. This can make it easier for your to remotely forward your calls.
WARNING: In order to set up these feature codes, Time Groups that forward calls will already need to be configured.
To learn more about Time Groups and forwarding calls, read this article.
Step 1: Allow a Number to Update Routing
For the manual time routing to work, the phone number that will be routed using these feature codes needs to be allowed to update its routing.
To do this…
- Navigate to Features → Numbers.
- Select the phone number that should be adjusted.

- In the Route calls to section of the number's settings, set Update this number when setting numbers routing to Yes.

- Click the Save button.

Step 2: Create a Code That Activates Call Forwarding
To set up a feature code that sets call forwarding…
- Navigate to Features → Feature codes.

- Click the New >> button.

- In the New feature code menu, fill in the following information:

| Setting | Description |
|---|---|
| * Feature code |
Type the set of numbers that should be dialed to activate the forwarding. DANGER: Do NOT use a N11 number, such as 911, 211, or 411. |
| Description | Type a note that will be displayed alongside the feature code in the list of feature codes, such as “Activate Temp Fwd”. |
| Owner | If needed, select a user that should be able to view and edit this feature code. |
| Allow callers to enter this feature code in attendant and IVRs | If this feature code should be allowed to be dialed in an IVR, select Yes. |
- In the Route calls to section, use the Default destination dropdown to select Set routing to time group.
Use the second dropdown to select the name of Time Group to use for forwarding.
Note: If you have not already added a time group for the feature code to activate, open the menu below to learn more about adding one:
Add a Time Group for Forwarding
1. Navigate to Features → Times and dates.
2. Click the New button.
3. On the New time group page, fill in the following information:
• *Name - Give the time group a unique name to identify it by.
• Description - If needed, add a description that will show by the time group's name.
• Priority - Select 1 so that this time group will only become active when the feature code is dialed.4. Click the Save button.
5. In the Time group saved menu, select Add a new time period >>.
6. Click the Save button again without making any changes.

- Click the Save button.


Step 3: Add a Time Route for Your Phone Number
To make sure the phone number you want to forward elsewhere with this code is able to be forwarded, a time route for the Time Group you selected in the previous step will need to be added to your phone number.
WARNING: Before moving forward, it is important to make sure that you have a business hours and afterhours time routes so that the forward's time route is completely inactive until the code is used.
To learn more about creating time routes, review the guide below:
Enswitch - Time Groups, Time Periods, and Time Routes
- Navigate to Features → Numbers.
- Select the phone number that the feature code will activate forwarding for.

- In the Time routes section, click the Add a time route button.

- In the New time route window, fill in the following information:

- Time group - Use the dropdown to select the time group that this route will use. This should match the time group you selected in Step 2.
-
Forwards matching calls to - Select the destination for calls that are forwarded during this time. Commonly used destinations include:
- Number
- IVR menu
- Mailbox
- Dial by name menu
- Click the Save button.
Step 4: Create a Code That Deactivates Call Forwarding
To create a feature code that returns your call routing to normal…
- Navigate to Features → Feature codes.
- Click the New >> button.
- In the New feature code menu, fill in the following information:
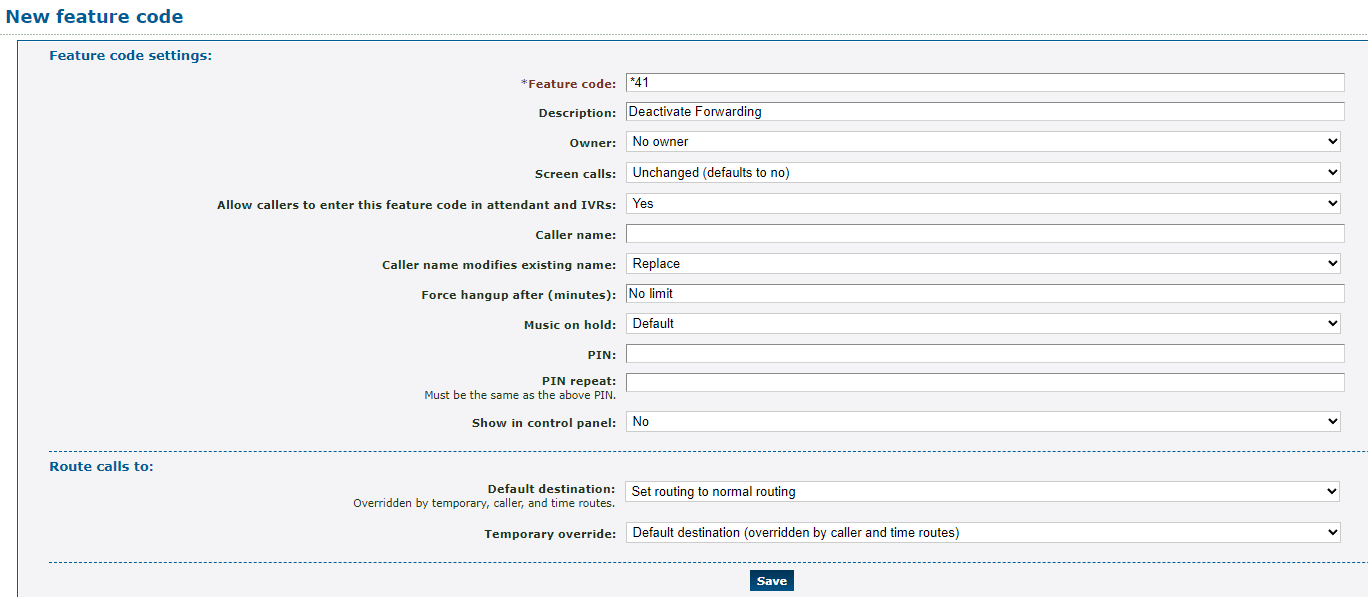
| Setting | Description |
|---|---|
| * Feature code |
Type the set of numbers that should be dialed to return call routing to normal. DANGER: Do NOT use a N11 number, such as 911, 211, or 411. |
| Description | Type a note that will be displayed alongside the feature code in the list of feature codes, such as “Deactivate Forwarding”. |
| Owner | If needed, select a user that should be able to view and edit this feature code. |
| Allow callers to enter this feature code in attendant and IVRs | If this feature code should be allowed to be dialed in an IVR, select Yes. |
- In the Route calls to section, use the Default destination dropdown to select Set to normal routing.

- Click the Save button.