Enswitch - Dialable Feature Codes
Discover how you can use our default feature codes and create your own feature codes.

Written by Val Campos
Updated at November 4th, 2025
Table of Contents
What are Feature Codes?
Feature codes are series of short numbers used to call a particular telephone line, voicemailbox, hunt group, destination feature, or other destination using a phone connected to SpectrumVoIP services. Feature codes are highly customizable and can be programmed to perform a variety of functions.
NOTE: Calls to feature codes are not charged.
Scope: Only Enswitch admin users will be able to create new feature codes.
Default Feature Codes
When your Enswitch account is created, the following feature codes are created for use by default:
| Feature Code | Function | Example |
|---|---|---|
| *1 | Voicemail direct access. | |
| *2 | Voicemail login. | |
| *3 | Conference login. | |
| *4 | Auto-attendant. | |
| *5 | Number routing menu. | |
| ** | Group pickup. | |
| ***<7-digit extension> | Pick up a call ringing the 7-digit extension number of a specific telephone line. | Dial ***0500101 to pick up a call ringing x101. |
| 3 or 4-digit extension | To make dialing a user easier, a feature code using the last 3 or 4 digits of their 7-digit extension number is added when a user is created. | 0500101 has 101 added as a feature code so that their coworkers can dial 101 to call them. |
| 1<3 or 4-digit extension> | Dial a 1 before a user's 3 or 4-digit extension number to call that user's mailbox. | Dial 1101 to call into x101's mailbox. |
| 2<3 or 4-digit extension> | Dial a 2 before a user's 3 or 4-digit extension number to page/intercom that user. | Dial 2101 to page x101. |
NOTE: These options are not shown on the feature codes configuration page.
If you create feature codes with these numbers, your feature codes override the defaults.
Create More Feature Codes
As an Enswitch admin, you can create new feature codes that your users can dial to make performing specific actions more efficient.
To create a new feature code…
- In the Enswitch web interface, navigate to Features → Feature codes.

- Click the New >> button.

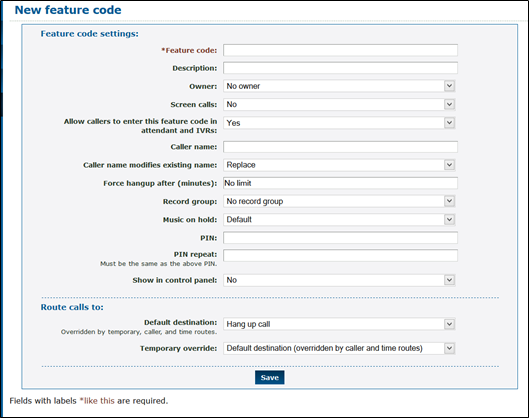
- In the New feature code menu, fill in the following as needed:
-
* Feature code: Type a combination of numbers with or without a * (for example, *123 or 123).
DANGER: Do NOT use a N11 number, such as 911, 211, 411, 811, etc.
These numbers must be avoided since they are reserved for dialing important government services.
- Description: Type a note about the purpose of this feature code. This will be displayed next to the code in the list of feature codes.
- Owner: If needed, select a user that should be able to edit the feature code even if they are not an admin.
- Screen calls: When set to Yes, the person answering is asked if they want to accept the call.
- Allow callers to enter this feature code in attendant and IVRs: When set to yes, this feature code can be entered in the IVR menus.
-
Caller name: Type a specific name or prefix that should be shown for a caller that gets routed through this feature code.
If this is left blank, the caller's Caller ID name will be shown. - Caller name modifies existing name: Determines if the name/prefix typed in the Caller name box will replace the caller ID name supplied by the caller or get prepended/appended to the Caller ID Name.
- Force hang-up after (minutes): If needed, set a time limit (in minutes) that when met, the call will be hung up.
- Record group: Assign the feature code to a record group so that a call that routes through the feature code gets recorded and stored with the record group.
- Music on hold: When selected, users who dialed this code and wait on hold will have music played back to them.
- PIN: Set a secure password for this feature code to while in the number routing menu. This password would need to be entered after entering the feature code to be able to change the temporary routing and announcement message.
- PIN repeat: Confirm the PIN you typed above.
- Show in control panel: When set to Yes, the feature code will be displayed in the control panel.
- Default destination: The next destination for the call unless a Temporary override is active.
- Temporary override: Overrides the main routing set as the Default destination. Used to forward calls to a different destination if the Default destination is not available (e.g., internet outage is affecting a phone, cell phone is our of service, etc.).
-
* Feature code: Type a combination of numbers with or without a * (for example, *123 or 123).
- Click the Save button.


✔ You should now have a list of the default feature codes and any feature codes you have created.

Export Feature Codes
Some users may want a list of the feature codes they can dial and their different functions.
To export the features codes as a spreadsheet…
- Navigate to Features → Feature codes.
- Scroll down to the bottom of the page.
- Click the Export as .csv button.

✔ The system will download a .csv file to your PC that is readable by spreadsheet applications.
Special Uses for Feature Codes
Feature codes are used in many different ways to serve a variety of purposes. Use the module below to view some of the most commonly created feature codes.
Do Not Disturb Toggle
Almost all phones will have a DND (Do Not Disturb) feature that can be activated. As an alternative, a dialable feature code can be created to allow your users to dial a set of numbers to disable/enable DND mode.
✔ Having this code can be useful for cordless phones.
To create a feature code that can turn on/off DND mode, fill in the following for the New feature code menu.
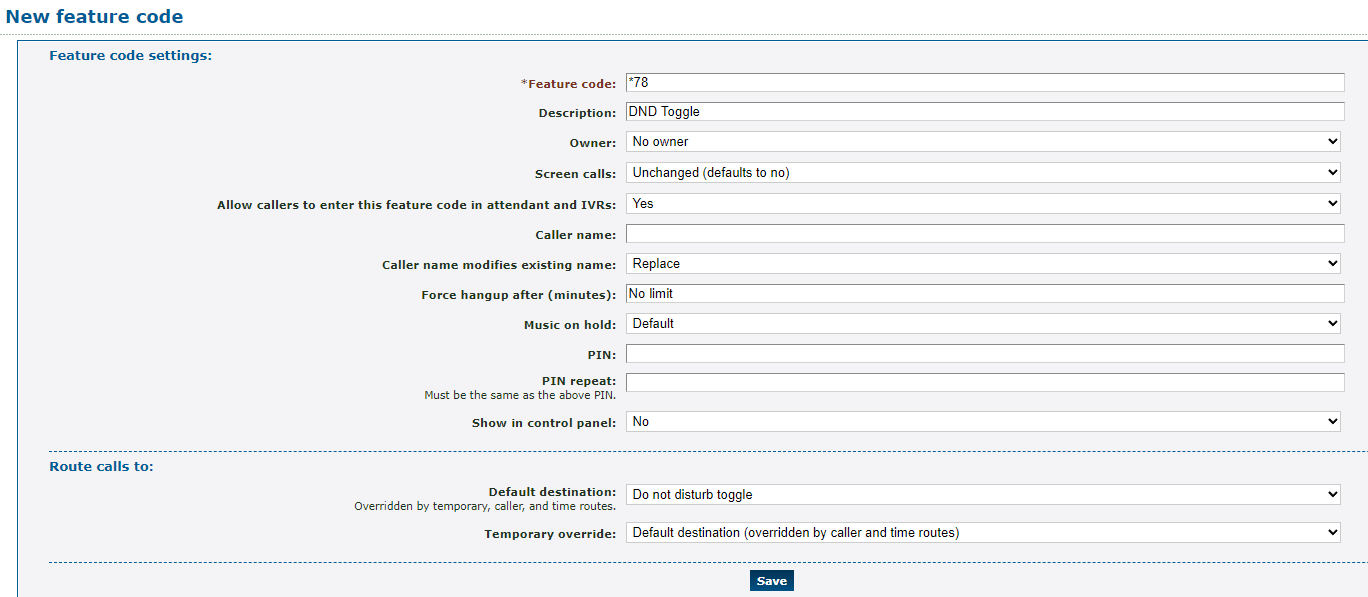
| Setting | Description |
|---|---|
| * Feature code |
Type the set of numbers that should be dialed to toggle this feature on and off. DANGER: Do NOT use a N11 number, such as 911, 211, or 411. |
| Description | Type a note that will be displayed alongside the feature code in the list of feature codes. |
| Owner | If needed, use the Owner dropdown to select someone that should be able to view and edit this feature code. |
| Allow callers to enter this feature code in attendant and IVRs | If this feature code should be allowed to be dialed an IVR, select Yes. |
In the Route calls to section, use the Default destination dropdown to select Do not disturb toggle.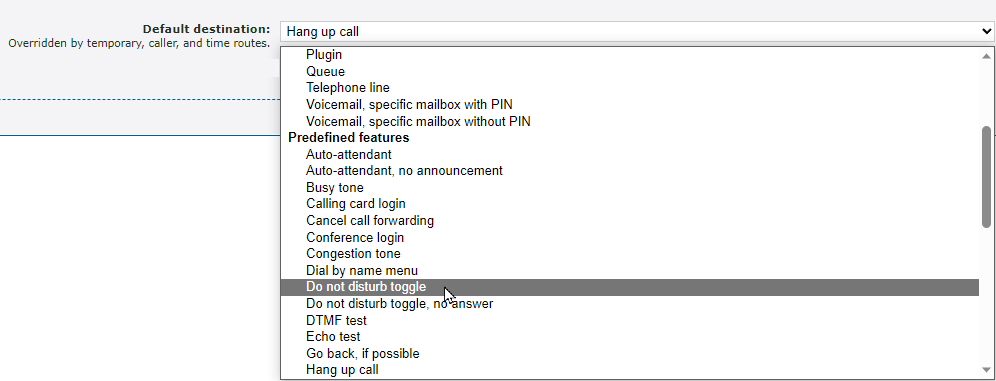
Disable/Enable Call Forwarding
It can be useful to have codes that can be dialed that activates and deactivates different forwards. This can make it easier for your to remotely forward your calls.
WARNING: In order to set up these feature codes, Time Groups that forward calls will already need to be configured.
To learn more about Time Groups and forwarding calls, read this article.
Step 1: Allow a Number to Update Routing
For the manual time routing to work, the phone number that will be routed using these feature codes needs to be allowed to update its routing.
To do this…
1. Navigate to Features → Numbers.
2. Select the phone number that should be adjusted.
3. In the Route calls to section of the number's settings, set Update this number when setting numbers routing to Yes.
4. Click the Save button. 
Step 2: Create a Code That Activates Call Forwarding
To set up a feature code that sets call forwarding…
1. Navigate to Features → Feature codes.
2. Click the New >> button. ![]()
3. In the New feature code menu, fill in the following information:
| Setting | Description |
|---|---|
| * Feature code |
Type the set of numbers that should be dialed to activate the forwarding. DANGER: Do NOT use a N11 number, such as 911, 211, or 411. |
| Description | Type a note that will be displayed alongside the feature code in the list of feature codes, such as “Activate Temp Fwd”. |
| Owner | If needed, select a user that should be able to view and edit this feature code. |
| Allow callers to enter this feature code in attendant and IVRs | If this feature code should be allowed to be dialed in an IVR, select Yes. |
4. In the Route calls to section, use the Default destination dropdown to select Set routing to time group.
Use the second dropdown to select the name of Time Group to use for forwarding. 5. Click the Save button.
 ![]()
Step 3: Create a Code That Deactivates Call Forwarding
To create a feature code that returns your call routing to normal…
1. Navigate to Features → Feature codes.
2. Click the New >> button. ![]()
3. In the New feature code menu, fill in the following information: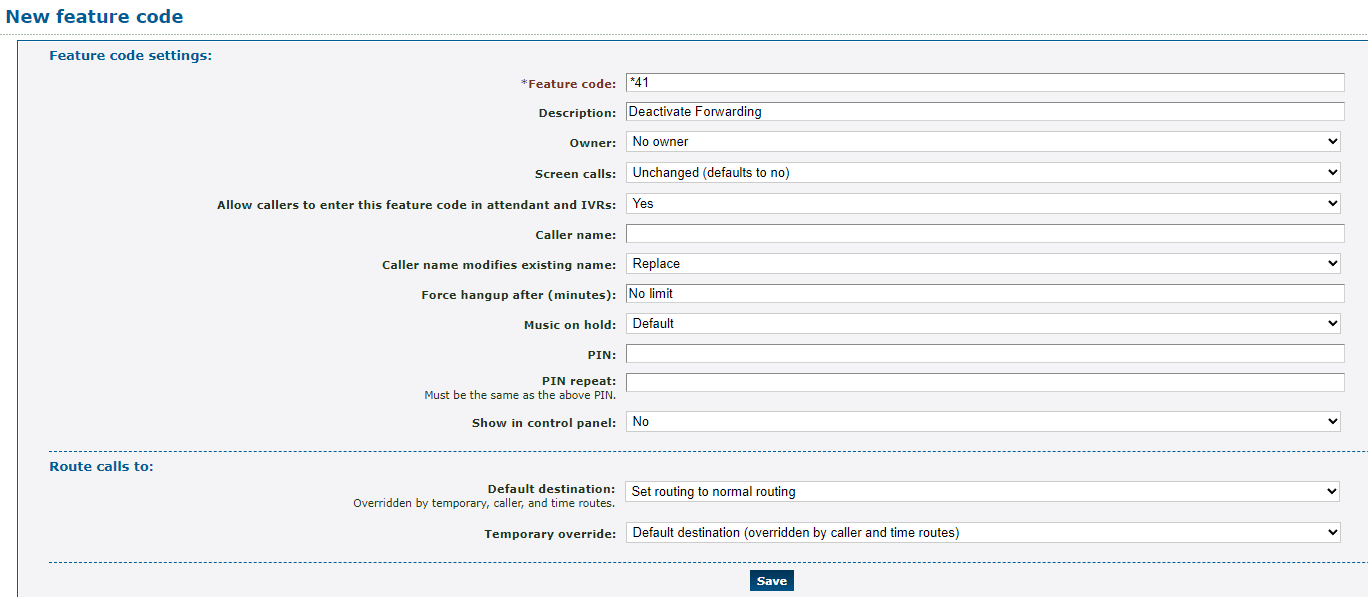
| Setting | Description |
|---|---|
| * Feature code |
Type the set of numbers that should be dialed to return call routing to normal. DANGER: Do NOT use a N11 number, such as 911, 211, or 411. |
| Description | Type a note that will be displayed alongside the feature code in the list of feature codes, such as “Deactivate Forwarding”. |
| Owner | If needed, select a user that should be able to view and edit this feature code. |
| Allow callers to enter this feature code in attendant and IVRs | If this feature code should be allowed to be dialed in an IVR, select Yes. |
- In the Route calls to section, use the Default destination dropdown to select Set to normal routing.

- Click the Save button.
Greeting or Announcement Message
One special use case for a feature code is using one as a greeting for calls being forwarded. This kind of code is especially useful for holiday greetings. The way this code is used
Step 1: Create a Greeting Feature Code
To add a message into a number's routing for calls being forwarded elsewhere, a feature code would need to be configured, fill in the following for the New feature code menu.
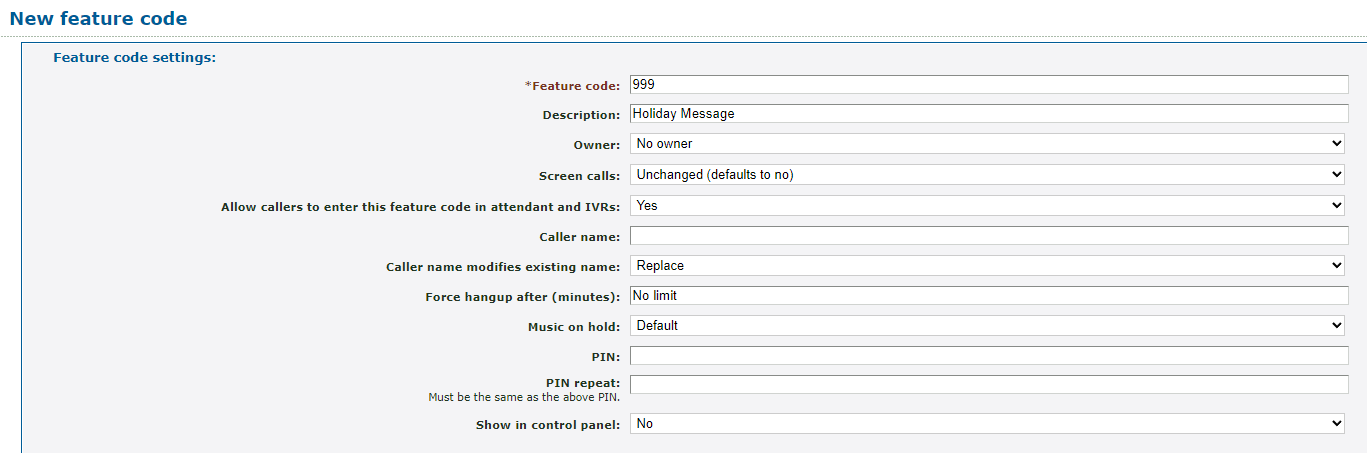
| Setting | Description |
|---|---|
| * Feature code |
Type a unique set of numbers (with or without a star *) that the system will use. DANGER: Do NOT use a N11 number, such as 911, 211, or 411. |
| Description | Type a note that will be displayed alongside the feature code in the list of feature codes, such as “Holiday Message”. |
| Owner | If needed, select a user that should be able to view and edit this feature code. |
| Allow callers to enter this feature code in attendant and IVRs | Set this option to No to prevent callers from dialing this feature code. |
In the Route calls to section, use the Default Destination dropdown to select the type of destination for forwarded calls.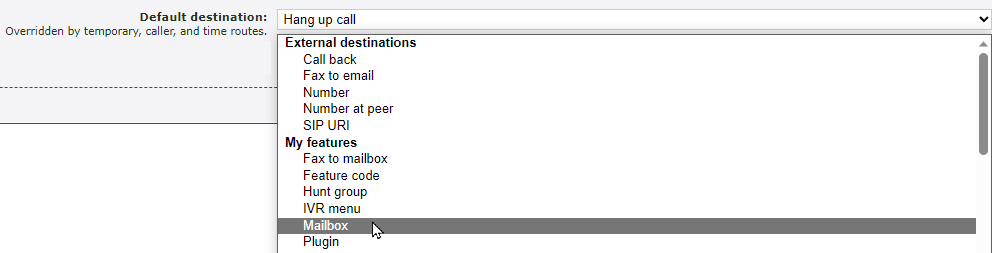
In the second dropdown, select or type the specific destination for forwarded calls.
Step 2: Add a Message to the Feature Code
Now that we have a feature code created that will route forwarded where they need to go, a greeting will need to be added that will play before the call is routed.
To add an audio message to the feature code…
1. Click the created holiday message feature code.
2. In the Announcement message section, do one of the following:
• Use the Sound file to use dropdown to select a saved Sound file.
• Click the Choose File button to select and upload a .wav audio file from your PC.
DANGER: The audio file needs to be in a .WAV file, mono channel, and 8000 Hz format to be properly read in the phone system.
To convert your audio file, use this handy website:
G711.org - Telephony File Converter
Example Text-to-Speech Greetings for US Holidays
If you do not have the means to record a holiday greeting, you can use any of these example holiday messages instead.
Click the buttons below to download and listen to these example greetings that have been created using text-to-speech.
Do Not Mention Leaving a Message
If you are routing calls during the holidays to a mailbox to allow callers to leave a voicemail, it might be better to not have a holiday message ask callers to leave a message. Having both a holiday message and a mailbox's greeting mention leaving a message can cause confusion for some callers.
If your mailbox already tells callers to leave a message, feel free to use these greetings below.
✔ These holiday greetings are useful for functions, such as a Holiday Auto Attendant or IVR Menu, that route callers to an answering service's phone number or a mailbox that has its own greeting.
Generic Holiday Greeting
If you prefer the message used to not mention the name of the holiday, you can download and use this greeting:
Example Holiday Greeting
✔ Using this greeting can help you avoid having to remember to switch out the holiday greeting for each holiday.
New Years
Example New Year's Eve Greeting
Christmas
If you prefer your Christmas holiday message to say, “Merry Christmas”, you can download and use this greeting:
Example Merry Christmas Greeting
If you prefer your Christmas holiday message to say, “Happy Holidays”, you can download and use this greeting:
Thanksgiving
Labor Day
Memorial Day
Independence Day
If you would like your Independence Day message to say, “4th of July”, you can download and use this greeting:
If you would like your Independence Day message to say, “Independence Day”, you can download and use this greeting:
Example Independence Day Greeting
Mention Leaving a Message
If you are using these greetings for a holiday mailbox or as a greeting for a user's mailbox, you can download and use these holiday messages. These holiday greetings below ask callers to leave a message.
✔ These holiday greetings are useful for holiday mailboxes.
If you are wanting to replace a user's mailbox greeting with a holiday message, these greetings can also be used.
Generic Holiday Greeting
If you prefer the message used to not mention the name of the holiday, you can download and use this greeting:
Example Holiday Greeting
✔ Using this greeting can help you avoid having to remember to switch out the holiday greeting for each holiday.
New Years
Example New Year's Eve Greeting
Christmas
If you prefer your Christmas holiday message to say, “Merry Christmas”, you can download and use this greeting:
Example Merry Christmas Greeting
If you prefer your Christmas holiday message to say, “Happy Holidays”, you can download and use this greeting:
Thanksgiving
Labor Day
Memorial Day
Independence Day
If you would like your Independence Day message to say, “4th of July”, you can download and use this greeting:
If you would like your Independence Day message to say, “Independence Day”, you can download and use this greeting:
3. Click the Use or upload button.
Step 3: Set Up a Time Route
Now that the feature code has been configured to play a message and forward calls to their destination, the feature code will need to be added to a phone number's time route.
Note: To learn more about creating a time route, read this article.
To set a time route to use the message feature code…
1. Navigate to Features → Numbers.
2. Select the phone number being forwarded.
3. In the Time routes section, click the name of your time route.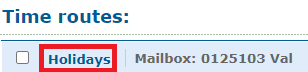
4. Use the Forwards matching calls to dropdown to select Feature code.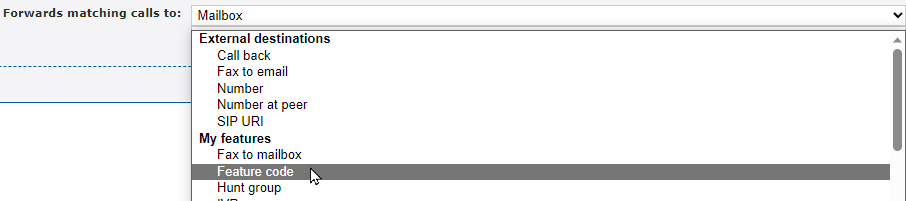
5. Use the second dropdown to select the message feature code.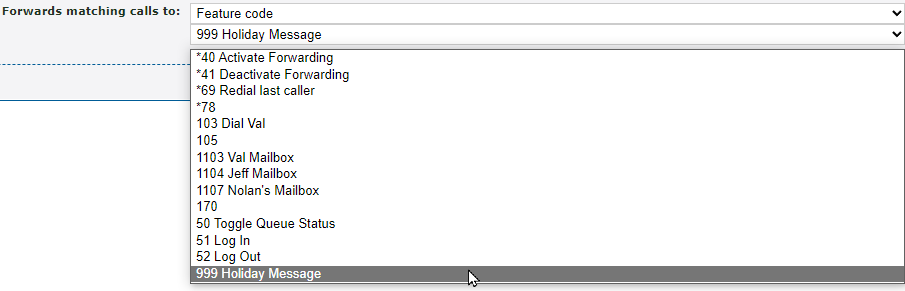
6. Click the Save button.
✔ You should now see the feature code as the destination for the phone number's time route.

Step 4: Test Your Forwarding
To confirm your holiday routing is implemented correctly, it is recommended to give your phone number a test call.
Test Call Your Phone Number
WARNING: It is recommended to use this method if your organization is not busy receiving calls to ensure callers are not accidentally routed using the holiday routing.
If your organization is too busy for a test call directly to your phone number, consider testing this routing during lunch or the after hours. You can also test this routing by dialing the feature code instead.
To test out your holiday routing by placing a call to the phone number…
1. Navigate to Features → Numbers.
2. Click the phone number that has the holiday routing set.
3. In the Time routes section, click Edit time group next to the holiday time route.
4. In the Time periods section, click the New >> button.
5. In the Time period settings section, use the Description box to type a note about this time period.
6. In the When the time period starts and stops each day section, select a brief time period for when your test call will be placed.
7. In the Which days the time period is active section, select the day you are placing this test call.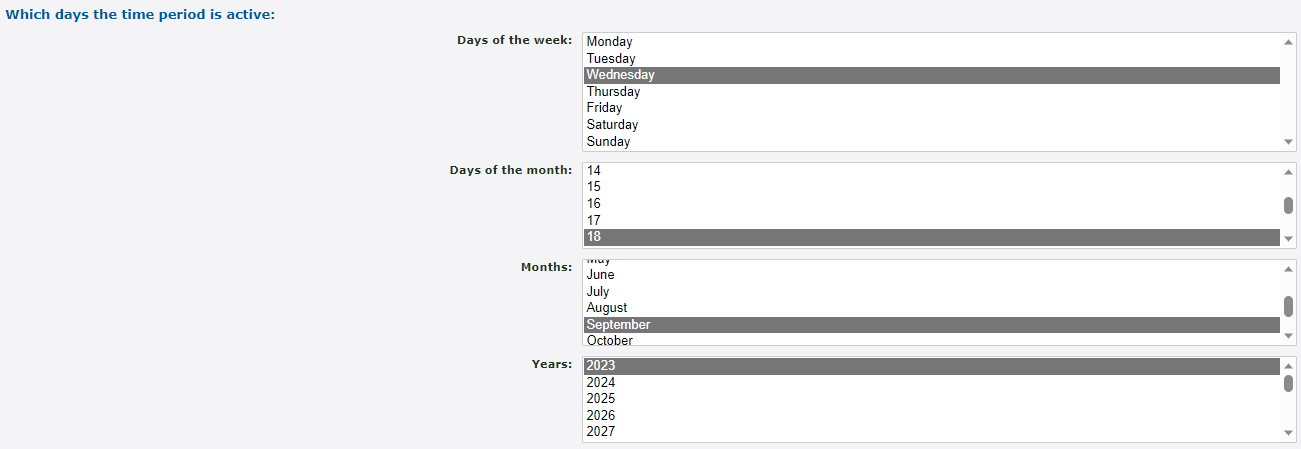
8. Click the Save button.
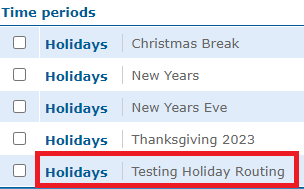
✔ Your new time period should now be seen in the list of time periods for the holiday time group.
9. Place a call to your phone number and confirm that…
• You can hear the correct holiday message.
• The call is routed to the correct destination.
10. Once your test call is complete, you can select the test time period and click the Delete selected button.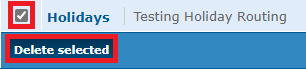
Test Call the Feature Code
If your business is too busy to place a test call directly to your phone number, you can place a test call to the feature code as an alternative.
To test your holiday routing in this way, dial the holiday message feature code on one of your devices provided by SpectrumVoIP. Confirm that you can hear the correct holiday message before the call is routed to the correct destination for holiday calls.
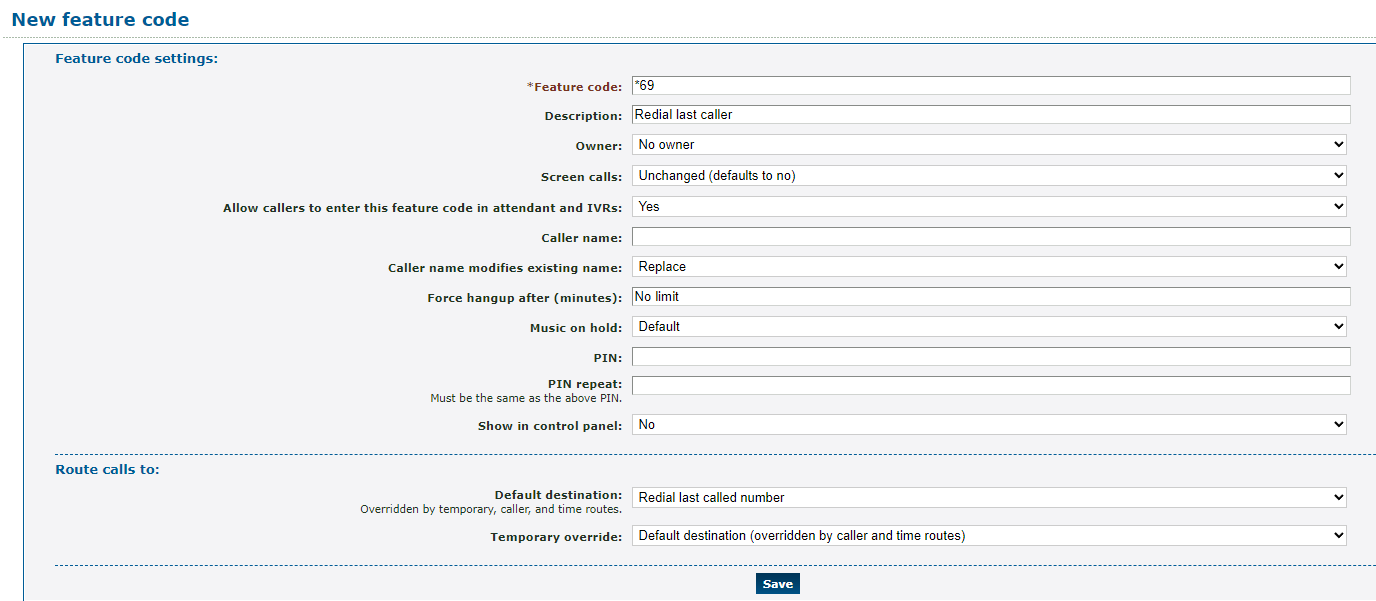
Redial Code
It can be useful having a code that can be dialed to redial the person that last called.
To create a code that can be dialed to redial callers, fill in the following for the New feature code menu.
| Setting | Description |
|---|---|
| * Feature code |
Type the set of numbers that should be dialed to redial. Quick Tip: *69 is commonly used to redial callers. DANGER: Do NOT use a N11 number, such as 911, 211, or 411. |
| Description | Type a note that will be displayed alongside the feature code in the list of feature codes. |
| Owner | If needed, use the Owner dropdown to select someone that should be able to view and edit this feature code. |
| Allow callers to enter this feature code in attendant and IVRs | If this feature code should be allowed to be dialed in an IVR, select Yes. |
In the Route calls to section, use the Default destination dropdown to select Redial last called number.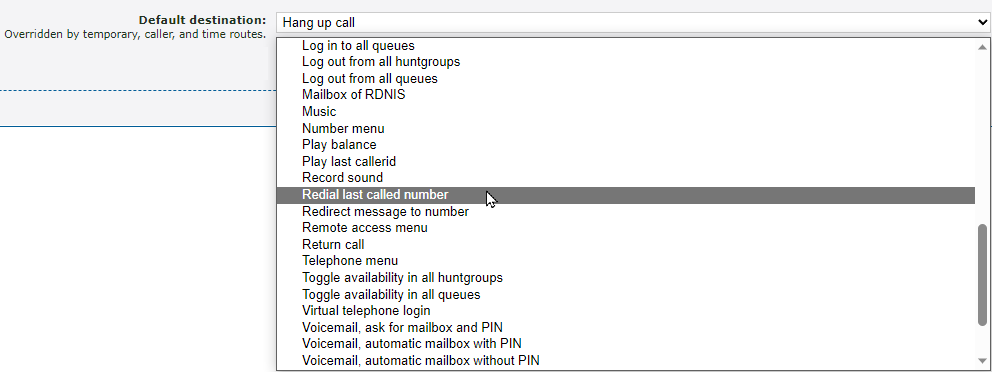
Log In/Out of Queues or Huntgroups
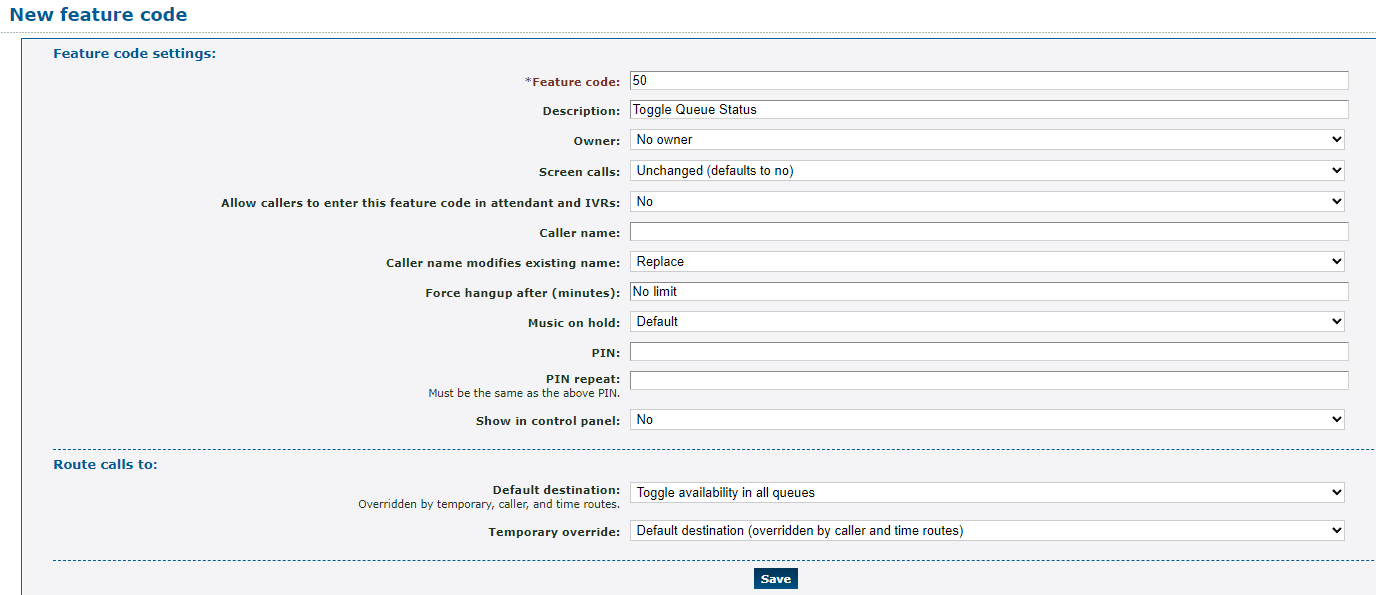
Method 1: Queue Toggle Feature Code
If you do not have designated users that are set as Call Center Supervisors or Admins, it can be difficult for users to change their status in call queues unless they are using the ES desktop app or mobile app.
As a convenient alternative, a dialable feature code can be created to allow your users to dial a set of numbers to set themselves as either available or unavailable in call queues.
To create a feature code that be used to toggle agents as available/unavailable in queues, fill in the following for the New feature code menu.
| Setting | Description |
|---|---|
| * Feature code |
Type the set of numbers that should be dialed to toggle the dialer's availability in their queues. Quick Tip: This code can be any set of numbers, as long as the combination of numbers is unique and does not use a star (*). DANGER: Do NOT use a N11 number, such as 911, 211, or 411. |
| Description | Type a note that will be displayed alongside the feature code in the list of feature codes. |
| Owner | If needed, select a user that should be able to view and change the queue toggle code. |
| Allow callers to enter this feature code in attendant and IVRs | If this code should be allowed to be used when dialed in an IVR, select Yes. |
In the Route calls to section, use the Default destination dropdown to select Toggle availability in all queues.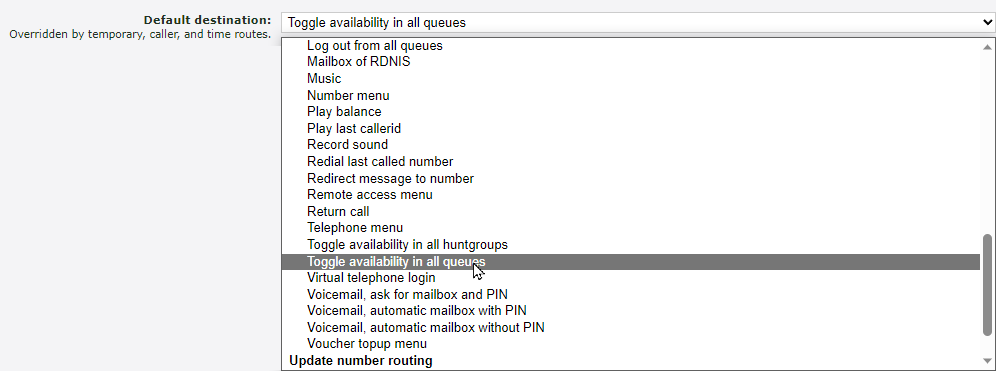
Note: If your company uses huntgroups instead of queues, select Toggle availability in all huntgroups instead.
Method 2: Separate Log In and Log Out Codes
In some call center environments, it may be important to have separate feature codes for users to use to set themselves as available or unavailable in the queues they are in.
Individual login and log out codes can be set up with ease using the Feature Codes page of the Enswitch web portal.
Configure a Queue Log In Feature Code
To create a feature code that sets agents as available when dialed, fill in the following for the New feature code menu.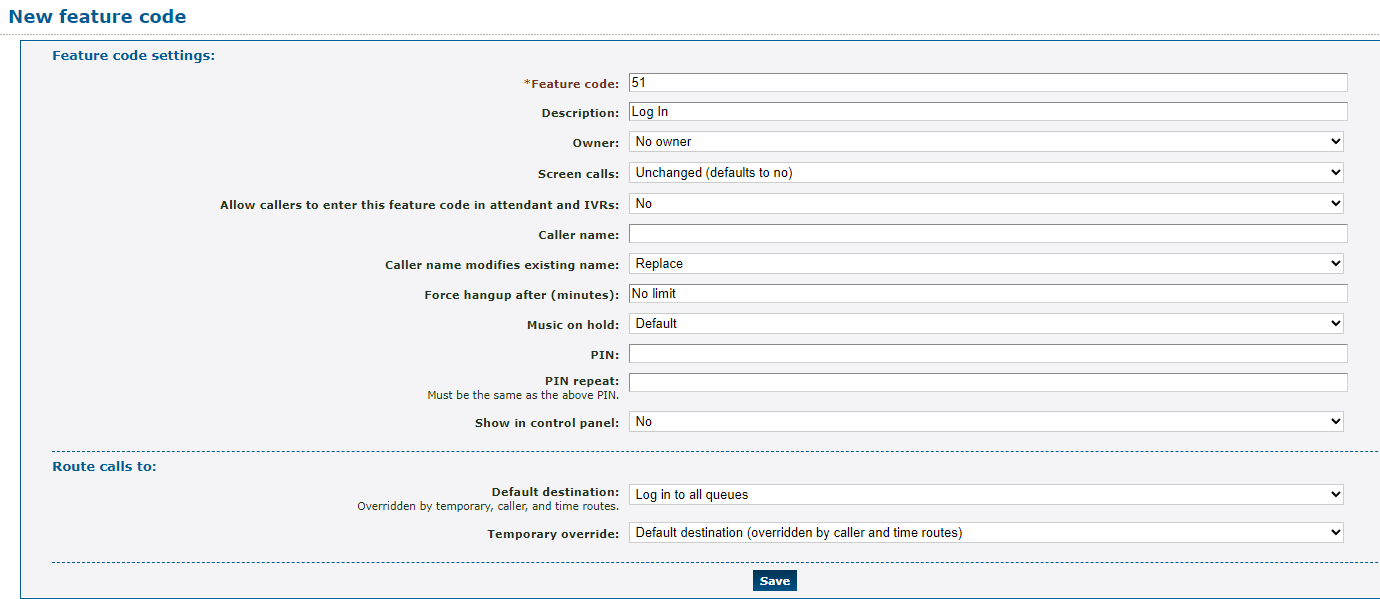
| Setting | Description |
|---|---|
| * Feature code |
Type the set of numbers that should be dialed by an agent to set their availability as “Available” in their queues. Quick Tip: This code can be any set of numbers, as long as the combination of numbers is unique and does not use a star (*). DANGER: Do NOT use a N11 number, such as 911, 211, or 411. |
| Description | Type a note that will be displayed alongside the feature code in the list of feature codes. |
| Owner | If needed, select a user that should be able to view and edit this feature code. |
| Allow callers to enter this feature code in attendant and IVRs | If this feature code should be allowed to be dialed in an IVR, select Yes. |
In the Route calls to section, use the Default destination dropdown to select Log in to all queues.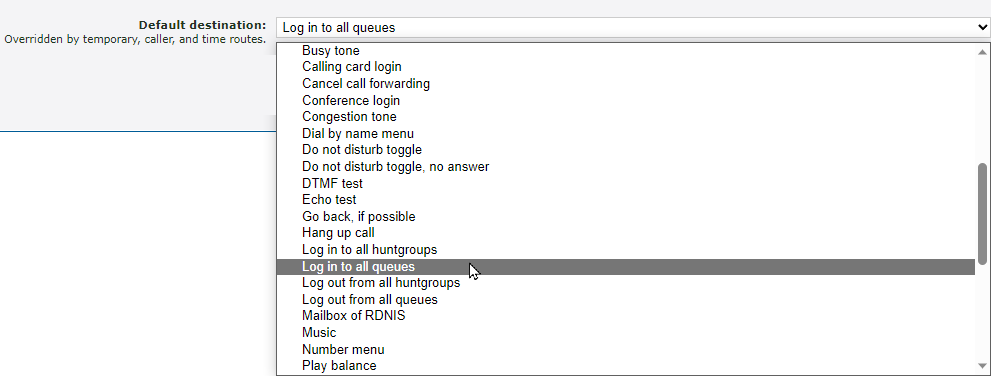
Note: If your company uses huntgroups instead of queues, select Log in to all huntgroups instead.
Configure a Queue Log Out Feature Code
To create a feature code that sets agents as unavailable when dialed, fill in the following for the New feature code menu.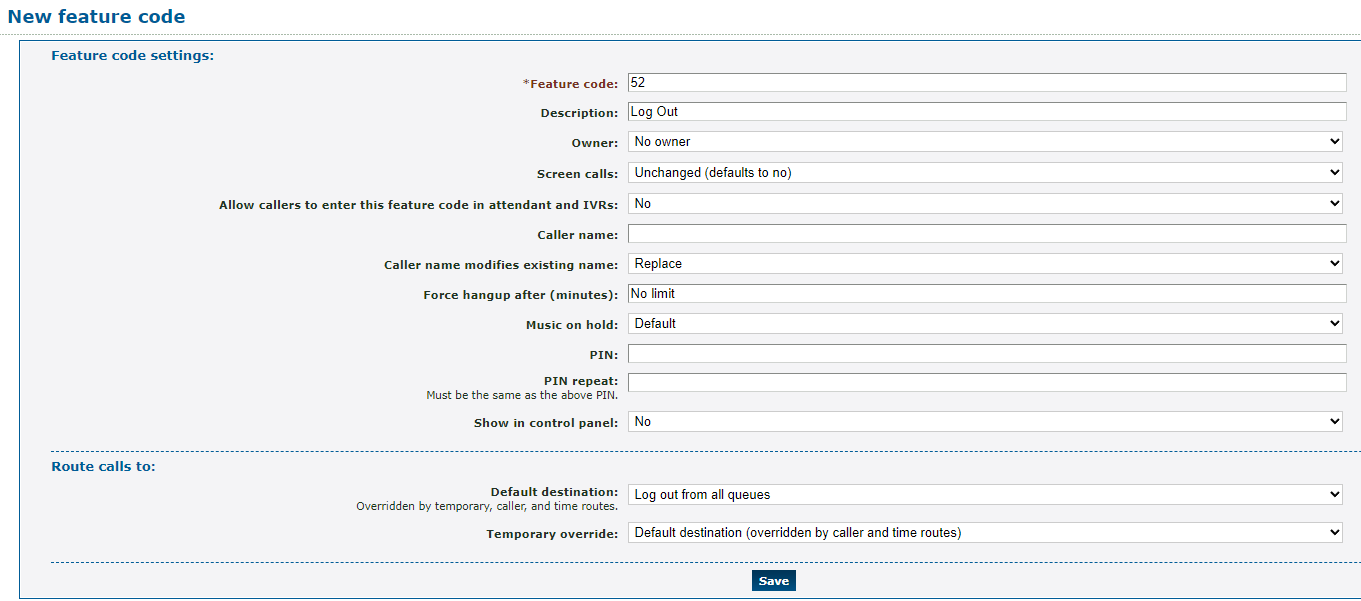
| Setting | Description |
|---|---|
| * Feature code |
Type the set of numbers that should be dialed by an agent to set their status as “Unavailable” in their queues. Quick Tip: This code can be any set of numbers, as long as the combination of numbers is unique and does not use a star (*). DANGER: Do NOT use a N11 number, such as 911, 211, or 411. |
| Description | Type a note that will be displayed alongside the feature code in the list of feature codes. |
| Owner | If needed, select a user that should be able to view and edit this feature code. |
| Allow callers to enter this feature code in attendant and IVRs | If this feature code should be allowed to be dialed in an IVR, select Yes. |
In the Route calls to section, use the Default destination dropdown to select Log out from all queues.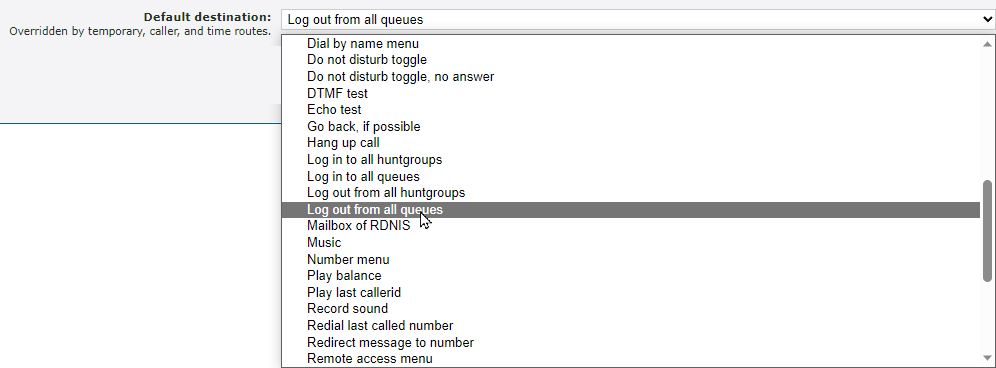
Note: If your company uses huntgroups instead of queues, select Log out from all huntgroups instead.
Record Audio for Greetings
The Sounds page can be used to store different audio files, which can make it easier to update on hold music and greetings for mailboxes, IVR menus, feature codes, and more. These audio files can be created using a special feature code that triggers the Record Audio tool.
To create a code for using the Record Audio tool, fill in the following for the New feature code menu.

| Setting | Description |
|---|---|
| * Feature code |
Type the set of numbers that should be dialed to trigger the Record Audio feature. Quick Tip: This code can be any set of numbers, as long as the combination of numbers is unique and does not use a star (*). DANGER: Do NOT use a N11 number, such as 911, 211, or 411. |
| Description | Type a note that will be displayed alongside the feature code in the list of feature codes. |
| Owner | If needed, select a user that should be able to view and change the queue toggle code. |
| Allow callers to enter this feature code in attendant and IVRs | If this code should be allowed to be used when dialed in an IVR, select Yes. |
In the Route calls to section, use the Default destination dropdown to select Record sound.
