Manage Your Voicemail in the Stratus Web Portal
Explore how to check and manage your voicemails using the Stratus web portal.

Written by Val Campos
Updated at July 27th, 2026
Table of Contents
When there is not a phone or app available to use for checking your voicemail, the Stratus web portal can be used instead. Some users may find using the Stratus portal to be a convenient alternative to having to traditionally call in and listen to their mailbox's voice menu.
There are two places to check and manage the messages left in a mailbox: the Home page and the Messages page.
The Stratus Home Page
On the Home page, use the NEW VOICEMAIL MESSAGES section to quickly listen to and manage your voicemails:

To listen to a message, click the Play icon  . You can use the icons on the right to interact with the message further:
To look at saved or trashed voicemails, you will need to go to the Messages page. You can click NEW VOICEMAIL MESSAGES to efficiently navigate to the Messages page.
The Messages Page
In addition to the NEW VOICEMAIL MESSAGES section of the Home page, Stratus has a Voicemail menu on the Messages page. Unlike the Home page's menu, the Messages page can be used to view the other folders of the mailbox: the Saved and Trash folders.
To check the voicemails in your voicemailbox so far, go to the Messages page.
Quick Tip: If you are a Stratus admin, you can view your own voicemails by clicking your name and selecting Messages.
On the Voicemail tab of the Messages page, you can review and manage your voicemails.

Use the Folder dropdown to swap between the New, Saved, and Trashed folder of your mailbox.
To listen to a message, click the Play icon .
Manage Voicemail Messages
When you are viewing a voicemail, you will see 5 icons that can be used to manage a message.

Use the module below to review these icons that you can use:
Call to Play
If you are not able to use speakers on your PC to listen to a voicemail, you can use the Call to Play  function to listen instead. This will have the system send a call to an available phone that is registered to your extension number.
To use this feature, click the Call to Play icon and answer the call that you receive.
Note: While the system is ringing your phone, a notification will be displayed:
When you answer the call on the phone, the voicemail's audio will be played before the call is automatically hung up.
Forward
If the voicemail you are reviewing is supposed to be handled by a different team member, it can be forwarded using the Forward  function.
To forward a voicemail message to another coworker…
1. Click the Forward icon.
2. Type and select the name or extension number of the other user.
3. Click the Forward button to send the voicemail to the other user's mailbox.
.
✔ Once the Forward button is clicked, there will be a notification saying the voicemail has been forward is complete:
Download
If a voicemail needs to be downloaded for record-keeping purposes, you can click the Download  icon to save the voicemail to your PC.
✔ When the Download icon is clicked, a .wav audio file of the message will be downloaded to your PC through your web browser. 
Move to Saved
As a way to organize your mailbox, you can click the Save  icon to move the voicemail to the Saved folder of your mailbox.
Check a Saved Voicemail
To listen to a Saved message, use the Messages drop-down to select the Saved folder.
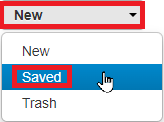
✔ From the Saved folder, saved messages can be played, forwarded, downloaded, or deleted. 
Delete
To declutter your mailbox, you can use the Delete  function.
When the Delete icon  is clicked, that message is sent to the Trash folder of the mailbox. The Trash folder of the voicemailbox is emptied at the end of each day.
Review a Trashed Voicemail
To see a message before it is deleted, use the Messages drop-down to select the Trash folder.
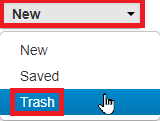
✔ From the Trash folder, deleted messages can be played, forwarded, downloaded, or saved.
Adjust Your Mailbox's Settings
On the Settings tab of the Messages page, you can edit the settings of your mailbox to do things like update your voicemail greeting, enable email notifications for voicemails, and much more.

Read the sections below to review the different settings that can be adjusted for your mailbox through this page.
Inbox Settings

| Setting | Description and Notes |
|---|---|
| Enable Voicemail |
If this mailbox should not ever receive voicemails, deselect this option to disable the mailbox. IMPORTANT: This will not delete any previous voicemails already in the inbox. This will just prevent any future voicemails from being left. |
| Options |
Additional settings that can fine-tune how your mailbox sorts and reads out voicemail messages. • Sort voicemail inbox by latest first - • Announce voicemail received time - • Announce incoming call ID - |
| Operator Forward |
Allows callers to press 0 in your mailbox to have their call routed to the extension number of a user, call queue, or auto attendant. Quick Tip: For this example user, callers can press “0" to be routed to this example account's Auto Attendant 8104 (“Operator AA”). |
| Copy to Extension(s) |
Set your mailbox to copy future voicemails to another user's voicemail inbox. Multiple extensions can be added to this list with the Add Note: When a voicemail is copied to an additional mailbox, you and the other user would still need to delete the voicemails separately. Deleting a voicemail in one mailbox will not delete a copied version in a different mailbox. |
| Voicemail Transcription |
Select Deepgram to enable voicemail transcriptions for your mailbox. These transcriptions would be displayed in the Stratus web portal, in email notifications for voicemails, and in the Stratus mobile app. Note: Voicemail transcriptions for a mailbox costs $2.99/mo. |
| Send email when mailbox is full |
To receive an email when the mailbox is full, select this option. Doing so can be a great backup option to avoid people being unable to leave voicemails if the mailbox is full. |
| Send email after missed call | If it is important to return missed calls as quickly as possible, enable this option so that an email is sent out when your extension number receives a missed call. |

 icon.
icon.
✔ Be sure to click the Save button at the bottom of the screen after making any changes.
Your Voicemail Greetings
In the Greetings section, you can view, Listen to  , Download
  , and Manage
 the greeting that is played to callers that reach the user's mailbox.

Click the Manage  icon next to the Voicemail Greeting to view the Manage Greetings menu and the mailbox's greetings.

You can also Download , Edit  , and Delete
  greetings.
Create a New Greeting
1. On the Manage Greetings menu, click the Add Greeting button. 
2. Use one of the following New Greeting options to add in a greeting.
Text-to-Speech
You can use the text-to-speech tool to create a greeting without having to record one.

To create a greeting using text-to-speech…
1. In the New Greeting section, select Text-to-Speech.
2. In the Message box, type out the voicemail greeting.
3. Use the Voice dropdown to select the voice that should say the message.
4. Press the Play  icon to listen to the voice and the message to confirm that they sound correct.
Quick Tip: If the message does not sound correct, try…
• Spelling out any names phonetically.
• Typing out email addresses and phone numbers without any special characters.
(e.g., 4 6 9 4 2 9 2 5 0 0 and business at g mail dot com)
• Selecting a different voice to see if a certain voice pronounces the name better.
6. Click the Save button. 
Upload
If you have a pre-recorded greeting or a downloaded backup of a greeting, you can upload the audio file to use as a voicemail greeting.

WARNING: The audio file should be a 16-bit WAV (8Khz, Mono, 16-Bit PCM) file.
Convert an Audio File Using G711.org
To convert the audio file, you can use a free site named g711.org. To do so…
1. Visit g711.org.
2. In the Source File section, click the Browse button.
3. Select the audio file to be converted.
4. In the Output Format section, ensure that the Standard Definition option is selected.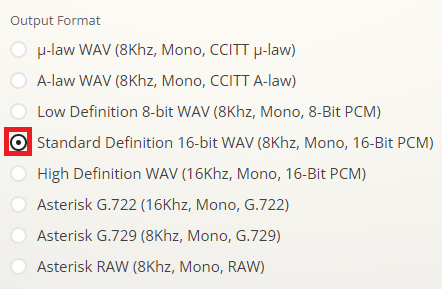
5.Click the Submit button.
✔ Doing so will pull up a new page with a link.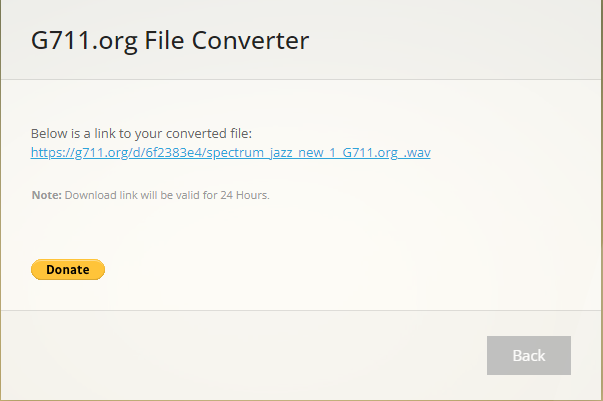
6. Right-click the link and select Save link as.
7. In the File name box, type a name for the converted audio file and then click the Save button.
DANGER: Not converting music files can cause catastrophic issues for your phone system.
Once the file has been selected on your PC, click the Upload button. 
Record
One way to add a greeting for a voicemailbox is the call to record tool.

To have a call sent out that will record your greeting…
1. In the New Greeting section, select Record.
2. In the Greeting Name box, type in an optional name for the greeting.
3. In the Call me at box, type the er of a phone to send the call to.
4. Click the Call button. 
5. Follow the call's instructions to record the greeting.
Change Your Active Greeting
If your mailbox has multiple greetings, you can use the Voicemail Greeting dropdown to select the greeting that should be active.

After selecting a different greeting, be sure to click the Save button at the bottom of the page. 
The Greetings section also allows you to listen to, download, and update your Recorded Name.
The Recorded Name is played to callers when they search for a user using an auto attendant's Dial-by-Name Directory. If your company does not use a Dial-by-Name Directory, then the recorded name does not need to be updated.
Update Your Recorded Name
If your Recorded Name is not correct, you can update it.
1. Click the Manage  icon.
icon.
2. In the Manage Recorded Name menu, do one of the following:
Text-to-Speech
To avoid having to take the time to record a user's name, you can use the convenient Text-to-Speech tool.

To use this tool to create a user's recorded name…
1. In the New Recording section, select Text-to-Speech.
2. In the Message box, type out the user's name.
3. Use the Voice dropdown to select the voice that should say the user's name.
4. Press the Play icon to listen to the voice and the name to confirm they sound correct.
Quick Tip: If the name does not sound correct, try spelling the name out phonetically. You can also try selecting different voices to see if a certain voice pronounces the name better.
5. Click the Save button. 
Upload
If you have a pre-recorded snippet of your name, you can upload the audio file to use as your recorded name.
Quick Tip: The recorded name will be announced to callers if they are searching for you in a Dial-by-Name Directory.
If your company is using the Iris AI Agent, this will also be the name Iris reads out to callers if its Directory feature is enabled and being used.

WARNING: The audio file should be a 16-bit WAV (8Khz, Mono, 16-Bit PCM) file.
Convert an Audio File Using G711.org
To convert the audio file, you can use a free site named g711.org. To do so…
1. Visit g711.org.
2. In the Source File section, click the Browse button.
3. Select the audio file to be converted.
4. In the Output Format section, ensure that the Standard Definition option is selected.
5.Click the Submit button.
✔ Doing so will pull up a new page with a link.
6. Right-click the link and select Save link as.
7. In the File name box, type a name for the converted audio file and then click the Save button.
DANGER: Not converting music files can cause catastrophic issues for your phone system.
Once the file has been selected on your PC, click the Upload button. 
Record

To have a call sent out that will help you record the user's name…
1. In the New Recording section, select Record.
2. In the Call me at box, type the extension number of a phone to send the call to.
4. Click the Call button. 
5. Follow the call's instructions to record the greeting.
Email Notifications for Voicemails
In your voicemail settings, you can enable email notifications to be sent when there is a voicemail message left in your voicemailbox. There are two kinds of notifications you can implement: email voicemail notifications and persistent voicemail reminders.

Email Notifications for Voicemails
If you prefer to check your voicemails through email, you can enable email notifications for your voicemailbox. Doing so can make it easier to check voicemails outside of the office.
Note: The email(s) that will receive these notifications is the email(s) set in the user's Profile settings.
To set up email notifications for your mailbox…
1. Select Receive an email for new voicemail to enable email notifications.
2. Use the Email Type dropdown to select what is sent in the email.
• Send with hyperlink - The email will have a hyperlink included that the user can click to listen to the email through the web portal.
• Send with attachment - The email will have an audio file attached so that the user can listen to the voicemail through the email itself.
3. Use the After Email Notification dropdown to select what should happen with the voicemail once the email notification is received.
• Leave as new - Have the voicemail left in the New folder of the voicemailbox when the email is sent.
• Move to saved - Move the voicemail to the Saved folder of the voicemailbox once the email is sent.
• Move to trash - Move the voicemail to the Trash folder of the voicemailbox once the email is sent.
Note: Voicemails moved to the Trash folder of a mailbox will stay there until the end of the day.
If a voicemail should not be deleted, the user can check the Trash folder of the voicemailbox for the message and manage that message as needed.

4. Make sure to click the Save button to save these changes. 
Persistent Voicemail Reminders
Persistent voicemail reminders are notifications that are sent repeatedly according to a set interval until the mailbox's new message is listened to and moved within your voicemailbox.
✔ These kinds of notifications are useful for mailboxes used for essential, time-sensitive services, such as after hours, on-call, and emergency services.
Mailboxes that could benefit from this feature could include an emergency maintenance mailbox or a mailbox used by nursing staff.
To set up persistent voicemail reminders…
1. For the Voicemail Reminders option, select Email Notification.
2. Type in an email address that should receive these reminders.
3. Set how long the system should wait before sending subsequent notifications. 
4. Make sure to click the Save button to save these changes. 
✔ The system will now send these reminders until the voicemail message in the voicemailbox is saved or deleted.