Recommended Unifi Firewall Settings
Understand the firewall settings for USG-series Unifi devices and learn how to optimize them for your network.
Table of Contents
Configure Your Unifi Firewall for VoIP
WARNING: Configuring the settings of your USG may result in a restart. It is recommended to perform these changes in your after hours.
Create a Smart Queue
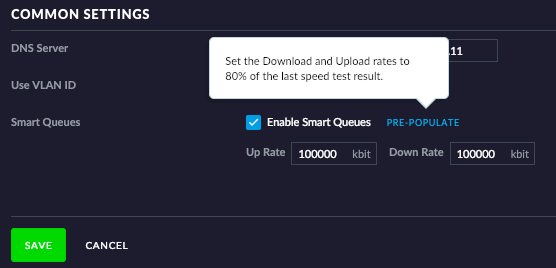
A Smart Queue option is available with UniFi Security Gateway that prioritizes traffic and minimizes delays when the router/bandwidth becomes overloaded. Activating this option will prioritize all traffic coming in and out of Aircall over other applications traversing the network.
WARNING: Activating the Smart Queue option may reduce the maximum throughput. It is strongly recommended to monitor the available speed with and without Smart QoS enabled.
To activate this option…
- Log into your UniFi controller.
- Navigate to Settings → Networks.

- In the Networks list, select the WAN network that your VoIP devices will use.
- In the COMMON SETTINGS section, select Enable Smart Queues.
✔ Selecting Enable Smart Queues will show the Up Rate and Down Rate fields.

- Click PRE-POPULATE to automatically have the Up Rate and Down Rate set to 80%.
- Click the SAVE button.
✔ QoS should now be configured on your Security Gateway.
Open Ports
In order to make sure that traffic used by your VoIP devices is not blocked, your USG may need certain ports opened.
To do this…
- Access your UniFi dashboard.
- Navigate to Settings → Routing & Firewall → Firewall → LAN IN.
- Click + Create a new rule

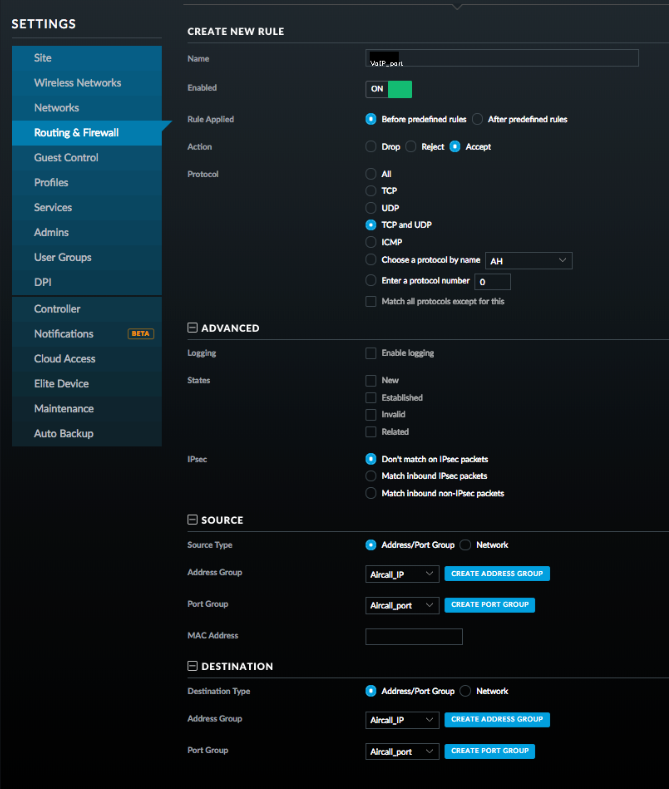
- Set the settings for the new rule to:
- Enabled - ON
- Action - Accept
- Protocol - TCP and UDP
- In the ADVANCED section, leave the default settings unaltered.
- In the SOURCE section, adjust the following settings:
- Source type - Address/Port Group
-
Address Group - Create a new address group with these parameters:
- Name the new group VoIP.
- Set the Type to Address.
- In the Address boxes, type in this list of IP addresses:
- 199.71.209.0/24
- 24.227.249.0/25
- 72.249.136.32/28
- 206.123.122.32/27
- 212.69.157.32/27
- 40.143.31.64/27
- Click the SAVE button.
- Click the SAVE button.
-
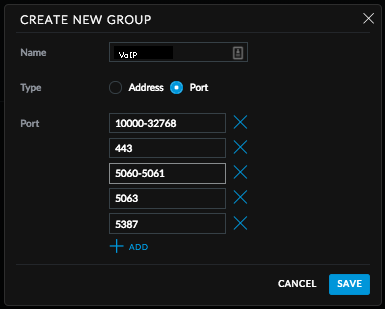
Port Group - Create a new port group with these parameters:

- Name the new group VoIP Port.
- Set the Type to Port.
- Add a list of the following ports and IP addresses:
- 5060-5062 UDP - SIP
- 20,000-40,000 UDP - RTP
- 80, 443 TCP - HTTP/HTTPS
- StratusMEETING - TCP and UDP
- 54.188.133.147:3443
- 3.130.158.184:3443
- 35.183.150.146:3443
- Text To Speech Services - TCP and UDP
- 54.149.243.27:8000
- 35.175.185.150:8000
- 54.149.243.27:3001
- 35.175.185.150:3001
- StratusWEB PHONE
- 9002 - TCP - websockets
- Portal Dynamic Updates
- 8001 - TCP
- Click the SAVE button.
- In the DESTINATION section, adjust the following settings:
- Destination Type - Address/port group
- Address group - VoIP
- Port group - VoIP Port
- Click the SAVE button.
UniFi Access Points and Switches
By default, The UniFi access points and switches will automatically map the DSCP value to a Wi-Fi Multimedia (WMM) priority. Voice is then automatically given highest priority on these devices, so no further changes are needed.