Stratus Web Portal Basic User Guide
The Stratus Basic User Guide provides essential information and step-by-step instructions for users to navigate and utilize the basic features of the Stratus platform effectively.
Table of Contents
View and Download a User Guide
Access the Portal
NOTE: If you are having trouble logging in, please contact an admin or our support team.
The Welcome Email
When you are first getting started with using the Stratus web portal, you should receive a Welcome Email that will allow you to set up your account's password and your voicemail PIN.
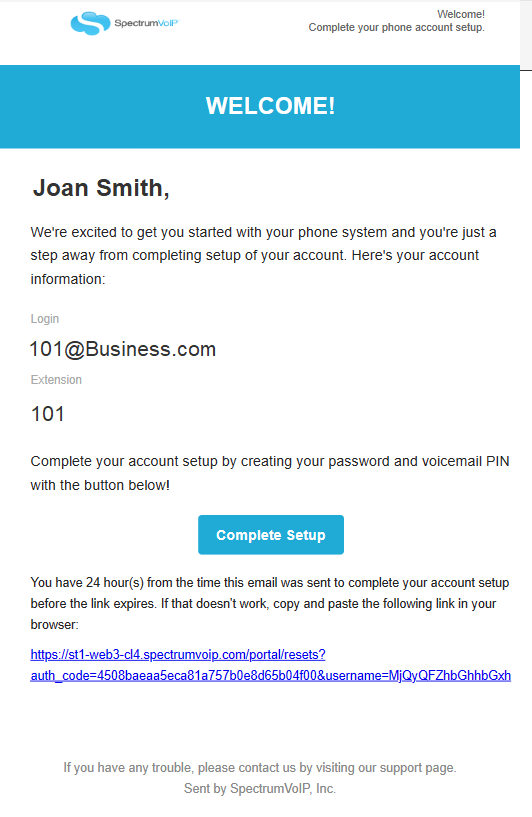
Quick Tip: You may see this email in your inbox with the Subject line saying, “Your new phone system account”.
NOTE: If you are not able to receive this email, please contact our Support team.
Once you click the Complete Setup button, you will see the New User Credentials menu where you can set up your Password and Voicemail PIN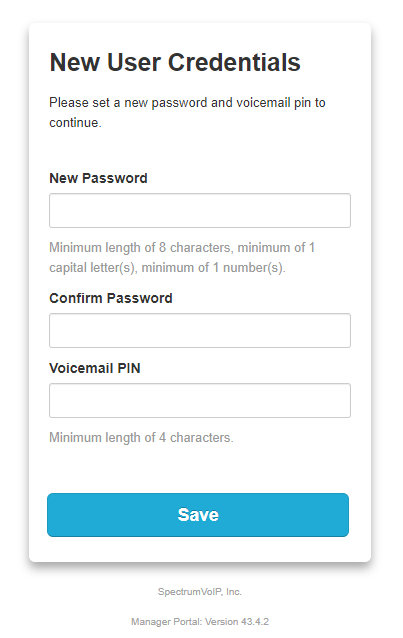
After clicking the Save button, you will be taken to the Log In page where you can use your new Login Name and Password to log into the Stratus web portal.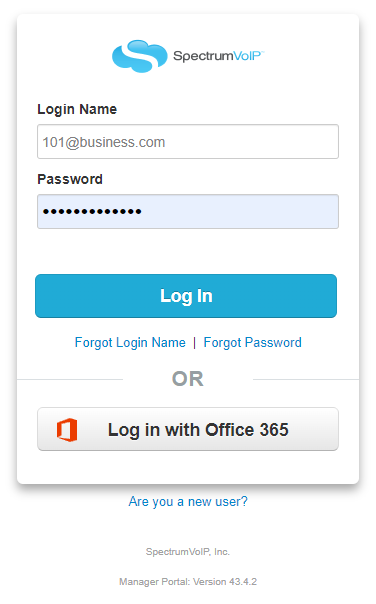
Get Logged In
- Visit www.stratus.spectrumvoip.com.
✓ Visiting this link will pull up Stratus' Login page:
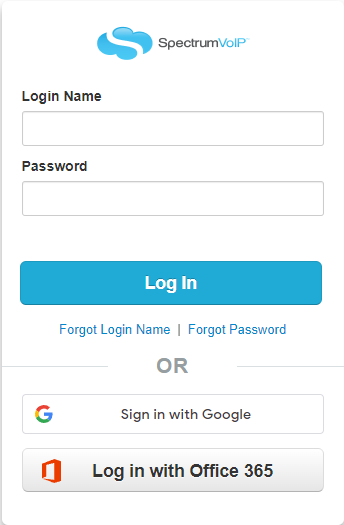
- In the Login Name box, type your login name.
- In the Password box, type your password.
- Click Log In.
Login Help
If you have forgotten your login name or password for the Stratus web portal, the Login page offers two links for requesting emails to remember a login name or reset a password.
Request Your Login Name
To find out the login name to use for logging into Stratus…
1. Click on the Forgot Login Name link.
2. In the Forgot Login Name menu, type your email address in the Email box.
3. If known, type nsion number in the nsion field.
4. Click the Send button.
✓ Clicking Send should send out an email with the login name:
Reset Your Password
To reset a forgotten password to get logged in again…
1. Click on the Forgot Password link.
2. On the Forgot Password menu, type your login name in the Login Name box.
3. Click the Send button.
✓ Clicking Send should send out a password recovery email that looks similar to this:
4. In the password recovery email, click the Reset Password button and follow the prompts.
Your Profile Settings
As a Stratus user, you can update any of your Stratus account's Profile information.
This information includes…
- Your basic account information that includes your first and last name, time zone, and directory preferences.
- Your Caller ID information.
- Your account security information.
- Your voicemail PIN.
To view and update these settings and information, click your name and select Profile.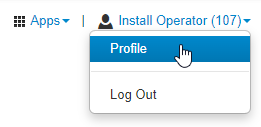
Doing so will pull up the Profile menu where this information can be referenced and adjusted.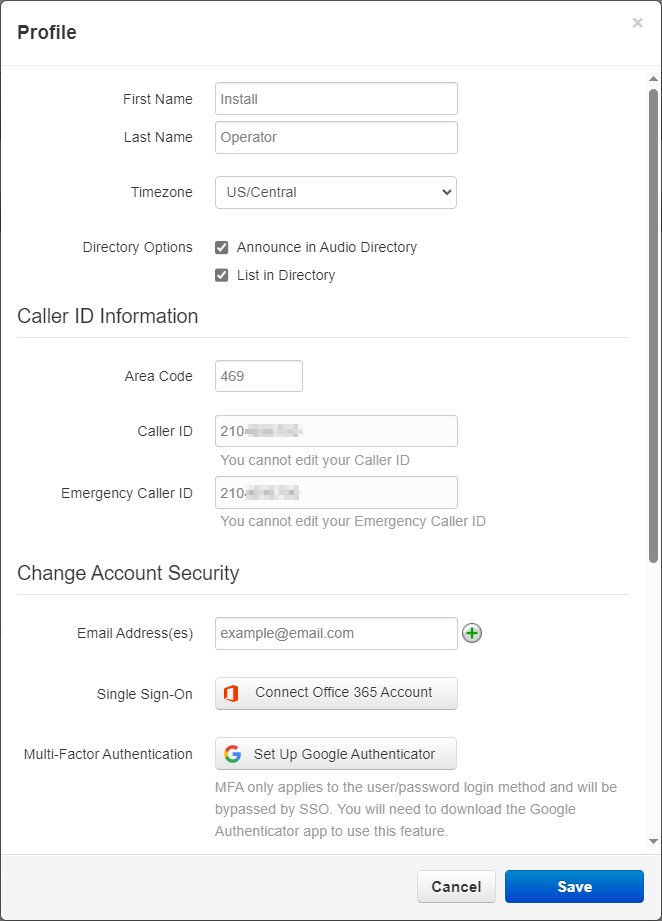
Basic Account Information
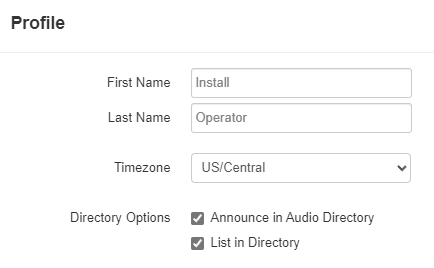
In the first section of the Profile menu, you can adjust the following settings and information:
| Field | Description |
|---|---|
| First Name and Last Name | Choose the first and last name to be shown in contacts for yourself. |
| Timezone | Select your local time zone that will be used for the time shown on your SpectrumVoIP desk phone, |
|
Directory Options |
• Announce in Audio Directory - Select this to have your name searchable in a dial-by-name directory. • List in Directory - Select this to have yourself visible in the contacts of other users. This includes the Directory feature of other user's desk phones. |
Caller ID Information
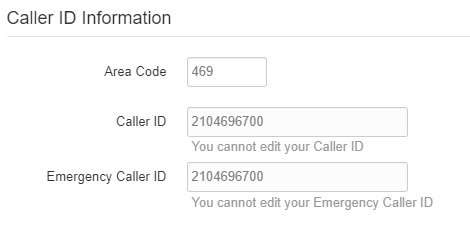
You can use the Caller ID Information section to adjust the area code you use for local 7-digit dialing and view the phone numbers used for your caller ID for outbound and emergency calls.
| Field | Description |
|---|---|
| Area Code | This is the area code that you may prefer for local 7-digit dialing. If you dial the last 7 digits of a phone number, this area code will be used automatically. |
| Caller ID |
For outbound calls, this is the phone number that recipients will see. Note: If you would like this caller ID number changed, please contact an admin for your account or our support team. |
| Emergency Caller ID | When 9-1-1 is dialed, the emergency dispatcher that handles the emergency call will see this phone number and your address information that our team has registered to it. |
NOTE: If your office's address changes, please contact our team to have the address tied to your phone number updated.
Account Security Information (Email, Password, and SSO)
In the Change Account Security section, you can update your email address(es), set up Single Sign-On (SSO) and Multi-Factor Authentication (MFA) sign in options, and change your password for Stratus.

| Field | Description |
|---|---|
| Email Address(es) | This is the email address that will receive any email notifications for things like voicemail notifications, password resets, etc.. To add more email addresses, click the Add another email |
| MFA Methods: • Single Sign-On - Office365 • Multi-Factor Authentication - Google |
If Single Sign-On has been enabled for your business, you can link either your Office 365 or Google account to your Stratus account to make logging in more convenient. |
| Change Password: • New Password • Confirm New Password • Current Password |
If needed, you can update the password you use to log into the Stratus web portal. It is recommended to occasionally update your passwords to ensure your account stays safe. |
Voicemail PIN
In the Change Voicemail PIN section, you can use the New PIN box to type a new, 4-digit PIN.

WARNING: Avoid using 1234 or 0000 as a PIN.
Voicemail
When there is not a phone or app available to use for checking your voicemail, the Stratus web portal can be used instead. Some users may find using the Stratus portal to be a convenient alternative to having to traditionally call in and listen to their mailbox's voice menu.
There are two places to check and manage the messages left in a mailbox: the Home page and the Messages page.
Quick Voicemail Access on the Home Page
On the Home page, use the NEW VOICEMAIL MESSAGES section to quickly listen to and manage your voicemails: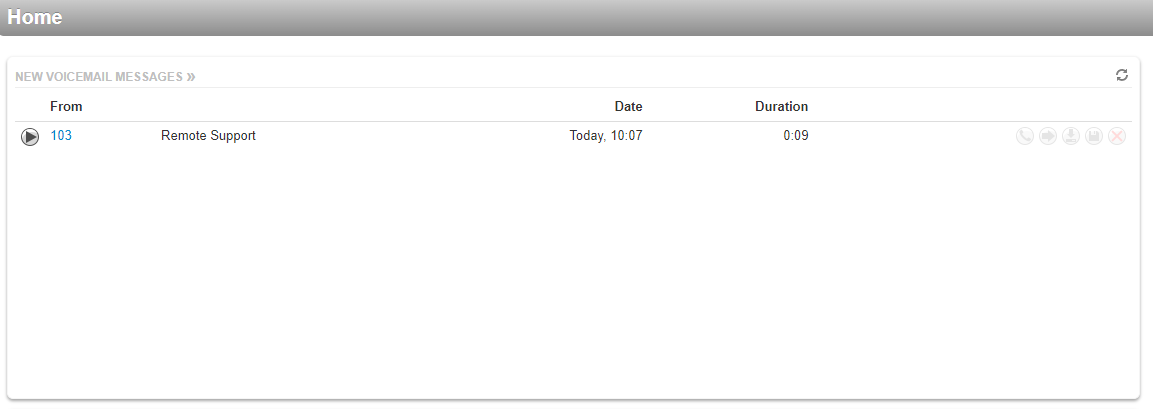
- To listen to a message, click the Play icon
 .
. - You can use the icons on the right to interact with the message further:

- To look at saved or trashed voicemails, you will need to go to the Messages page.
- You can click NEW VOICEMAIL MESSAGES to efficiently navigate to the Messages page.

- You can click NEW VOICEMAIL MESSAGES to efficiently navigate to the Messages page.
The Messages Page
In addition to the NEW VOICEMAIL MESSAGES section of the Home page, Stratus offers a dedicated Voicemail menu on the Messages page. Unlike the Home page's menu, the Messages page allows users to look at saved and deleted voice messages.
To use this menu…
- Visit the Messages page.

Quick Tip: If you are a Stratus admin, you can view your own voicemails by clicking your name and selecting Messages.

- In the Messages menu, use the Voicemail tab to view and control the mailbox's voicemails.

- Use the Filter drop-down to view either New, Saved, or Trashed voicemail messages.

- To listen to a message, click the Play icon
 .
. - Use the icons on the right to organize the message.

Manage Your Mailbox
When you are checking your mailbox, there are several options available for controlling what happens to the messages inside.
Play a Voicemail Through a Call
If audio speakers are not able to be used, voicemails can be listened to by using the Call to Play function. 
To use this feature, click the Call to Play icon  to have a call sent to your extension's phone.
Note: While the system is ringing your phone, a notification will be displayed:
When you answer the call on the phone, the voicemail's audio will be played before the call is automatically hung up.
Forward a Voicemail Elsewhere
If another user should handle the voicemail, the message can be forwarded using the Forward function.
To forward a voicemail message to another coworker…
1. Click the Forward icon  .
.
2. Use the pop-up that appears to type in the name or extension of the other user.
3. Click the Forward  button.
✔ Once the Forward button is clicked, there will be a notification saying the forwarding is complete:
Download a Voicemail
If a certain voicemail needs to be downloaded for any reason, you can easily do so using the Download function:
✔ When the Download icon is clicked, a .wav audio file of the message will be downloaded to your PC. 
Save a Voicemail
As a way to organize your mailbox, you can Save specific messages to have them stored in a separate folder of the mailbox.
When the Save icon  is clicked, that message is sent to the Saved folder.
Check a Saved Voicemail
To listen to a Saved message, use the Messages drop-down to select the Saved folder.
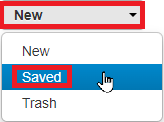
✔ From the Saved folder, saved messages can be played, forwarded, downloaded, or deleted. 
Delete Voice Messages
To declutter your mailbox, you can use the Delete function. 
When the Delete icon  is clicked, that message is sent to the Trash folder of the mailbox.
Check a Deleted Voicemail
To see a message before it is deleted, use the Messages drop-down to select the Trash folder.
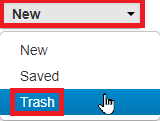
✔ From the Trash folder, deleted messages can be played, forwarded, downloaded, or saved.
Contacts
To access and reference your contacts, visit the Contacts page.
From here, you can reference your contacts as needed.
You can also use Stratus' Contacts popup menu to view and contact your Contacts.
Pop-Out Your Contacts
Your contacts can be shown in their own window for easy viewing.
To pop your contacts out into their own window, click the Popout button.
Doing so will show the Contacts window where you can reference your contacts and place calls to them as needed.
Using the Filter drop-down, you can select specific groups of contacts to view.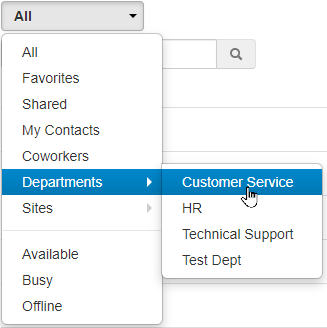
You can also use the search bar to find a specific contact.
Create and Import Contacts
On the Contacts page of Stratus, you can add more contacts in two different ways:
Add Contacts Individually
The Contacts page offers you the ability to individually add contacts using the Add Contact modal.
To create contacts in this way…
1. Click the Add Contact button.
2. In the Add Contact modal, fill in the person's information to be stored in the contact.
3. Once you are done, click the Save button.
Import a Spreadsheet of Multiple Contacts
In the Contacts page, you can avoid having to add contacts one-by-one by importing a spreadsheet instead.
1. To begin, it is recommended to export a spreadsheet of your contacts to use as a template to fill out.
2. Once you have a template to use, fill in the fields with each person's information like so:
3. When your spreadsheet has been filled out or adjusted, click File → Save as to save the file with a unique name in your PC.
4. Once your spreadsheet is saved on your PC, click the Import button on the Contacts page.
5. In the Import Contacts modal, click the Browse button and select the spreadsheet to be uploaded.
6. Click the Import button.
Manage Your Contacts
If you have created contacts for yourself, you can use the Contacts page to view and edit them at any time.
NOTE: Any Shared Contacts that were created by your Stratus admin will not be able to be edited. Only contacts that you have created can be adjusted.
You can view your own contacts by using the My Contacts filter.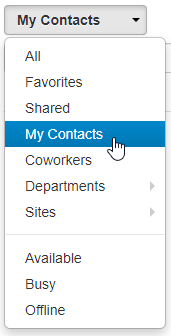
Edit a Contact
When you need to update the information in a contact you created, you can do so at any time.
To do this…
1. Click the Edit  icon next to a contact you have created.
Quick Tip: You can only edit contacts that you have created, which can be found quickly using the My Contacts filter option.

2. Use the Edit Contact menu to adjust the contact's information.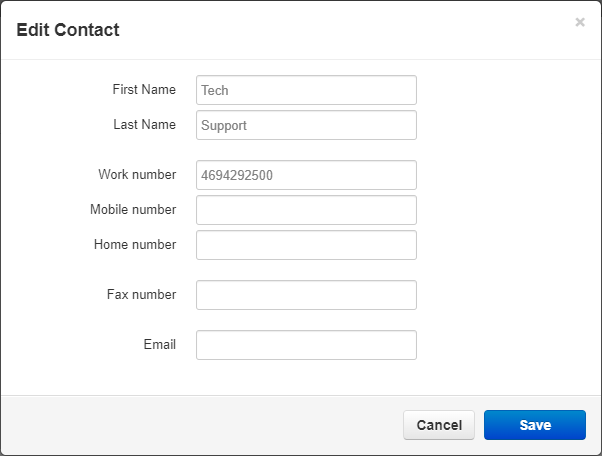
3. Once completed, click the Save button.
Favorite a Contact
You can add one of your created contacts to your Favorites by hovering over the contact and clicking the light gray Star  icon that appears.
You can view your favorite contacts in one place using the Favorites filter.
Export a Spreadsheet of Your Contacts
You may find it useful to have a spreadsheet containing all of your contacts for reference and record-keeping purposes.
To export a spreadsheet of your contacts…
1. On the Contacts page, click the Export button.
2. In the Export Contacts modal, use the Contacts to export drop-down to select which contacts to include in the spreadsheet.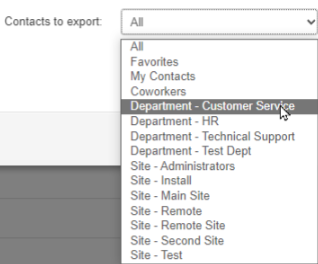
3. Use the Export format drop-down to select the format of the spreadsheet to be downloaded.
4. Click the Export button.
✔ Doing so will download the spreadsheet to your PC.

This spreadsheet can be viewed and printed from your PC. It can also be modified and imported in the future.
Time Frames - Schedule Call Routing
When you are setting up routing for yourself, you will notice that answering rules require a time frame to be created. A time frame determines when an answering rule should be active.
To create a time frame to use for routing and forwarding…
- Navigate to the Time Frames page.

- Click the Add Time Frame button.

- In the Add a Time Frame menu, fill in the following information:

-
Name - Type in a unique name for this time frame.

-
When - Select the type of time frame to be created.

Use the Module below to explore the selectable options for When:Always
If the time frame should be active until it is disabled, select Always.
✔ This option is commonly used for call forwarding that will be enabled for an undetermined length of time, such a forwarding for work leave, emergencies, or an outage.
Days of the Week
Select Days of the Week if the time frame will be active on a recurring basis (same time and day every week).

✔ This option is commonly used for scheduling Lunches.
To add a break in the time that the time frame is active on a certain day, click the Add range
 icon.
icon.
Click Copy to All to have this time range added to the other selected days.

Specific Dates
Select Specific Dates to schedule routing during special date(s) and times that may or may not recur, such as Meetings, Conferences, etc.
In the Specific dates section, select the date(s) and times the time frame will be active for and click the Add button.


If the date(s) will be recurring, use the Recurrence dropdown to select when this time frame should automatically be active in the future.

Quick Tip: If you have set this time frame to recur, you can use the Ends option to set a date that this time frame will stop following the Recurrence option.

Holidays
With the Holidays option, you can select commonly celebrated holidays from different regions that you would like to forward or reject calls for.

Use the search bar to find and select a holiday.
Use the dropdown filters to look for holidays observed in specific regions.

Select the range of time that this time frame will be active for, such as your business hours.

To remove a holiday, click the Delete
 icon.
icon.
If needed, use the Recurrence dropdown to select whether or not these holidays will be observed yearly.

Quick Tip: If you set these holidays to recur, you can use the Ends option to set a date that this time frame should stop following the Recurrence option.

Custom
Create custom time routing that combines days of the week, specific dates, and holidays all together to suit any time routing need.

-
Name - Type in a unique name for this time frame.
- Click the Save button.

- To add more time frames, repeat steps 3-5
✔ You should now have a list of time frames that you can use.

You can now select that owned time frame while creating an answering rule.

Note: To learn how you can use these time frames to create Answering Rules to route calls, check out this article.
Answering Rules - Route and Forward Calls
Once Time Frames have been created, call routing and forwarding can be set up using Answering Rules. As a basic Stratus user, you can create your own Answering Rules that will determine where a call should be routed/forwarded when a time frame is active.
Quick Tip: When no answering rules are in effect, calls will ring your extension by default. This means that answering rules do not technically need to be set up in order for your phone to ring.
To look at your answering rules, you can visit the Answering Rules page.

On the Answering Rules page, you can…
- Create and edit answering rules.
- View and adjust your Default answering rule.
- Adjust how long calls will ring.
- Allow/block phone numbers from contacting you.
Add an Answering Rule
Creating additional answering rules allows you to specify where calls should go for different scenarios and events (e.g., separate call routing for weekends).
To create an answering rule that routes your calls during a specific time frame…
- Click the Add Rule button.

✔ The Add an Answering Rule modal will appear.

- Use the Time Frame drop-down to select a time frame.

Quick Tip: A Time Frame is required in order for an answering rule to be created.
To learn more about creating time frames, check out this article.
- If this answering rule should not yet be active, uncheck the Enabled box to disable this rule.

- If necessary, select Do not disturb to send all calls to your voicemail when this answering rule is active.

- If needed, select Call screening to have callers say their name when they call to allow the call to be screened when answered.

- If calls should be forwarded elsewhere for this answering rule, use the Call Forwarding section to select when and where calls should be sent:
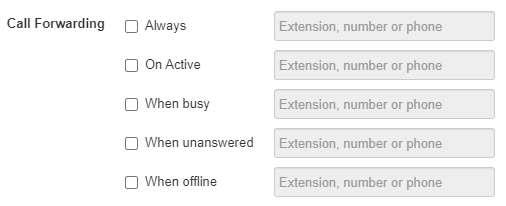
Call Forwarding Options
• Always - immediately forward calls to the number specified in the text field. No other forward rules will be followed.
• On Active - forward calls to the destination if the user's phone is already on a call.
• When busy - will forward calls to the destination if the reject button is pressed on an incoming call.
• When unanswered - forward calls to the number specified in the text field if the call is not answered after the specified ring timeout.
• When offline - automatically forward calls to the number specified in the text field when no devices are registered. This means that no devices, physical or virtual, are registered to Stratus. (for example, during a power outage).Destination Options for Forwarding
When the destination field is being filled with text, Stratus will show possible destinations based on the input.

Possible destination types:
• User - Forward calls to the user at the specified extension and follow their answering rules.
• Phone - Bypass the user's answering rules and forward calls to the device associated with the specified user.
•ail - Forward calls to voicemail at the specified extension.
• Queue - Forward calls to a call queue associated with that extension.
•dant - Forward calls to the auto-attendant associated with this user.
• Off-Net Number - Forward calls to a 10-digit Phone Number, such as a cellphone or answering service. - If multiple phones you own should ring for this answering rule, use the Simultaneous ring checkbox and its other options to fine-tune how these phones ring:

Simultaneous Ring Options
• Include user’s extension- Select this to ring the phone that uses your extension number.
• Ring all user’s phones - Ring all of your registered devices at the same time (i.e., mobile apps, softphones, and desk phones).
• Answer confirmation for Offnet Numbers - When conducting a simring to a cell/landline, this feature ensures that the answering party is a person instead of voicemail by requesting the answering agent to press 1 to accept the call.
• In the field for entering an extension, number, or phone, you can enter the extension or phone number of another telephone you want to ring.
• Click the Clock button to specify a ring delay. A ring delay allows you to enter the amount of time before the call rings at the destination.
• To add additional phones to the simring, click the Add icon.
icon. - To only ring your main phone that has your extension, select Just ring user’s extension.
- Once the answering rule has been configured, click the Save button.

The Default Answering Rule
The Default answering rule is an answering rule that is created each time a user is created. By default, this rule is usually set to Simultaneously ring all of the user's registered devices.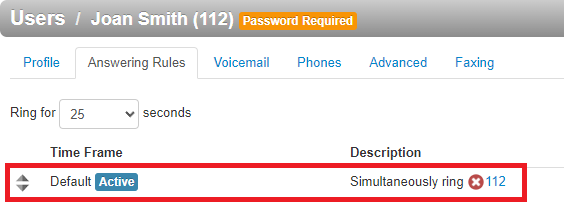
The Default answering rule acts as a “catch all” and stays active 24/7 unless there are answering rules above it that are active. Since this rule exists by default and is constantly active, it is usually used for routing After Hours calls, especially if there is a business hours answering rule that has been created.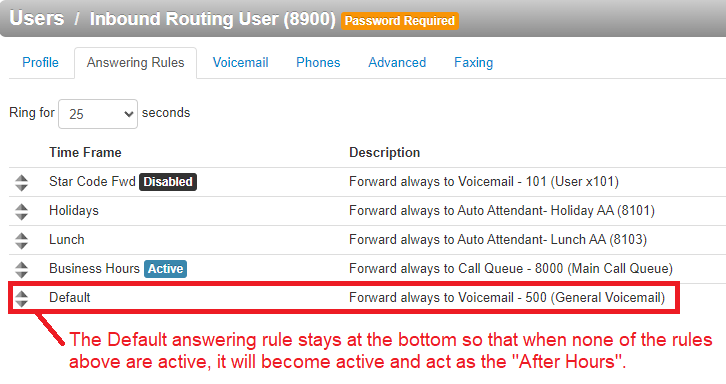
By clicking the Edit  icon next to the Default answering rule, you can adjust the destination for calls that are received while the Default answering rule is active.
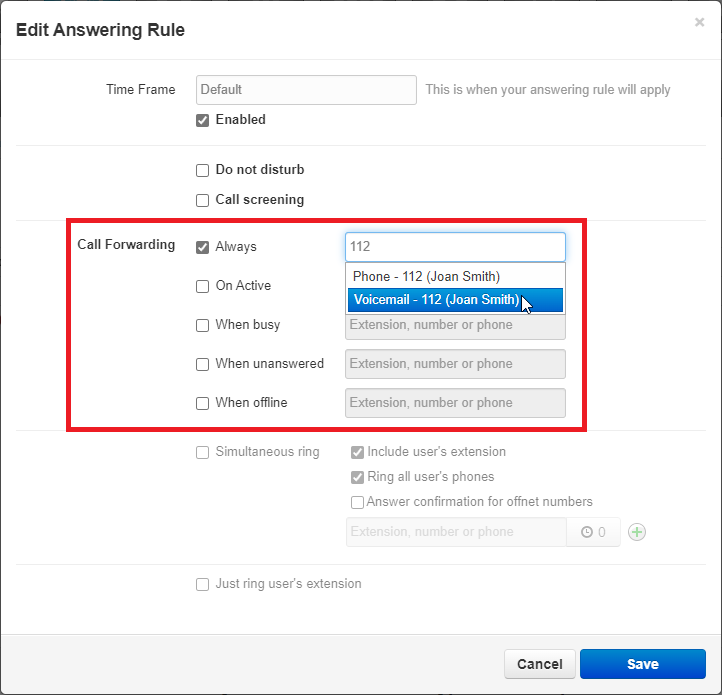
This can be useful to do when you have added more answering rules for things such as your business hours or lunch. 
The Active Answering Rule
You can have multiple answering rules, but only one rule can be active at a time. The active rule is the top-most rule with an active time frame. This can be seen with an Active tag next to the active answering rule.

Best practices dictate that you order answering rules according to how specific they are and their priority, with the highest priority time frames (for example, Temporary Forwards and Holidays) at the top. The default time frame can be used as a ‘catch all’ or ‘after hours’ timeframe if other timeframes are applied.
For example…
Assume today is Monday, July 4th. In this example, the Holidays and Open time frames could match the time and date conditions for July 4th. If Holidays is the first rule, however, it becomes the active rule. But if My Business Hours is the first rule, My Business Hours becomes the active rule.
Reprioritize Answering Rules
To adjust the order, or priority, of your answering rules…
1. In the Answering Rules page, find the rule you want to adjust the priority for.
2. On the left side of an answering rule, hover the mouse over the up/down arrows for that rule.
3. Click and drag the answering rule to where it should be in the list.
✔ A message should appear letting you know that the answering rules have been reprioritized before prompting you to click Save like so:

4. Click the Save button.
Ring Time Adjustment
The Ring Time can be adjusted using the drop-down menu. This is the amount of time that your phone(s) will ring for on an incoming call.

NOTE: The Ring Time does not affect the ring time of calls that reach you through a call queue.
This can be adjusted in the Call Queue's settings by a Call Center Supervisor, Site Manager, or Office Manager.
Ring Time Options
• 5 second intervals from 5 to 90 seconds
• 30 second intervals from 90 to 300 seconds
• 1200 seconds
• Unlimited
Block Phone Numbers
Using your Stratus web portal, you can block and allow calls from different phone numbers to help mitigate spam or other malicious calls.
Blocking phone numbers can be done in two places:
-
The Call History page using the Block
 icon and the Blocked Numbers menu.
 - The Allow / Block menu that you can access while viewing a user's Answering Rules.
Block Numbers in the Call History Page
With the Stratus v42 update, you can use the Block ![]() icon and the Blocked Numbers menu on the Call History page to block phone numbers from calling you. Use the module below to explore the different ways you can block numbers from the Call History page.
icon and the Blocked Numbers menu on the Call History page to block phone numbers from calling you. Use the module below to explore the different ways you can block numbers from the Call History page.
Block a Recent Caller
If you have recently spoken to someone that you need to block, you can block their phone number using the Block ![]() icon found on their call log.
icon found on their call log.
1. Filter and scroll to find the call of the person that needs to be blocked and click the Block ![]() icon.
icon.
2. On the confirmation message, click the Yes button.
✔ You will now see a Blocked number icon next to the phone number in your Call History page.
For any future calls you receive from the blocked number, the call will automatically be rejected, and a Blocked tag will appear in the Duration column for that call.![]()
Block Multiple Numbers
With the Stratus v42 update, there is now a new Blocked Numbers tool that can be used to block malicious phone numbers.
1. Click the Blocked Numbers button. ![]()
2. In the Blocked Numbers menu, type the phone number that needs to be blocked. 
3. Click the Add button to add this phone number to your Blocked Numbers list. ![]()

✔ You should see a confirmation message that the phone number was added to the list.![]()
You should also see the phone number listed alongside any other blocked numbers. 
4. Repeat steps 2 and 3 for additional phone numbers that need to be blocked.
✔ Now if you receive calls from the phone numbers you have blocked, the calls will automatically be rejected, and a Blocked tag will appear in the Duration column for those calls.
![]()
Import a Spreadsheet
If you have a list of phone numbers that should be blocked, you can download and fill in a spreadsheet of those numbers. This spreadsheet can be imported so that the list of phone numbers gets added all at once.
1. Click the Blocked Numbers button. ![]()
2. In the Blocked Numbers menu, click the Import button. ![]()
3. In the Import From File menu, click the Download Template button. 
✔ You should see a .CSV spreadsheet download through your browser.

4. Open the downloaded template spreadsheet.
5. Type a phone number into the cells of column A.
6. When you have typed in your phone numbers, save the spreadsheet by pressing CTRL + S or clicking the Save icon.
7. Back in the Import From File menu, click the Browse button and select the updated template.
8. Click the Upload button. ![]()

✔ You should see a confirmation message that tells you how many blocked phone numbers were imported. It will also state if any of the phone numbers were duplicates.![]()
You should also see the phone numbers from the spreadsheet listed in the Blocked Numbers menu.
Now if you receive any calls from the phone numbers you have blocked, the calls will automatically be rejected, and a Blocked tag will appear in the Duration column for those calls![]()
Unblock a Phone Number
If you have added a phone number to your Call History's Blocked Number list, you can remove it at any time. Removing a phone number from the Blocked Number list will unblock that caller so that you and your users can start receiving calls from that phone number again.
To unblock a blocked number…
- On the Call History page, click the Blocked Numbers button.

- In the Blocked Numbers menu, click the Delete icon next to the phone number that needs to be unblocked.

Quick Tip: Alternatively, you can click the Unblock
 icon next to the log of a recently received call from a blocked phone number.
✔ You should see a confirmation message that the phone number has been removed from the Blocked Numbers list.

- Repeat step 2 for each phone number that needs to be unblocked.
The Allow / Block Tool
In the Answering Rules of your Inbound Routing Users and regular users, you can click the Allow / Block button to control whether or not the user receives calls from certain phone numbers.
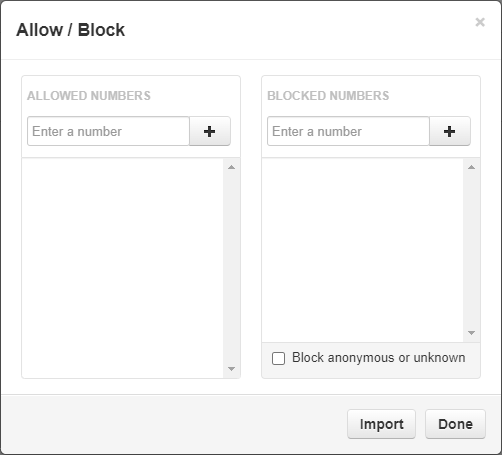
Quick Tip: There is a SPAM CALLS section that can be shown in the Allow / Block tool.
To have this feature enabled and shown, please contact our technical support team.
Block Callers
If you are having issues with malicious, spam, and/or robo callers and you know their phone numbers, you can block those phone numbers from calling back in.
To do so…
1. In the BLOCKED NUMBERS section, type in the phone number and click the Add button. 
✓ Clicking Add will make that number appear in the BLOCKED NUMBERS list:
2. If needed, click Remove to delete that phone number from the list.
3. Add more phone numbers to the list if needed.
4. Select Block anonymous or unknown to block all unknown callers if necessary.
5. Click the Done button to save the changes made to the block list. 
Allow Callers
If you have previously blocked a phone number from calling and need to re-allow that number to call in, you can allow the phone number to be routed again.
To do so…
1. In the ALLOWED NUMBERS section, type in the phone number and click the Add button.
✓ Clicking Add will make that number appear in the BLOCKED NUMBERS list: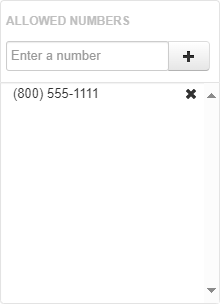
2. If needed, click Remove to delete that phone number from the list.
3. Add more phone numbers to the list as needed.
4. Click the Done button to save the changes made.
Call History
On the Call History page, you can view the calls you have recently received and placed.

The information shown in the chart includes the following:
| Column Name | Description |
|---|---|
| Type of Call |
• Inbound -  • Outbound - • Missed or Blocked - 
|
| Number |
• Inbound calls - The phone number or extension number that placed a call to you. • Outbound calls - The phone number or extension number that was dialed. |
| Name |
If the person is… • An existing contact, their contact's name will be displayed. |
| Date | The date the call was placed/received. |
| Duration | The time elapsed (minutes:seconds) during a call. If a phone number has been blocked, this column will show a Blocked tag instead. 
|
| Topics |
If call recording w/ transcription is enabled for your account, you can view the top 3 topics that was discussed in the call based off of the analysis of the call's recording.
|
|
Quick Links
|
• Block / Unblock - Block a phone number that has called you. • Add Contact / Edit Contact - Either add this person to your Contacts or edit your existing contact for this person. • Download - If call recording has been enabled, download the call's recording to your PC. • Listen - If the call was recorded, open an audio player on screen to listen to the recording. • Add Notes - Add disposition notes to the call. |
Find a Specific Call
Using the Filters button, you can filter your call history and view only the events of interest to you.
-
In the Call History page, click the Filters button.
✔ Doing so will make the Call History Filters modal appear.

- Complete the fields using this table:
| Option | Description |
|---|---|
|
Date Range (From and To) |
Select the From and To dates for the events you want to view. The maximum From-To range is 31 days. The furthest back you can search within the Stratus Web Portal's Call History is 6 months. To view call data records from beyond 6 months, you can access the CDR Archives. |
| Caller Number | Enter the caller number you want to view |
| Dialed Number | Enter the dialed number you want to view |
| Call Type | Enter the type of call you want to view. Choices are: • Inbound • Outbound • Missed • Ext to Ext |
-
Click Set Filters.
✔ The Call History page will update to only show entries that match your criteria.
If no events match your criteria, a message will inform you that there are no matches to your
filter.
Export Your Call History
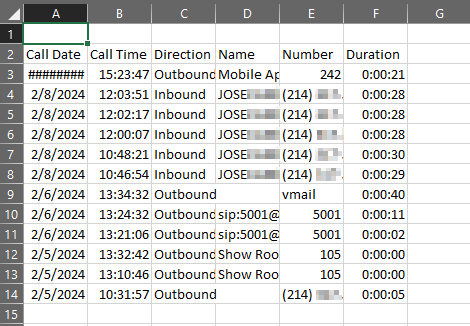
You can export the call history as a spreadsheet in a CSV format. From there, you can open the information in Microsoft Excel or a different spreadsheet software for further manipulation.
To export the call history logs shown, click the Export button.
✔ Once the spreadsheet is downloaded, you can open, view, and edit the spreadsheet as needed.
Phones
On the Phones page, you can view your registered devices and their information.

The information on this page that you may find useful include…
- Your phone's registration status.
- Your phone's model.
- The IP address of your phone.
- Your phone's unique MAC address.
✔ Checking this information can be helpful if you ever need to contact our technical support team regarding any technical issues affecting your phone.
Edit Your Phone's Buttons
On the Phones page, you can access and use the Phone Manager tool to edit the layout of each phone.
- On the Phones page, click the Phone Manager
 icon next to the phone you wish to edit.
 - On the Confirmation message, click the Yes button to use the Phone Manager tool.

✔ Doing this will pull up the Phone Manager page when you can view your phone's configuration.
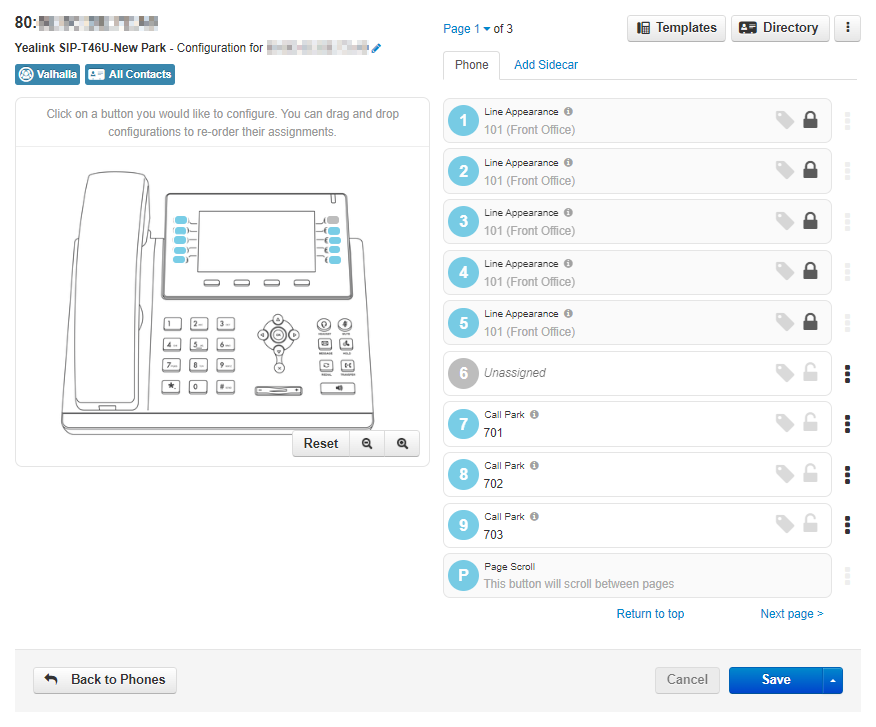
- Click a numbered spot where you would like a button, select a feature for the button, and fill in its information.
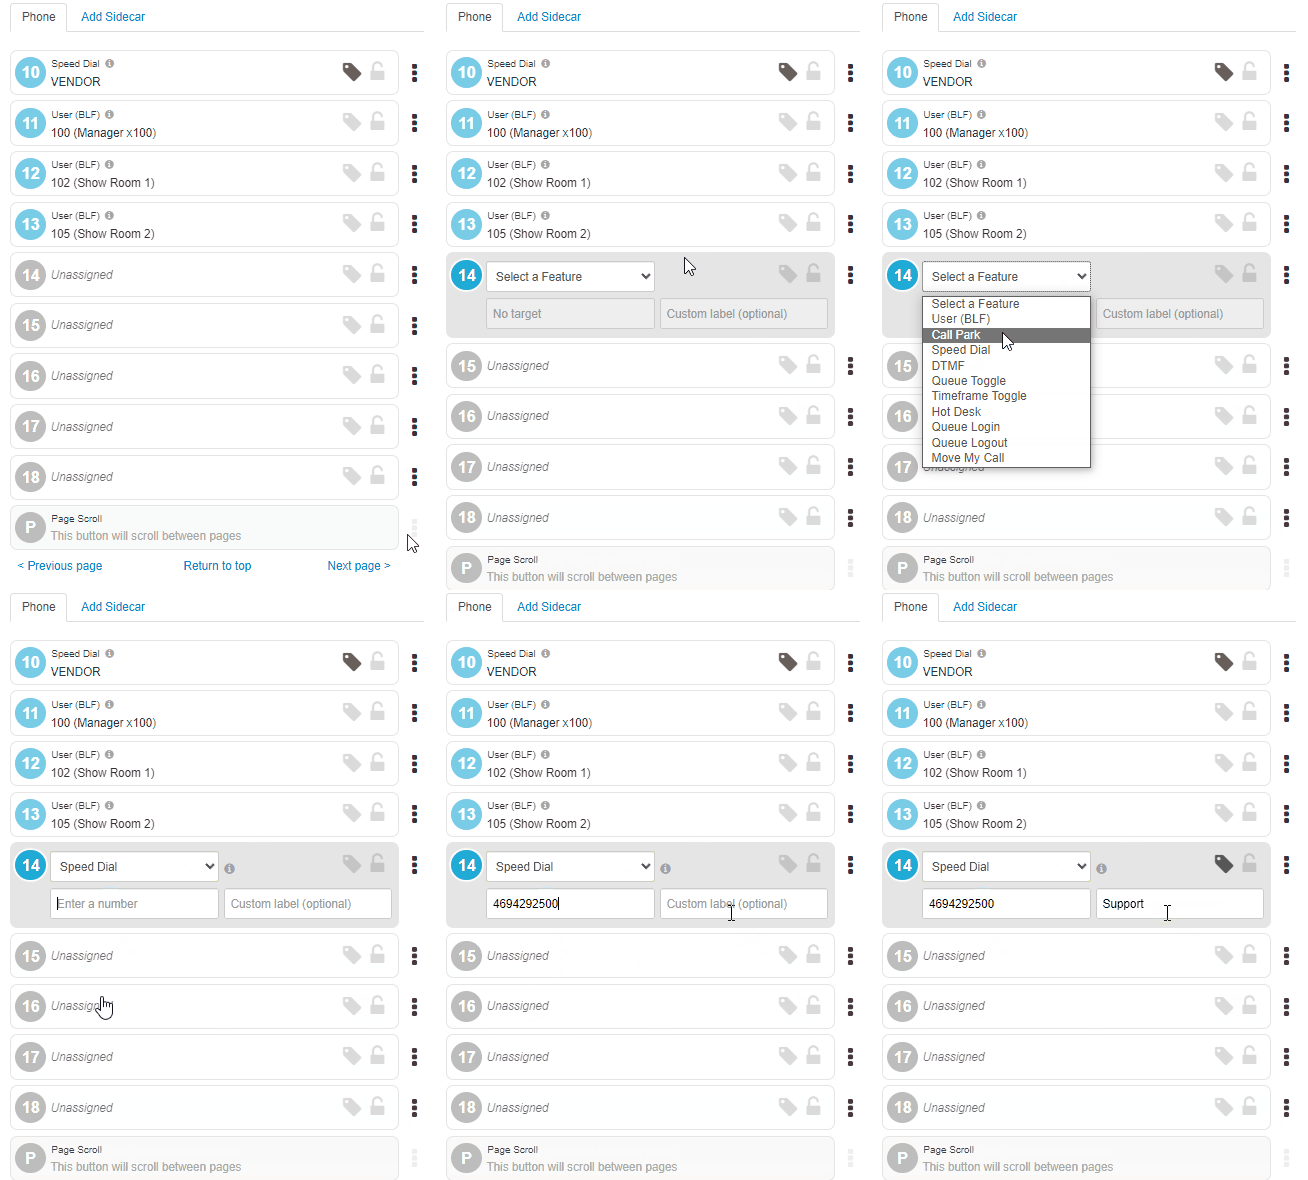
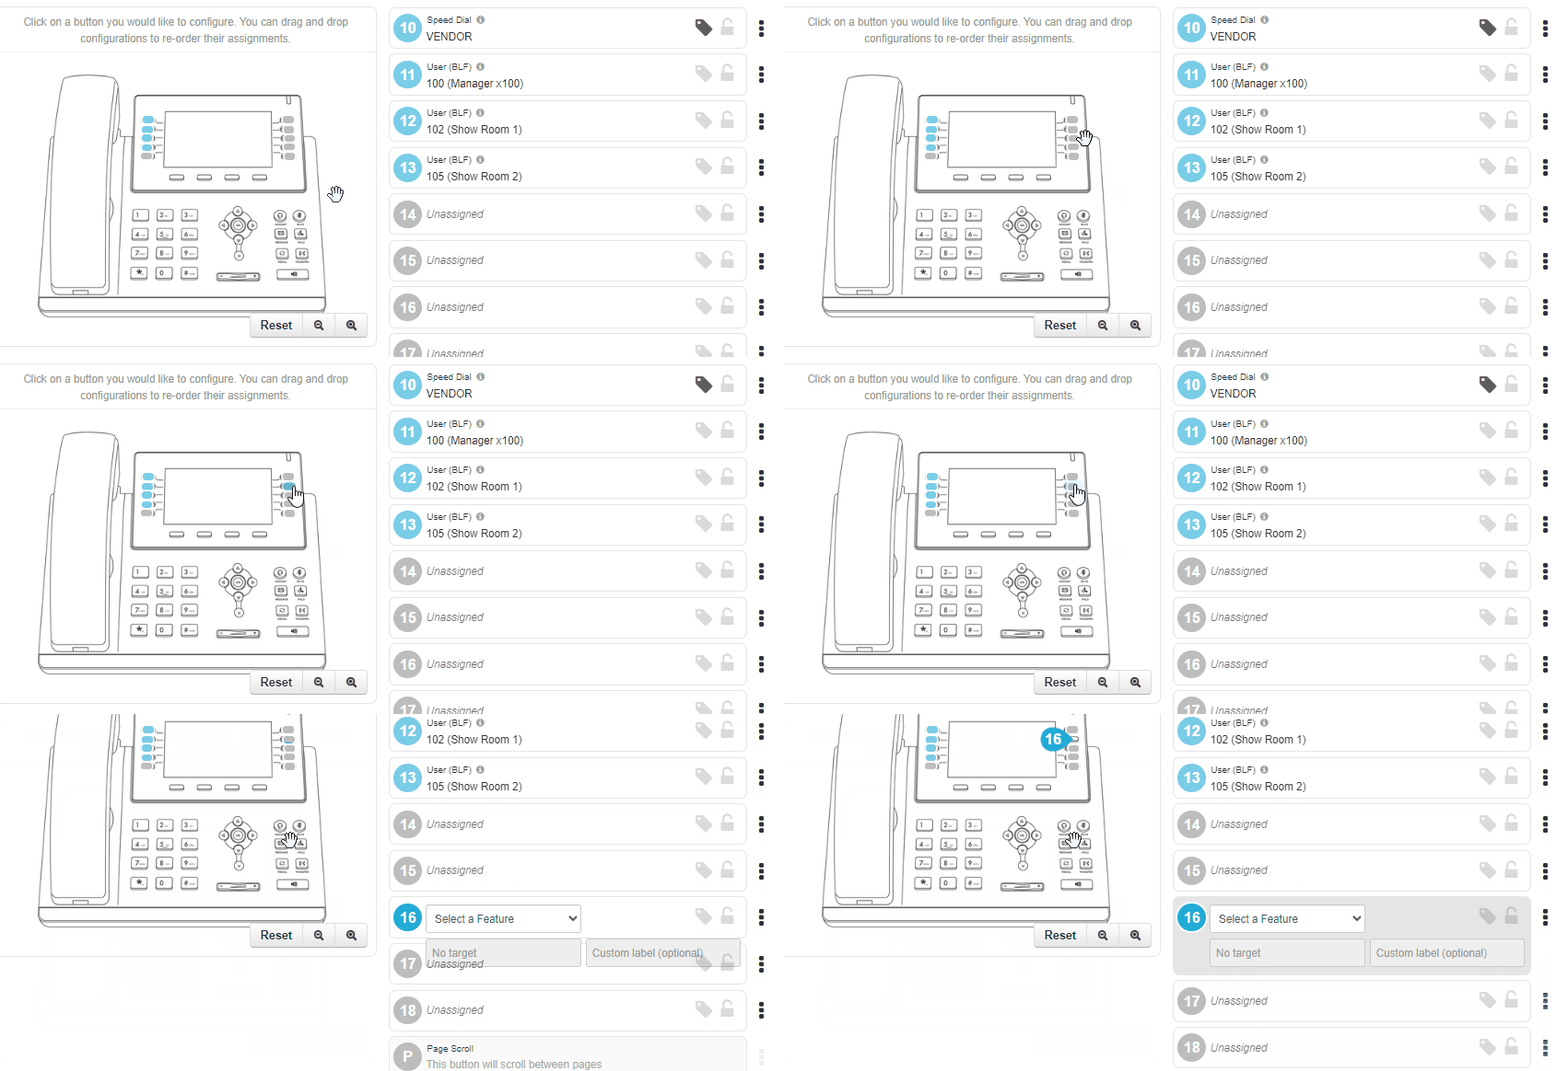
Quick Tip: You can click the buttons on the photo of your phone to quickly select that button on the menu to the right.
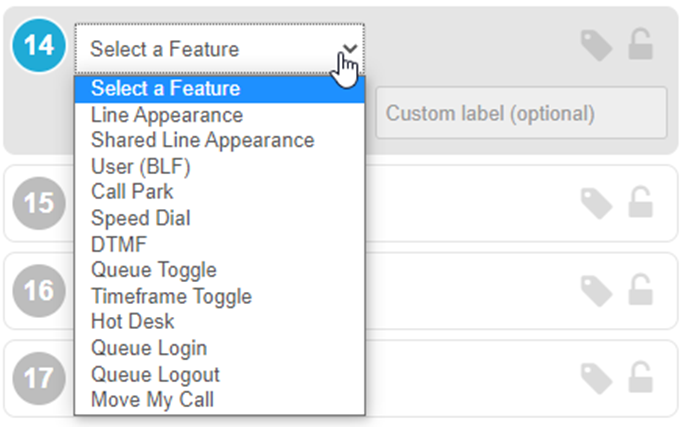
Features to Add to Buttons
As you are editing the layout of a phone using the Phone Manager tool, you will notice that there are different types of features that can be added to the line keys, or buttons, of a phone.
Line Appearance Keys
A Line Appearance key acts as a channel, or line, where a call can be hosted. Having multiple line appearance keys allows a phone to facilitate multiple calls at once.

✔ It is recommended to have at least two or three line appearance keys to allow your phone to perform transfers and conferencing.
Line appearance keys can be seen as the multiple buttons that display the phone's extension number. These line keys are usually located on the left side of page 1 on a phone's screen.
Shared Line Appearance (SLA) Keys
A Shared Line Appearance key allows two or more phones to share a line that uses the information of a certain extension number.

✔ Any phones that have a shared line appearance key of a certain extension can pick up and handle calls for that extension.
To make calls as the extension of a shared line, press the shared line appearance key and then dial the number to be called.
User (BLF) Keys
A User (BLF) key acts a speed dial for internal users that can be pressed to quickly call another user. This key can also be pressed during a transfer to easily send the call to someone else without the need to dial that person's extension number.

BLF stands for Busy Lamp Field, which is a function that allows the presence of someone or something to be indicated.
A user (BLF) key uses this function in the form of the light on its button which changes colors to indicate a user's status.Light
Status of User
Green User is available to take a call. Red User is currently busy or on DND (Do Not Disturb). No Light User is currently unavailable. Their phone may be disconnected or not receiving service. Call Park Keys
A Call Park key is used to transfer callers to a specific park queue. These park queues are a special type of call queue that act as unified holding pools where calls can be parked and picked up from.

Quick Tip: Your account can have as many call parks added as necessary. Many organizations set up three park queues for each of their departments.
To have more park queues added, feel free to contact our technical support team, or follow this guide to add more park queues.
Phones that share the same call park keys will be able to see a light that indicates the status of the park queue.
Color of Light
Status of Park Queue
Green
The call park is empty. Red
The call park is occupied. The key can be pressed to pick up a parked call. To park an active call, you can either…
• Press the call park key of the park queue you wish to transfer the call to.
• Press Transfer and then dial the extension number of the specific park queue.
• To dynamically park the call, dial *** during the call.To pick up a parked call, you can either…
• Press the call park key that is showing as occupied (red light).
• Dial the extension number of a park queue that is holding a call.Speed Dial Keys
A Speed Dial key can be used to quickly dial and transfer calls to someone. This key is commonly set up to dial the phone number of external users, such as vendors, cellphones, and more.
When setting up a speed dial, you will tell the key what exactly to dial. You can also label what the speed dial will be displayed as on the phone.

Quick Tip: Since a speed dial key dials exactly what is set during its creation, this key can be used to dial special codes such as star codes and feature codes.
To create a key that acts as a speed dial and shows the status of internal users, refer to the User (BLF) Keys section.
DTMF Keys
A DTMF key can be configured to dial a specific string of DTMF characters that prompts the phone to perform certain actions.
Although you may not set up this key yourself, you may see this type of key on your phone. For example, our team will commonly use a DTMF key to give users a button that will dial into a general voicemailbox and press *.
WARNING: DTMF keys are not supported by Cisco and Polycom phones.
Queue Toggle Keys
A Queue Toggle key allows users to quickly toggle their queue availability status between Available and Unavailable for the call queues they are set as an agent for.

If the phone supports the BLF (Busy Lamp Field) function, the user will see a light that indicates their status in their call queues.
Color of Light Status of User in Queues Green
The user is set as offline. The key can be pressed to set the user as available in their call queues. Red
The user is set as online. The key can be pressed to set the user as unavailable in their call queues. Timeframe Toggle Keys
The Timeframe Toggle key be pressed to toggle a specific time frame on and off for the phone's user.

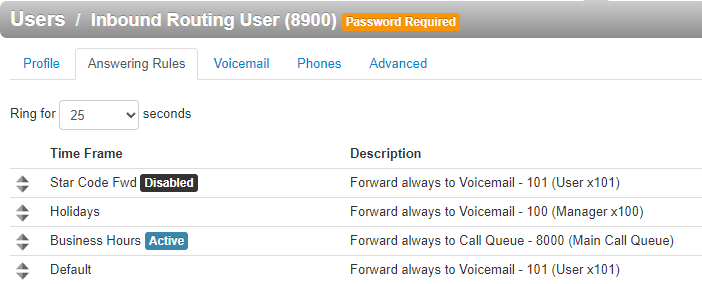
When you create a Timeframe Toggle key, you will be required to select a time frame that is being used by an answering rule set up for the phone's user or the user indicated in the Target User box.
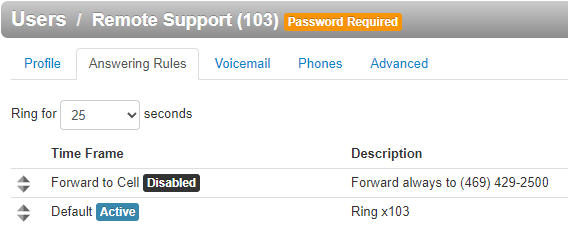

This key can be set up to forward calls for the whole business by having the Target User box set with the extension number of an inbound routing user (usually extension 8900).

WARNING: When you use this method of forwarding, the time frame box will not allow you to select a time frame. The time frame's name must be typed out.

The time frame's name must be typed exactly as seen in the answering rules to work correctly. The same spelling and capitalization used by the time frame itself must be used.
Hot Desk Keys
Hot-desking allows your users to log in and log out of a phone each time they are set to take calls. This hot-desking can be useful in call center environments where multiple people will be using different phones at different times.
Although the hot desk key can be added in Phone Manager, this key is not recommended to be used as hot-desking is configured differently depending on the phone.

✔ To have hot-desking set up for your phones, please reach out to our technical support team.
Queue Login Key
The Queue Login key can be pressed to log the phone's extension into any call queues they are set as an agent for.

✔ The user will be marked as online, or available, and start receiving calls coming from the call queues they are in.
Queue Logout Key
In contrast to the Queue Login key, the Queue Logout key can be pressed to log the phone's extension out of any call queues they are set as an agent for.

✔ The user will be marked as offline, or unavailable, and stop receiving calls coming from the call queues they are in.
Move My Call Key
The Move My Call key can be set up to allow you to easily move a call from another device registered to your extension, such as the SpectrumVoIP Stratus Mobile App or the SpectrumVoIP Desktop App, to your desk phone.

✔ Using this key can be useful when you are handling a call on your mobile app and want to move the call to your desk phone when you arrive in the office.
- If you need to remove a button, click the 3-dot
 icon and select Clear Button.
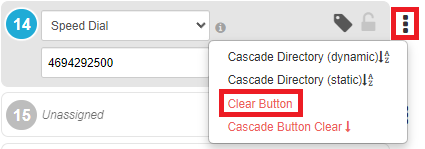
Quick Tip: Selecting Cascade Button Clear will clear that button and any buttons below that spot.
- Once you are done editing your phone's buttons, save your changes by doing one of the following:

-
Save - Save without immediately applying your changes.
Note: When your phone does its nightly update, it should apply these changes automatically.
- Save and resync - Save your changes and have your phone resync itself to apply the changes.
- Save as new template - Save this configuration as a template that you can apply to your other phones.
-
Save - Save without immediately applying your changes.
Add All Stratus Coworkers as BLF Buttons
To apply User (BLF) keys based off of the directory on the phone, select the 3-Dot  icon next to the line where the BLFs will begin, and select Cascade Directory (static) or Cascade Directory (Dynamic).
-
Cascade Directory (static) option auto fills the selected button and all subsequent buttons with static BLFs for the current directory entries.
Note: Statically cascading BLFs allows you to view how the BLF buttons will look, make adjustments to the BLFs, and clear out any that you do not wish to have added.

Anytime one of the contact's information changes, the keys will need to have that information manually updated.
For example, if a user's name changes, their BLF will need to have its Label updated to reflect this change. -
Cascade Directory (dynamic) option auto fills the selected button and all subsequent buttons with dynamic BLFs, which update whenever the phone resyncs.
Note: Dynamically cascading BLFs will have your phone's Directory entries automatically applied. Anytime one of the contact's information changes, such as their name, the keys will automatically update themselves when the phone does its nightly update.

Adjust Your Cascaded BLF Keys
If you do not like how the BLF buttons look after cascading them, you can adjust how exactly they are added using the Directory menu of Phone Manager.
Hide a Contact
If you do not want a certain user to show up on the BLF keys that are added, you can hide that user by editing the phone's Directory through Phone Manager.
NOTE: Using this method will hide this user from your phone's Directory feature as well.
If you still want to see this user in your phone's Directory, it is recommended to either use the Cascade Directory (static) option or add your BLF buttons one-by-one.
To hide a user from your phone's BLFs and Directory feature.
1. On the Phone Manager page, click the Directory button.
 or
or 
✔ Doing so will pull up the Phone Manager Directory modal.
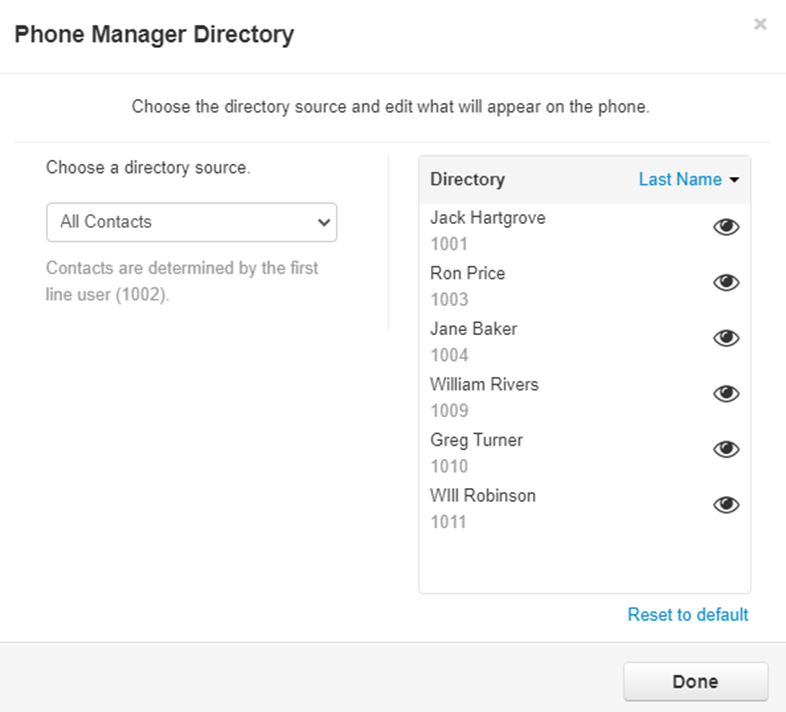
2. Click the eye icon to hide/show a contact.

✔ The hidden user's name will grey out while the eye will appear with a slash. This user will be removed from your phone's directory.
To undo all the changes at one time, select Reset to Default.
3. Click the Done button to apply these changes.
Change the Source
The Contacts that are used for the BLF keys that are cascaded are determined by the Directory Source set for your phone.
NOTE: Editing the Directory Source will also affect the contacts shown in your phone's Directory feature.
If you do not want to affect the contacts shown in your phone's Directory, it is recommended to either use the Cascade Directory (static) option or add your BLF buttons one-by-one.
To edit your phone's directory source to only show certain contacts…
1. On the Phone Manager page, click the Directory button.
 or
or 
✔ Doing so will pull up the Phone Manager Directory modal.

2. Use the Directory Source drop-down to select what kind of contacts should be referenced.

3. Click the Done button to save this change.Re-Sort Contacts
By default, the order that the cascaded BLFs are applied will be by extension number. If needed, you can have these BLFs ordered and applied by First Name or Last Name instead.
NOTE: Editing the Directory Source will also affect the contacts shown in your phone's Directory feature.
If you do not want to affect the order of the contacts shown in your phone's Directory, it is recommended to either use the Cascade Directory (static) option and edit the keys added or manually add your BLF buttons one-by-one.
To adjust how your BLFs are organized…
1. On the Phone Manager page, click the Directory button.
 or
or 
✔ Doing so will pull up the Phone Manager Directory modal.

2. Select if the contacts should be sorted by Extension Number, First Name, or Last Name.
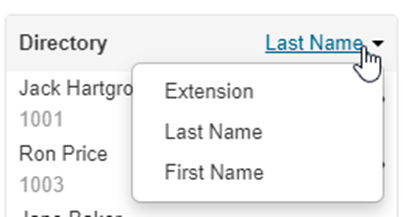
3. Click the Done button to save this change.After making any changes, be sure to save your changes.

Use Templates
To make editing your phones more efficient as a basic user, you can create and apply templates.
When you are customizing your phone, you have the option to save your phone's configuration as a template that can be applied to any of your other phones. You can also apply templates created by a Stratus admin user for your business.
Create a New Template
As a basic user, you can create a template by saving your phone's layout as a template.
To do so…
- Edit your phone's layout to match what you would like your template to apply.

- Once you are done editing your phone, click the Arrow next to the Save button and select Save as New Template.

- In the Save as New Template menu, give this template a name.

- Click the Save button.
✔ Once the template is saved, you should see a confirmation message with a hyperlink that you can click to view the new template and make any edits.

Apply a Template
When you have templates that can be used, you can apply any of those templates to your phone.
To apply a template…
- On the Phone Manager page, click the Templates button and select a template from the dropdown.
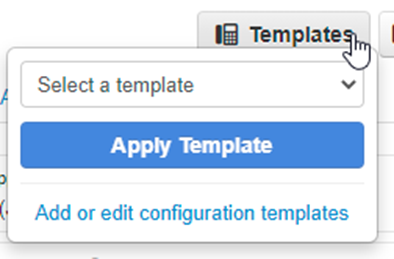
- Click the Apply Template button.

✔ You should see the buttons appear on the Phone Manager screen.
- Click Save and Resync to apply the template to your device.

Adjust Your Phone's Directory
The source of the directory will determine what contacts a phone will display when the Remote Phonebook of your phone is accessed using the Directory button on your phone.
To adjust your phone's directory source…
- On the Phone Manager page, click the Directory button.
 or
or 
✔ Doing so will pull up the Phone Manager Directory modal.

- Use the Directory Source drop-down to select a directory source (determined by the first line user assigned).
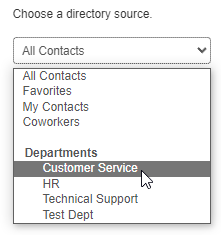
- Use the Directory section to view the contacts that will be shown.

- If needed, select if the contacts should be sorted by Extension Number, First Name, or Last Name.

- Click the eye icon to hide/show a contact.

✔ The hidden user's name will grey out while the eye will appear with a slash. This user will be removed from your phone's directory.
To undo all the changes at one time, select Reset to Default.
- Click Done to apply these changes.
Note: Once the directory has been updated, you will need to reboot the phone to allow the phone to update. Alternatively, you can wait until the phone does its nightly update.
Music on Hold

As a Basic User or Call Center Agent, you can access your own Music on Hold (MoH) page. This page allows you to customize your own music and messages that callers will hear while waiting on hold for you.
Add Music on Hold Files
If you have produced songs or have the right to use certain songs, you can add those music files into your music on hold.
DANGER: Using copywritten songs and songs that you do not have permission to use can put you at risk legally.
To add music files into your Music on Hold…
- Click the Add Music button.

✔ Doing so will pull up the Add Music modal.

- In the Song Name box, type in a descriptive name to identify the song with.
- Take a moment to confirm that the music file is in a proper format for the phone system.
WARNING: The audio file should be a 16-bit WAV (8Khz, Mono, 16-Bit PCM) file.
Convert an Audio File Using G711.org
To convert the audio file, you can use a free site named g711.org. To do so…
1. Visit g711.org.
2. In the Source File section, click the Browse button.

3. Select the audio file to be converted.

4. In the Output Format section, ensure that the Standard Definition option is selected.
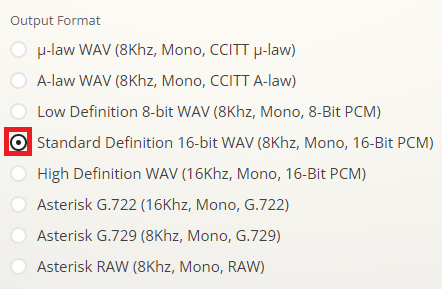
5.Click the Submit button.

✔ Doing so will pull up a new page with a link.
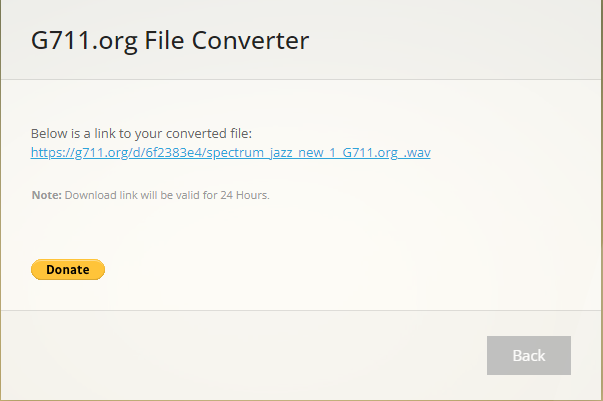
6. Right-click the link and select Save link as.

7. In the File name box, type a name for the converted audio file and then click the Save button.

DANGER: Not converting music files can cause catastrophic issues for your phone system.
- Click the Browse button.

- Select the converted audio file.
✔ Now the file name and its file path should appear in the box.

- Click the Upload button.

✔ The new song will appear at the bottom of the list of songs in the Music section

Create a Message
To add in a message for callers to listen to while waiting on hold for you…
- Click the Add Message button.

✔ Doing so will pull up the Add Message modal.
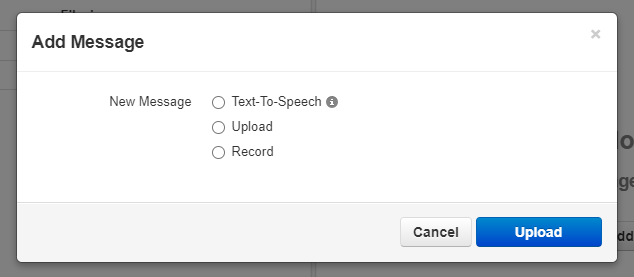
- Use either of these options to add in a Message:
Text-to-Speech
Use the text-to-speech option to type out a message and select an automated voice that will read out what is typed.
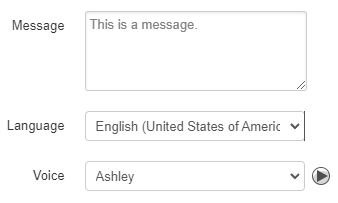
Once the message has been typed out, click the Save button.
Upload
Using the upload option, you can upload a converted audio file and give the message a name.

WARNING: The audio file should be a 16-bit WAV (8Khz, Mono, 16-Bit PCM) file.
Convert an Audio File Using G711.org
To convert the audio file, you can use a free site named g711.org. To do so…
1. Visit g711.org.
2. In the Source File section, click the Browse button.

3. Select the audio file to be converted.

4. In the Output Format section, ensure that the Standard Definition option is selected.

5.Click the Submit button.

✔ Doing so will pull up a new page with a link.

6. Right-click the link and select Save link as.

7. In the File name box, type a name for the converted audio file and then click the Save button.

DANGER: Not converting music files can cause catastrophic issues for your phone system.
Once the file has been selected on your PC, click the Upload button.
Record
The record option allows you to type in the phone number or extension number for the phone system to send a call.

Click the Call button to send a call to the number. When the call is answered, it will record whatever is said to it.
✔ You should now see the new Message added into the Messages section.

Play an Introduction Greeting
Similarly to a regular message, an Introduction Message can be added in. The introduction message is played before any of the music or messages play. This kind of message is useful for notices or warnings, such as that the call may be recorded.
To add in an Introduction Message…
- Click the Add Intro Message icon
 .
. Quick Tip: If there have not been any messages added, you can click the Add Introduction button on the notice that shows in the Messages section.

- Use either of these options to add in an Introduction Message:
Text-to-Speech
Use the text-to-speech option to type out a message and select an automated voice that will read out what is typed.

Once the message has been typed out, click the Save button.
Upload
Using the upload option, you can upload a converted audio file and give the message a name.

WARNING: The audio file should be a 16-bit WAV (8Khz, Mono, 16-Bit PCM) file.
Convert an Audio File Using G711.org
To convert the audio file, you can use a free site named g711.org. To do so…
1. Visit g711.org.
2. In the Source File section, click the Browse button.

3. Select the audio file to be converted.

4. In the Output Format section, ensure that the Standard Definition option is selected.

5.Click the Submit button.

✔ Doing so will pull up a new page with a link.

6. Right-click the link and select Save link as.

7. In the File name box, type a name for the converted audio file and then click the Save button.

DANGER: Not converting music files can cause catastrophic issues for your phone system.
Once the file has been selected on your PC, click the Upload button.
Record
The record option allows you to type in the phone number or extension number for the phone system to send a call.

Click the Call button to send a call to the number. When the call is answered, it will record whatever is said to it.
✔ You should now see the new Introduction Message added into the Messages section.

Manage Your Music and Messages
On the Music on Hold page, you can do the following to manage and adjust your music and messages:
Re-Order Music and Messages
Once messages and music have been added in, the lists of music and messages can be re-ordered to prioritize when those songs/messages should play.

✔ Once the music or messages have been re-ordered, click the Save button that appears in the warning banner.
Rename a Song or Message
To rename a song or message, click the Edit Name icon  next to it.

Delete a Song or Message
To delete a song or message, click the Delete icon  next to it.

Copy Existing Music or Messages
Copy an existing message or song by clicking on the Copy  icon .

✔ Clicking Copy will add the same message/song to the bottom of the list with "Copy" appended to the name.
Randomize Music
The Randomize Music feature randomly orders the music when a user is calling in and is put on hold.
It can be enabled by selecting the Randomize music checkbox.
Add Time Between Messages
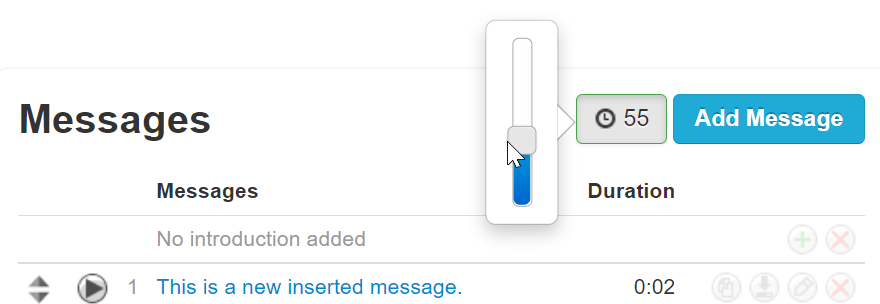
The Time Between Messages feature sets the time between the end of one message and the start of the next one. Within each of these breaks, the music will resume.
This can be adjusted with a slider in increments of 5 seconds. The default value for the time between messages is 30 seconds, but this value can range from 15 to 120 seconds.


