Enable Call Center Statistic Tracking for Individual Agents
Discover how you can ensure users that are not in a call queue can have their call statistics tracked.

Written by Val Campos
Updated at August 20th, 2025
Table of Contents
How Are Call Statistics Tracked?
In order for statistics to be tracked for agents, that agent must be present in a call queue. Depending on how calls route to your agents, you may not have a call queue being used for routing calls to certain users. If a user is not set as an agent in a call queue, then their statistics will not be tracked in Call Center or StratusWALLBOARD.
Note: This issue is commonly seen in call center environments where agents have their own DID (Direct Inward Dialing) numbers that route calls to their extension number.
Implement a Call Queue for a User
To have a user's statistics tracked, a call queue will need to be created for that user and then added into the user's inbound call routing.
Step 1: Create a Call Queue for a User
If you need to be able to track the statistics of users that are not supposed to be in a group of agents, you can enable the collection of statistics for those users by giving them their own call queues.
To create a call queue for a single agent…
- Navigate to the Call Queues page.

- Click the Add Call Queue button.

- In the Basic tab, fill out the following information:

- Name - Give the user's queue a name.
-
Extension - Type in a unique extension number for their queue.
Quick Tip: The extension numbers of call queues are usually in the 8000s range.
- Department and Site - If needed, sort this queue into a Department and Site.
- Type - Select Ring All.
- Record Calls - If calls should be recorded for this user, select Yes.
- Statistics - Select Yes to have the queue collect statistics.
- Click the Next button.

- On the Pre Queue Options tab, use Queue Audio dropdown to select if callers should hear music and messages from the Music on Hold page or ringing (Ringback) while they wait for the user to answer the call.

Quick Tip: It is recommended to select Ringback since some callers may get confused and think the user automatically put them on hold instead of answering the call when this is not the case.
- Click the Next button.
- On the In Queue Options tab, fill in the following information:

-
Queue Ring Timeout (sec) - Use the slider to select how long (in seconds) the call should ring before being forwarded.

-
Enable Voicemail - This option enables the queue's own voicemail. Since the voicemails of users are commonly used instead, use the dropdown to set this option as No.

-
If Unanswered - Use the dropdown to select Forward to destination.

-
Forward Destination - Type and select the destination for unanswered calls.

✔ Using the voicemail of the user is a great option!
-
Queue Ring Timeout (sec) - Use the slider to select how long (in seconds) the call should ring before being forwarded.
- Click the Next button.
- Click the Add button.

Step 2: Add the User to the Call Queue
Now that a call queue has been created, we will need to add that user into the call queue to accept calls.
- Click the Edit Agents
 icon next to the user's new queue.
 - Click the Add Agent button.

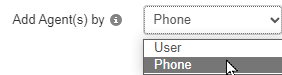
- Use the Add Agent(s) by dropdown to select Phone.
- In the Agent Phone box, type and the name or extension number of the user and their devices to have ring in the queue.

Quick Tip: You can type and select a phone number to have ring as well.
- Repeat step 2 for each of the user's devices that should ring.
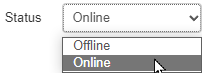
- Use the Status dropdown to select Online.
- If needed, adjust the settings for the user in the queue.
- Click the Save Agent button.

✔ That agent should now show as Online in their new call queue.

Step 3: Route Calls to the Call Queue
Once you have created a call queue that routes calls to the user, you will need to add this call queue into the routing for that user.
There are three different ways this could be done:
- Update a user's answering rules.
- Route a DID (Direct Inward Dialing) number to the call queue.
- Add the call queue as a dial pad menu option for an auto attendant.
Update a User's Answering Rules
By default, a user's answering rules is usually routing calls to the devices of that user. We can adjust that answering rule to instead route calls to the user's new call queue.
To have the user's extension number route calls to their call queue…
- Navigate to the Users page.

- Use the search bar to find the user by their extension number or name.

- Click the Edit icon next to the user and select Answering Rules.

- Click the Edit
 icon next to their main answering rule.
Quick Tip: The main answering rule for most users is the Default rule.
- In the Call Forwarding section, select Always and use the box to type and click the call queue's name or extension number.

- Click the Save button.

✔ Now calls to that user's extension number will be routed to their new call queue so that call statistics will be recorded.

Route a DID Number to the Call Queue
If the user has their own DID (Direct Inward Dialing) number, you can route that phone number straight to the user's call queue.
Note: If you have adjusted the answering rules of the user to route calls to the user's call queue, then you do not need to adjust the destination of their DID number.
To route a DID to a user's call queue…
- Navigate to the Inventory page.

- Click the Edit icon next to the user's DID number.

- Use the Treatment dropdown to select Call Queue.

- In the Call Queue box, type the extension number or name of the call queue.

- If needed, in the Notes box type a description of what the number is used for.

- Click the Save button.

✔ You should now see that DID number routing to the new call queue.

Adjust a Dial Pad Menu Option in an Auto Attendant
If you are using an auto attendant that routes calls to your users, you can adjust the user's dial pad menu option to route calls to their call queue instead.
Note: If you have adjusted the answering rules of the user to route calls to the user's call queue, then you do not need to adjust the dial pad menu option.
To route a dial pad menu option to the user's call queue…
- Navigate to the Auto Attendants page.

- Click the name of the auto attendantor the Edit icon next to the auto attendant needing adjustment.
- Click the dial pad menu option that routes calls to the user.

- Click Remove.

- Click the dial pad menu option again.

- In the Choose a new application section, select Call Queue.

- In the box, type the extension number or name of the user's call queue.

- Click the Save button.

✔ Now when that number is pressed on a caller's dial pad in that auto attendant, the call will route to the user's new call queue.