Yealink Cordless Handset Comprehensive User Guide
Discover how to effectively use your Yealink W56H cordless handset with this informative user guide.

Written by Val Campos
Updated at April 7th, 2025
Table of Contents
Explore Our Guided Phone Tutorial
Handset Components
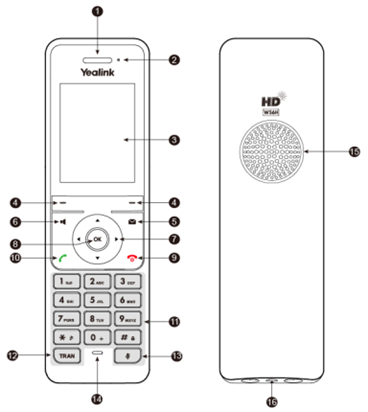
| # | Button Name | Function |
|---|---|---|
| 1 | Receiver | Receives audio in receiver mode. |
| 2 | Power Indicator LED | Indicates call status, message status and charging status. |
| 3 | LCD Screen | Displays information, such as a information from calls, menus, and more. |
| 4 | Soft Keys | Depending on the status of the phone, the functions for the soft keys will change. |
| 5 |
Message Key 
|
Access the voicemailbox of the handset's assigned extension number. |
| 6 |
Speakerphone Key 
|
Switches among the receiver, headset and handsfree modes. Can be used to answer an incoming call in handsfree (speakerphone) mode. |
| 7 | Navigation Keys | Scroll through information or options on the screen |
| 8 |
OK Key 
|
Confirms actions. Press this button on the Home screen to access the handset's Menu. |
| 9 |
Power/ Hang Up Key 
|
Press briefly to return to the previous screen. Long press to return to the idle screen. Press to turn the handset on. Long press on the idle screen to turn the handset off. Cancels actions or ends a call. Rejects an incoming call. |
| 10 |
Dial Key 
|
Answers an incoming call in receiver or headset mode. While on the Home screen, press the Dial key to view the Redial menu. |
| 11 | Keypad |
Dial a contact or provide input for automated menus, such as auto attendants and voicemailboxes. More Info: To learn more about assigning speed dials to these buttons, read this guide. |
| 12 | Transfer (TRAN) Key | Initiate a transfer to send this call to another person. |
| 13 |
Mute Key 
|
Mute or unmute your microphone in the call. |
| 14 | Microphone | Picks up audio. |
| 15 | Speaker | Outputs audio in handsfree mode. |
| 16 | 5mm Earphone Jack | Used to connect a standard 3.5mm headset. |
Shortcut Keys
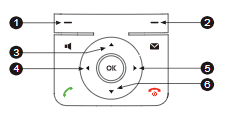

| # | Button | Default Shortcut | Function |
|---|---|---|---|
| 1 | Left Soft Key | History | View your cordless handsets call logs. |
| 2 | Right Soft Key | Line Status | Check the status of handsets connected to the same base station as this cordless handset. |
| 3 | Up Navigation Key  |
Intercom | Intercom other handsets connect to the same base station. |
| 4 | Left Navigation Key  |
Volume Down - | Turn down the volume of your handset's ringer. |
| 5 | Right Navigation Key  |
Volume Up + | Turn up the volume of your handset's ringer. |
| 6 | Down Navigation Key  |
Directory | Create, reference, and call custom contacts. |
| 7 | 1 Button | Voicemail | Hold down to call into the mailbox of this handset's extension number. |
| 8 | * Button | Silence Ringer | Hold down to mute/unmute this handset's ringer. |
| 9 | # Button | Phone Lock | Hold down to lock/unlock this handset's keypad. This can help prevent unauthorized people from dialing on this handset. |
More Info: To learn how you can reassign these button shortcuts to different features, check out this guide.
Power LED Indicator
| LED Status | Description |
|---|---|
| Solid red | The handset is charging. |
| Fast flashing red (300ms) | The handset is ringing. |
| Slowly flashing red (1s) | The handset has received a voice mail or a missed call. |
| Off | The handset is powered off, idle, and fully charged. |
Status Icons
| Icon | Description | Icon | Description |
|---|---|---|---|
 |
Ringer volume is 0 (Silent Mode) |  |
Voicemails |
 or or 
|
Call Forward is active |
 or or 
|
DND is active |
 or or 
|
Keypad lock is active |
 or or 
|
Mute is active |
 or or 
|
Hands-free Mode |
 or or 
|
Headset Mode |
Handle Calls
While talking with a contact, there is a variety of ways that you can handle their call they have an optimal experience communicating with your company. Read the sections below to learn more about placing calls, answering calls, and using your handset's active call features to handle calls.
Place a Call
You can do one of the following to start a call:
- Start dialing the number you want to call using the keypad.
- Press the Speakerphone key to enter the pre-dialing screen.
- Press the Dial Key while off a call to enter the Redial menu. Select a recent caller to call.
- Press the Left Softkey to use the History to select someone you have called before.
- Press the Down Navigation Key to use the Directory to call a contact you have created,
Answer a Call
There are several ways you can answer calls on your cordless handset. To do so, either…
- Press the Send button.
- Press the Answer softkey.
Calls on Hold
You can place an active call on hold and resume the call when you are ready. When you place a call on hold, Stratus may play music on hold to the other party while they wait for an agent.
Place an Active Call on Hold
While speaking with someone, you can place their call on hold by doing the following:
- While on an active call, press the Options softkey.
- Using the navigational buttons, select Hold.
- Press the OK button.
Swap Between Held Calls
Do one of the following to swap between active and held calls:
- If the call is active, press the Swap soft key.
- Press the up or down navigation button.
Resume a Call That is on Hold
If you are ready to begin speaking with a caller you placed on hold, you can resume that call by pressing the Resume softkey.
- Use the navigational buttons to select a call on hold from the list of on hold calls on your screen.
- Press the Resume softkey.
WARNING: If you have a call on hold and are currently on another active call you must place the active call on hold, transfer it, or end it before you can resume a call on hold.
Call Parking
Call parking can be an effective alternative to placing a call on hold. When a call is put on hold, the call will stay on your device. If you want other users to be able to retrieve and handle the call, you can park the call instead.
Park a Call
If there is caller that you would like to place on hold and give a colleague a chance to handle the call, do the following to dynamically park the call:
- While on an active call, press *** on the keypad.
WARNING: Do not press the Send (#) button.
- You will hear a message played indicating the parking spot number where the call can be retrieved.
✔ The phone will read off a message that says where the call is parked:
“The call is parked at 7-0-1”. - The caller is now on hold until a phone retrieves the call.
Retrieve a Parked Call
If you have a cordless handset and you have the time to retrieve a parked call, do the following:
-
Dial the extension number of the park where the call is parked.
Quick Tip: By default, each park will have the following extension numbers:
• Park 1 = 701
• Park 2 = 702
• Park 3 = 703 - Press the Send (#) button.
✔ The phone will pick up the call that was parked in that park queue. If there are multiple calls parked for that park, the first call parked will be retrieved in a first in, first out basis.
Transfer Calls
While handling a call, it may be necessary to pass the phone call along to a user, call queue, or an external phone number. This can be done through transferring.
Using your Yealink cordless handset, there are three different types of transfer that can be utilized depending on how exactly the call needs to be transferred and handled:
- Blind Transfer - Transfer a call directly to another person without talking to that second person. This is sometimes referred to as a “cold” or "unassisted" transfer.
- Attended Transfer - Speak with the person being transferred to before completely transferring the call. This is sometimes referred to as a “warm” or “assisted” transfer.
- Voicemail Transfer - Transfer a caller directly to a general mailbox or the voicemailbox of another user.
Use the module below to view step-by-step instructions about how you can perform these transfers:
Blind Transfer
When you use a blind transfer, you transfer a call without speaking to the party that the call will be transferred to.
To perform a blind transfer…
1. To initiate a Transfer, do one of the following:
• Press the TRAN button.
• Press the Options soft key during a call and select Transfer.
2. On the Dialing screen, do one of the following:
• Dial the number or telephone number to transfer to and press the Transfer softkey.
• If transferring to another handset, select the handset you want to transfer the call to and press the Transfer softkey.
• To transfer to a saved contact, press the Directory soft key and select the desired contact. Press the Call soft key. If both the office number and the mobile number of the contact are stored, select the desired number and press the OK button OK soft key.
Attended Transfer
Perform an attended transfer if you want to talk to the person receiving the transfer. This can be a great way to check that the person being transferred to is actually ready to receive a transfer.
Quick Tip: If you decide you do not want to talk to the person you are transferring to, you can perform a semi-attended transfer. To do so, you can press the Transfer softkey or the TRAN button a second time while the call is still ringing.
To perform an attended transfer…
1. To initiate an attended transfer, do one of the following:
• Press the TRAN button or press the Options softkey and select Transfer. On the Dialing screen, dial the person's extension number or telephone number and press the Call button.
• Press the New Call softkey. On the Dialing screen, dial the person's extension number or telephone number and press the Call button.
• Press the TRAN button or select Transfer from the Options menu. On the Dialing screen, press the Directory soft key and select the desired contact. Press the Call soft key. If both the office number and the mobile number of the contact are stored, select the desired number and press the OK soft key to dial out.
2. Once the other person answers, you can speak with the second person while the first caller is waiting on hold.
3. When you are ready to transfer the call to them, do one of the following:
• Press the TRAN button.
• Press the Options softkey and select Call Transfer.
4. In the list, select the caller that will be transferred to the person accepting the transfer and press the OK button.
Transfer to Voicemail
In some instances, a caller may need to reach out to a user that is not able to accept a transfer at the moment. If this is the case, the caller can instead be transferred to a user's voicemailbox to leave a message.
To transfer a caller to a user's voicemailbox…
1. To initiate the transfer, do one of the following:
• Press the TRAN button.
• Press the Options soft key and select Transfer.
2. On the Dialing screen, dial 03 and the mailbox's extension number.
For example… To transfer the caller to the mailbox of user 100, dial 03100. To transfer the caller to general mailbox 500, dial 03500.
3. To complete the transfer, press the TRAN button or press the Transfer softkey.
Conference Calls
The Yealink phones support creating a conference with two other external parties or an external and an internal party.
- While on an active call, press the Options softkey.
- Press the Conf. softkey.
- Enter the extension number or phone number of the users to add to the three-way call.
✔ The first active call will be placed on hold.
- When the second party answers the call, press Conf. again to join all parties in the conference.
Check Voicemails
If you are using a Yealink cordless handset, you can check the handset's mailbox for voicemails at any time.
You can access the mailbox of a cordless handset by either…
- Pressing the Message
 key.
key. - Holding down the 1 button on the handset's keypad.
- Using the Voice Mail option of the Main Menu.
- Dialing a code that calls the mailbox.
Use the module below to explore these different methods for checking voicemails on cordless handsets:
The Message Button
On a Yealink cordless handset, you can use the Messages & Calls menu to check for any missed calls and voicemail messages.
To access this menu and check your voicemails…
1. Press the Message key.
2. Use the Down navigation key to select the voicemail option with your extension number.
3. When prompted for a Password, dial your cemail PIN and press #.
The 1 Button
By default, your cordless handset will be set up to reserve its 1 button on the keypad as a speed dial for your voicemail.
With this feature, you can hold down the 1 button to call into your voicemailbox. From there you can enter your voicemail PIN when prompted and check your messages.
The Voice Mail Menu
In the Main Menu of the handset, you can use the Voice Mail option to access your mailbox and view its settings.
To use the Voice Mail menu to check your mailbox…
1. Press the OK button to access the handset's Menu.
2. Use the Right Navigation key to select Voice Mail.
3. In the Voice Mail menu, select Play Message.
4. Press the OK button to select the handset's extension number.
5. When prompted for a Password, dial your Voicemail PIN and press #.
Dial a Code
An alternative to using the handset's own buttons is dialing a code on the handset to call your mailbox. Depending on the platform you are using (Stratus vs. ES), the code you dial will differ.
For Stratus Users
To access a cordless handset's mailbox…
1. Dial 5001.
2. When prompted for a Password, dial your PIN and press #.
✔ From here, you can review the mailbox's voicemails and use the menu options to manage the mailbox's settings.
For Enswitch (ES) Users
To access a cordless handset's mailbox…
1. Dial your mailbox's code.
Quick Tip: Most accounts use 1+EXT (e.g., 1103 for dialing extension 103's mailbox) as the code for dialing into the mailboxes of other users.
Find Your Mailbox's Dialable Code
If you are not sure what your mailbox's feature code is, you can check this and the other feature codes you are set as the Owner for by logging into the ES web portal as a basic user.
To find your mailbox's feature code…
1. Log into the ES web portal.
2. Navigate to Features → Feature codes.
3. Take note of the Feature Code shown that is marked for your extension's Mailbox. 
Reference the Feature Codes for Your Users as an Admin
Admins of the ES web portal can check the Feature Codes shown for all of their users using the web portal.
To check the feature codes for the whole account…
1. Log into the ES web portal.
2. Navigate to Features → Feature codes.
3. View and take note of the feature codes for your users.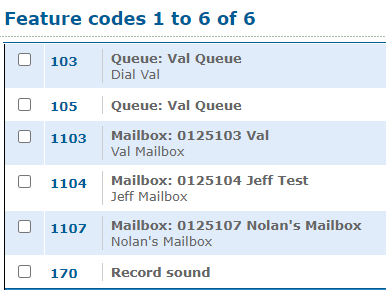
4. If needed, click the Export as .csv button to download this list of feature codes as a spreadsheet that you can keep record of and share with your team.
If you do not have access to the ES web portal, feel free to contact our technical support team to learn more about the dialable codes you can use. You can also read this article to learn how you can create a code for dialing a mailbox.
2. When you hear the mailbox's greeting, press *.
3. When asked for the Mailbox, dial your 7-digit extension number and press #.
4. When asked for your PIN, enter your PIN and press #.
✔ From here, you can review the mailbox's voicemails and use the menu options to manage the mailbox's settings.
Do Not Disturb (DND)
Many businesses utilize cordless handsets alongside their desk phones. If you or another user want a cordless handset to stop ringing for calls, you can enable DND (Do Not Disturb) mode for that device.
Quick Tip: When DND is enabled, callers that call that cordless phone directly will be taken to its voicemailbox. If the cordless handset is part of a queue, the cordless handset will not ring while the other agents' phones are ringing.
Setting up a Busy Forward for cordless handsets is an option. To learn more, check out this guide.
To enable DND for a cordless handset…
- Press the Up navigation key on your handset.
- In the Do Not Disturb menu, press the OK button to select your extension number.

- For the Status option, use the Right navigation key to select Enabled.

- Press the OK button or Save softkey to save.
✔ The DND
icon will appear at the top left of the handset's screen to indicate that DND mode is enabled.
If the handset receives a direct call, the caller will be sent to voicemail and a Missed Call icon will appear on the screen.
If the handset is part of a call queue, it will not ring with the other phones.
Paging and Intercoms
For some companies, it may be imperative that users be able to make announcements to other users through an intercom message. With a Yealink cordless handset, there are three different ways that you can page/intercom other phones:
- Use the paging function to page all phones on the same internet network.
- Use the intercom function to page other handsets.
- Dial the 08 code to page a single phone.
Use the module below to explore these different ways to page and intercom other devices:
Page All Phones
With the Paging function of the handsets, you can page all other phones that are connected to the same LAN (Local Area Network) as your handset.
Fun Fact: This form of paging is called Multicast Paging. Phones using multicast paging are set with a specific multicast IP address that they listen to. Users receiving a multicast page will have one-way audio where they can hear the sender of the page, but they cannot respond.
It is possible to have different multicast paging channels set up for different groups of phones. Some companies will have different paging channels for their individual departments.
If you are interested in adding other multicast paging channels, contact our Technical Support team for assistance.
To page all other phones on the same internet network…
1. Press the OK button to access the Menu.
2. Navigate to Call Features.
3. In the Call Features menu, select Paging.
✔ The handset will send out a multicast page that all other phones on the same internet network will receive.

The message you speak into the handset will play over the speakers of the other phones.
Intercom Other Handsets
Yealink cordless handsets have the ability to page other handsets connected to their same base station. This can be useful for businesses that require separate paging channel for handsets.
To use the Intercom function to page another cordless handset…
1. Press the OK button to access the Menu.
2. Navigate to Intercom.
3. In the Intercom menu, do one of the following:
• Select a single handset to intercom.
• Select All Handsets to intercom all handsets that are registered to the same base station as this handset.
4. Wait for the handsets to accept the call.
Quick Tip: By default, cordless handsets will ring when they receive an intercom call from other handsets. This ensures that users accept the intercom call before the intercom message is played over the handset's speaker.
If you need to set a handset to automatically answer intercoms from other handsets, follow the module below:
Set a Handset to Auto Answer Intercoms
If you would like a handset to automatically answer intercoms, do the following:
1. Press the OK button to access the Menu.
2. Navigate to Settings.
3. In the Settings menu, select hony.
4. In the lephony menu, select Auto Intercom.
5. In the Auto Intercom menu, select one of the following:
• On(Beep On) - Play a beep sound before automatically answering the intercom message.
• On(Beep Off) - Automatically answer intercom calls without an initial beep.
• Off - Require the intercom call to be accepted before the person initiating the intercom can proceed.
5. Speak into the handset or its speaker. The handsets being paged will hear your message over their speakers.
✔ When the intercom message is ready to be relayed, you will see a duration being tracked on your handset's screen.
The handset(s) being paged will show the name of the handset paging them.
Page a Single Phone
In some situations, it may be more appropriate to only page one device. With the 08 code, you can page a device connected to a specific extension number. Doing so would place an intercom call that the phone should automatically answer.
✔ This code is useful for companies that rely on a paging device or phone to play intercoms.
This can also be a great solution for users that need to page a device that is connected to a different internet network.
If you need to page one phone by itself, dial 08 and the extension number of the paging phone/device. Speak into the handset or its speaker. The phone being paged will hear your message over their speakers.
Forward Calls
Your Yealink cordless handset will give you three options of forwards to configure to ensure your calls are being answered when your phone is not available to be answered in certain conditions. Setting a forward can be useful when you need your calls to be handled someone instead of having the caller leave a voicemail.
These forwards include…
- An always forward
- A busy forward
- A no answer forward
To learn more about these different types of forwards, read the tabs below:
Always Forward
When an always forward is enabled, the forward will keep being active until disabled. When an unconditional forward is enabled, any calls to your phone will be immediately forwarded to the forward's destination. When your phone should receive calls again, the always forward will need to be disabled.
✔ Setting an always forward can be useful when you need to step away from your phone for a period of time.
Busy Forward
A busy forward is a conditional forward that will only become active when your phone is busy on a call or on Do Not Disturb (DND). This type of forward can be configured and set to be enabled indefinitely.
✔ A busy forward is commonly set up to forward calls to the extension number of a coworker in the same department/role. Busy forwards also commonly route calls to the extension number of an operator or receptionist.
No Answer Forward
A no answer forward is a conditional forward that will only become active when your phone is not answered in time. This type of forward can be configured and set to be enabled indefinitely.
✔ A lot of people will have a no answer forward set to forward unanswered calls to their cellphone number.
Set Up a Call Forward
To configure and enable a forward for a cordless handset…
1. Press the OK button to access the Main Menu.
2. In the Main Menu, select Call Features → Call Forward.
3. In the Call Forward menu, select your extension number.
4. Select the type of forward that is active and needs to be disabled.
5. Use the left and right navigational button to select either Enabled or Disabled.
6. Press the OK button or the Save softkey to confirm the change.
Customize Your Handset
There are many settings and features that can be adjusted on the handset to match your preferences. These settings and features that can be added and adjusted include the handset's…
- Button shortcuts.
- Contacts
- Speed dials
- Backlight and keypad light levels
- Display language
Read the sections below to learn more about the different ways you can personalize your cordless handset to meet your needs and preferences.
Reassign Button Shortcuts
While using your cordless handsets, you may notice that there are button shortcuts that are not very useful to you. These shortcuts can have different features assigned to them to fit your needs.
To adjust what features are being used when you press a button shortcut…
- Press the OK button to access the handset's Menu.
- In the Menu, select Settings.
- In the Settings menu, select 4.Shortcut.

-
Hover over a shortcut you would like to edit and press the OK button or the Change softkey.

- Use the up and down navigational keys to scroll through and select a feature to assign to the shortcut.

- If there are other shortcuts that need adjustment, repeat steps 3 and 4.
Create Contacts for the Directory
Each cordless handset has a Directory that contacts can be added to. Once a contact is added, you can press the call button while hovering over a contact to place a call to that person/business. These contacts that you add can be edited and deleted as needed.
Quick Tip: Adding contacts to the Directory is necessary if speed dials need to be assigned to the number buttons of the keypad.
To create contacts…
- Do one of the following to access your handset's Directory:
- Press the Down navigational key.
- Press the OK button to access the menu and select Directory.
- In the Directory menu, press the Options softkey.

- Select New Contact.

- In the Add menu, type the contact's name and extension number or phone number.

Quick Tip: You can create contacts for park queues (i.e., 701 for Park 1, 702 for Park 2, and 703 for Park 3) and useful dialable codes (e.g., *38 for Domain Call Pickup, *98 and *99 for starting and stopping recording, etc.).
- To save the contact, press the OK button or the Save softkey.
✔ Now that a contact has been added, you can press the Dial Key
to place a call to that contact.
If you need to check or manage the details of a contact, you can press the Options softkey while hovering over the contact. You can also delete contacts from this menu.

Add Speed Dials
If you have contacts that have been added to the handset's Directory, those contacts can be assigned as speed dials to the number buttons of the handset's keypad. This will allow you to hold down a number button to quickly dial a contact.
Quick Tip: Each handset can have up to 7 speed dials, which can be assigned to buttons 2-9 on the keypad.
There is not a #1 option since the 1 button on the keypad is reserved for calling the handset's voicemailbox.
To add a speed dial for one of your contacts…
- Press the OK button to access the Menu.
- Use the navigational keys to select Settings.
- In the Settings menu, select 7.Telephony.
- In the Telephony menu, select Speed Dial.

- In the Add to speed dial menu, hover over a spot for the speed dial and press the OK button or Assign softkey.

Quick Tip: The number spot that you select correlates to the number on the handset's keypad. Assigning a contact to one of these numbers will turn that number on the keypad into a speed dial button.
As a reminder, there is not a #1 option since the 1 button on the keypad is reserved for calling the handset's voicemailbox.
For example… If I assign the #2 speed dial spot to call a contact that dials 100, holding down the 2 button on the handset's keypad would dial 100.
- In the Directory menu that appears, select a contact that will be assigned to that speed dial.

✔ That speed dial will now be assigned to the number button on the handset's keypad. Holding down that button on the keypad will call the contact.
For example… If you assign a speed dial that dials 100 to the spot 2, holding down the 2 button on the keypad will dial 100.
You can also press the Call button while hovering over a speed dial in the Speed Dial menu to quickly place a call to that contact.
-
Repeat steps 5 and 6 for each speed dial you need to add.
✔ You should now have a list of speed dials that are now assigned to a number on the handset's keypad.

Example Speed Dials
Similar to how speed dials can be used to dial extension numbers and phone numbers of people, speed dials can also be used to dial call parks and codes.
Use the module below to learn more about the two most commonly added speed dials for cordless handsets:
Call Park Speed Dials
Unlike desk phones, cordless handsets do not have park buttons ready to use for parking and retrieving calls. As a workaround, you can add contacts and speed dials for the parks.
By default, your account will have Park 1 (extension 701), Park 2 (extension 702), and Park 3 (extension 703). You can create contacts and speed dials for each of these parks.:
✔ Using these speed dials for the parks will make it easier for users to retrieve parked calls.
For example… If a call is parked on Park 1 (x701), a user can hold down the speed dial button they have for Park 1 to retrieve the parked call. The user can also dial 701 on a handset to retrieve a parked call in Park 1.
Another contact and speed dial can be added for dynamic call parking. When *** is dialed during an active call, the system will park the call in an available call park and read off which park the call was parked on.
To make dialing this more convenient, a contact and speed dial can be added:
✔ Having a speed dial for *** allows users to use this speed dial during an active call to dynamically park the call.
For example… If a speed dial for *** was assigned to the #2 spot of the speed dial list, holding down the 2 button on the keypad during an active call would dial *** and park the call.
Call Pickup Speed Dials
Feature codes can not only be dialed by users themselves; they can also be dialed through speed dials. Some of the most commonly used codes are the call pickup codes 07, *36, and *38.
Use the module below to explore the three different call pickup codes you can consider adding as a contact and speed dial for a cordless handset.
07: Directed Call Pickup
If you dial 07 and a user or call queue's extension number, you can pick up a call actively ringing them.
| Feature Code | Action | Example |
|---|---|---|
| 07<extension number> | Pick Up Call for Extension |
Example 1: Dial 07101 to pick up a call ringing for user 101. Example 2: Dial 078000 to pick up a call ringing the queue with extension 8000. |
For example… If a user needed to pick up a call for user 105, they would dial 07105 on their SpectrumVoIP device.
This method also works for picking up a call waiting in a call queue. You would dial 07 and then the queue's extension number.
For example, if a call queue with extension 8001 has a call waiting, you could dial 078001 to pick up the call.
To make dialing this code easier, a contact and speed dial can be created that dials 07 and an extension number:

*36: Group Call Pickup
By dialing *36, you can perform a group call pickup. This allows you to pick up a call ringing to a user that is in your same Department. If there are multiple calls waiting for your department, dialing this code would pick up the first call that was placed in a first in, first out basis.
| Feature Code | Action | Example |
|---|---|---|
| *36 | Group Pickup | Dial *36 to pick up a call ringing to someone in your Department. |
To make dialing this code easier, a contact and speed dial can be created for this code:

NOTE: In order for Group Pickup to work, users will need to be sorted into departments.
Sorting users into departments not only allows them to pick up calls for each other by dialing *36, it also makes it easier to organize your users for certain features, such as Call Center Reports and the contacts/directories of SpectrumVoIP devices (e.g., desk phones, the SpectrumVoIP Desktop app, etc.)
Sort a User into a Department as an Admin
To add a user to a department…
1. Navigate to the Users page.
2. Use the search bar to type and select the name or extension number of the user.
3. In the Department box, type or select the name of a department to add the user to.
4. Click the Save button.
*38: Domain Call Pickup
By dialing *38, you can perform a domain call pickup. This allows you to pick up a call ringing to any user or call queue for your business. If there are multiple calls waiting for users, dialing this code would pick up the first call that was placed in a first in, first out basis.
| Feature Code | Action | Example |
|---|---|---|
| *38 | Domain Pickup | Dial *38 to pick up a call ringing to anybody in your organization. |
To make dialing this code easier, a contact and speed dial can be created for this code:

Backlight Timeout
When in charger/out of charger is enabled, the backlight will be turned off after the handset is idle for about 30 minutes when the handset is or is not in the charging cradle.
When an incoming call arrives, a key is pressed, or the handset's status changes, the backlight is automatically turned on.
- Press the OK button to access the Menu.
- Navigate to Settings → Display → Display Backlight.
- Select the desired timeout for the In Charger and Out of Charger fields.
- Press the Save softkey.
The Keypad Light
You can enable the keypad light to illuminate the keypad keys when any key is pressed.
- Press the OK button to access the Menu.
- Navigate to Settings → Display → Keypad LED.
- Press the Change softkey.
Change Display Language
Your cordless handset supports 10 languages: English, French, German, Italian, Polish, Portuguese, Spanish, Turkish, Swedish, and Russian.
The default handset language is English.
- Press the OK button to access the Menu.
- Navigate to Settings → Language.
- Use the navigational buttons to hover over the desired language.
- Press the Select softkey.
✔ The phone screen will pull up a prompt asking if you would like to
- Press the Yes softkey.
Device Reboots and Factory Resets
Reboot the Handset
If your handset seems to be experiencing issues, it is recommended to power cycle your handset. Power cycling, or turning the handset off and back on again, can help the handset re-register itself. This can help resolve minor technical issues.
To power cycle your handset…
- Hold down the Power/ Hang Up Key .
- Wait at least 30 seconds to allow the handset's battery to fully discharge.
- Press the Power/ Hang Up Key to turn the handset back on again.
Note: If your cordless handset is still experiencing issues, please contact our Technical Support team for further assistance.
Reboot the Base Station
When handsets seem to be having connection issues, power cycling the base station the handset connects to may help. To try turning the base station off and on again, you can do the following:
- Press the OK button to access the Menu.
- Navigate to Settings → System Settings → Base Restart.
- Enter the system PIN.
Note: The default PIN should be 0000.
- Press Done.
✔ After the above steps, the registration LED and network status LED will dim simultaneously. After a period of time, the LED indicators will glow green again when the base station restarts successfully.
Reset the Base Station
For tricky troubleshooting issues, a Technical Support team member may ask you to reset your base station to its factory default settings.
DANGER: Resetting the base station will delete all your personal settings and reset all settings to the factory defaults.
It is suggested to check with our Technical Support team to see if any of the personalized settings need to be kept before resetting your phone to factory.
To perform a factory reset for the base station…
- Press the OK button to access the Menu.
- Navigate to Settings → System Settings → Base Reset.
- Enter the system PIN.
Note: The default PIN should be 0000.
- Press Done.
- Select Reset to factory.
- Press OK.
✔ All individual settings of the base station will be reset to factory defaults.
The power and network status LEDs on the base station will slowly flash in sequence during the reset process. These LED indicators will glow green after startup.
Reset the Handset
You can reset individual settings that you have configured on the handset.
NOTE: Resetting the handset will not overwrite the settings of the directory, call history, voicemail, and the handset's registration. Other customized settings on the handset will be reset to factory after the handset is reset.
- Press the OK button to access the Menu.
- Navigate to Settings → System Settings → Handset Reset.
✔ The phone will pull up a prompt to confirm if the phone should be reset.
- Press the Yes softkey.
Register a Handset to a Base
- If a handset warns that it is “Unregistered!”, long press the button on the center of the base station until the registration LED flashes
- Press the
- Select Register Handset.
- Select the base station to register the handset to.
Quick Tip: Alternatively, you can press the Reg soft key on the handset.
- Use the dial pad to enter the base's PIN.
Note: The default PIN should be 0000.
✔ After the handset is registered successfully, the phone prompts “Handset Subscribed” and “Base NO. (The last 4 characters of the connected Base’s MAC address)”.
After the handset connects and makes any necessary config updates, an icon with the internal handset number and handset name will appear on the handset's screen.
Deregister a Handset from a Base Station
You may need to deregister your handset if you want to replace a base station.
- Press the OK button to access the Menu.
- Navigate to Settings → Registration → Dereg. Handset.
- Enter the system PIN.
Note: The default PIN should be 0000.
- Press the Done softkey.
✔ The phone screen will display the names of the handsets that are registered to the same base station. The name of the handset itself is highlighted and followed by a left arrow.
- Use the directional buttons to hover over the name of the handset.
- Press the OK button.
✔ The phone will pull up a prompt to confirm if the handset should be deregistered and disconnected.
- Press the Yes softkey.