US English (US)
CA French (Canada)

Contact Us

If you still have questions or prefer to get help directly from an agent, please submit a request.
We’ll get back to you as soon as possible.

Please fill out the contact form below using as much detail as possible so that our team can best assist you.

  • Home
  • Contact Us
  • Employee Log In
  • Getting Started
  • Using Your SpectrumVoIP Services
  • Working Remotely
  • Frequently Asked Questions
  • Troubleshooting
  • Training Resources
English (US)
US English (US)
CA French (Canada)
  • Home
  • Using Your SpectrumVoIP Services
  • The Stratus Platform
  • Stratus Administrators
  • Adjust Your Call Routing
  • Forward Your Calls

Forward Your Number

Learn how to forward a number to a different destination.

Written by Adrian Angwenyi

Updated at November 30th, 2023

Contact Us

If you still have questions or prefer to get help directly from an agent, please submit a request. We’ll reach back to you via email as soon as possible.

Please fill out the contact form below using as much detail as possible so that our team can best assist you.

After clicking 'Submit Ticket' you wil receive an email confirmation that your ticket has reached a member of our support team. They will reply back to continue to supporting, or you can call in referencing the ticket number on the email. (469) 429-2500

  • Getting Started
    Policies Preparing to Use VoIP Services Billing Basics Register an SMS Campaign Connect Your Device Using Your Phones Web Portals
  • Using Your SpectrumVoIP Services
    Customer Announcements Basic Phone Use The Stratus Platform The Enswitch Platforms SMS Messaging Use Your Fax Service Manage Your Network Equipment
  • Working Remotely
    Relocate Your Phone Use Your Phone Remotely Stratus Working Remotely Enswitch Working Remotely
  • Frequently Asked Questions
    Getting Help Common Equipment and Feature Questions SMS Campaign Registry Billing and Accounting Questions LNP / Porting Telephone Numbers
  • Troubleshooting
    Common VoIP Issues and Solutions Fax Problems Phone Problems Share Your Screen
  • Training Resources
    Web Portal User Guides Phone Video Tutorials Phone Guides Fax Guides Stratus Mobile App Guides ES Mobile App Guides StratusHUB Guides ES Desktop App Guides
+ More

Table of Contents

Implementation Step 1: Add a Time Frame Step 2: Create an Answering Rule for the Routing

Implementation

Step 1: Add a Time Frame

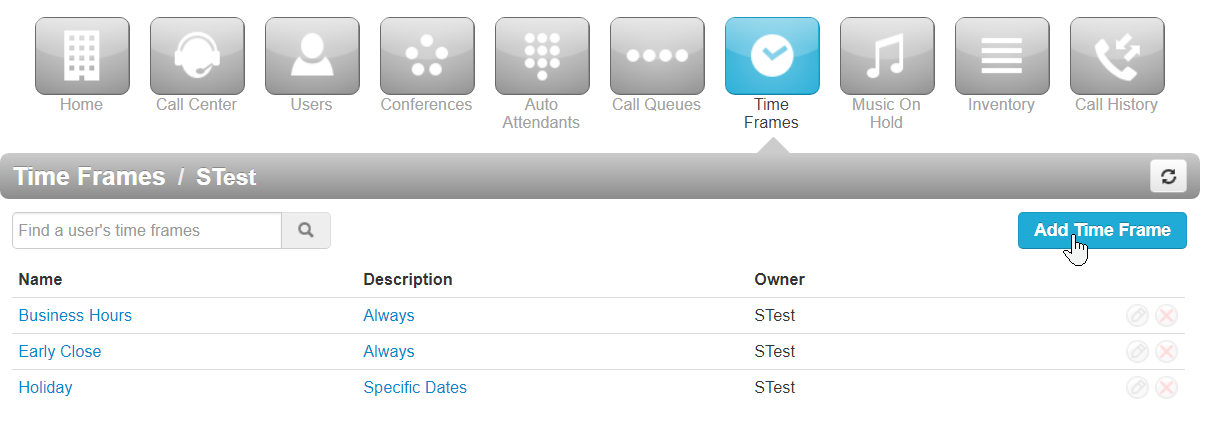
To add a forwarding rule into your routing, you will need to make a Time Frame. To do so…

  1. Navigate to the Time Frames page.
  2. Click the Add Time Frame button. 2018-08-17_12_09_13-Manager_Portal_-_Time_Frames.png
  3. Name the time frame you are creating something that is easily identifiable, in this case Temp Forward.
    2018-08-17_12_09_33-Manager_Portal_-_Time_Frames.png
  4. Select When the time frame should be active.
    • If you would like to Toggle the forwarding off and on, select Always.
    • If this forwarding should be recuring, select Days of the week and times, and set the days and times for the forwarding. 
    • If this forwarding is for a certain date, select Specific dates or ranges. 
  5. Click the Save button.

Step 2: Create an Answering Rule for the Routing

Now that the Timeframe is created, we will need to apply it to the answering rules of the user that will need the forwarding.

Find the Destination of a Number

To find the user that takes the routing for a certain phone number on your account, navigate to the Inventory page and check the phone numbers in the Phone Numbers tab.
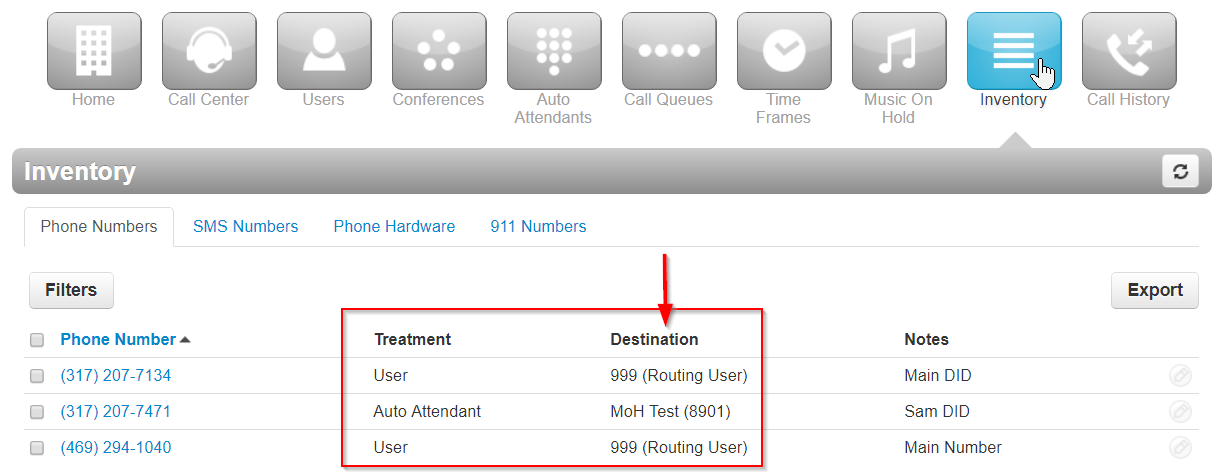
2018-08-17_12_07_26-Manager_Portal_-_Inventory.png
 
 
  1. Navigate to the Users page.
  2. In the search bar, type either the name or extension number associated for the user.
  3. Click the Edit icon and select Answering Rules.
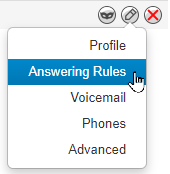
     
  4. In the user's Answering Rules page, click the Add Rule button.
     

    ✔ The Add an Answering Rule modal will appear.
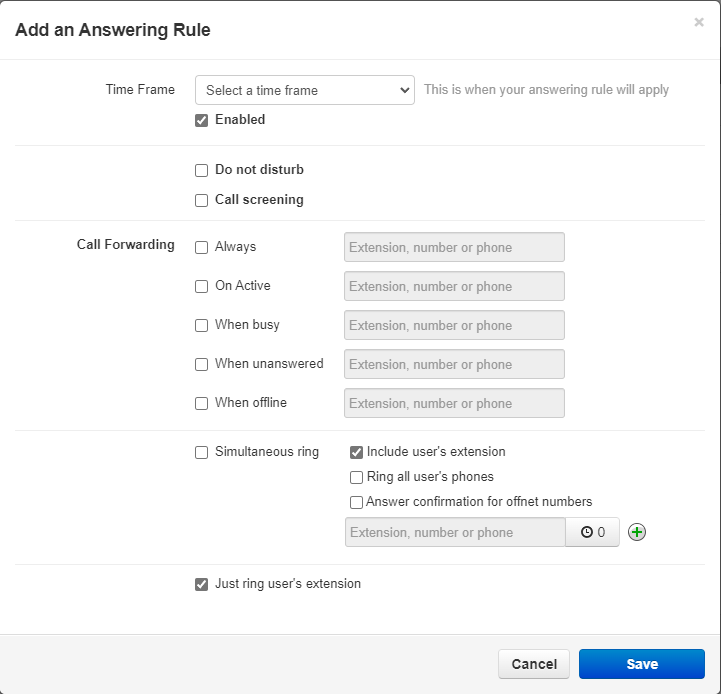
     
  5. Using the Time Frame drop-down, select the time frame for forwarding.
    2018-08-17_12_10_52-Manager_Portal_-_Users.png
  6. If this forwarding should not yet be active, click the Enabled box to disable the forwarding for now.
  7. In the Call Forwarding section, select Always and type the destination for the forwarded calls in the box.
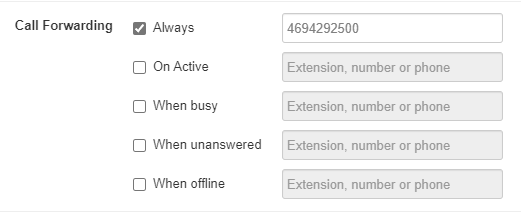
    Quick Tip: An extension number, phone number, auto attendant, etc. can be typed in as the destination. 

     
  8. Click the Save button.
  9. Reprioritize the answering rules to ensure the forward is above the business hours rule:
  10. When it comes time to enable the forwarding, click Edit icon and select the Enabled box.

    ✔ When enabling forwards, it is recommended to give your number a test call to ensure the forwarding is set correctly. 

     
call forwarding phone forwarding forward calls temporary forward answering rules call routing time frames reprioritize answering rules

Was this article helpful?

Yes
No
Give feedback about this article

Related Articles

  • Temporary Call Forward
  • Set Up an Emergency Forward
  • Forward Your Own Phone's Calls
  • How to Forward Your Main Number - Video
  • Customer Stories
  • Hardware
  • Channel Partners
  • Pricing
  • Blog
  • Contact Us

Main Products

  • Business Phone Software
  • VoIP Features
  • VoIP Integrations
  • Stratus Managed Network
  • AI Business Surveillance
  • Internet

More Products

  • Stratus Web Portal
  • Stratus Fax
  • Emergency Lines
  • Business Texting
  • Business Cellular
  • Business Phone Hardware

Resources

  • About Us
  • FAQ
  • Careers
  • Support
  • Training
  • SpectrumVoIP Store

Connect

  • Facebook Fill 1 Created with Sketch.
  • Twitter Fill 1 Created with Sketch.
  • LinkedIn Group 2 Created with Sketch.
  • YouTube
  • Instagram
  • Pinterest

SpectrumVoIP Status

© SpectrumVoIP™ 2022. All Rights Reserved


Knowledge Base Software powered by Helpjuice

Main — (972) 312-0388 Sales — 866-506-3457 Support — (469) 429-2500 Terms of Service Privacy Policy
Expand