Enswitch - Dial-by-Name Menu
Learn how to set up a dial-by-name menu to allow callers to quickly and easily get in contact with your team.

Written by Adrian Angwenyi
Updated at June 26th, 2024
Table of Contents
What is the Dial-by-Name Menu?
Dial-by-name allows callers to reach a person by entering the characters of a person's first name using their device's dial pad.
When a caller enters the letters of a person's first name, the Dial-by-Name menu will read out the audio names of the users that match the digits entered.
Note: When the system detects that multiple names match the keyed characters, it plays a recording of each name and gives the caller a number to press for each name.
When there are more than ten matches, the caller is asked to enter more characters.
When the caller successfully chooses a match, the call is transferred to the extension number, telephone number, or feature code that is set as the destination for dial-by-name calls in the person's settings.
System Rules for Matching Names
When the system decides which recorded names to play that match what a caller has keyed, it starts with the people defined in the system and looks for the following, step-by-step.
If there is a mailbox with the same number as the person's internal extension with a name recorded, that recorded name is used.
If the person is the owner of any mailboxes that have recorded names, the name of the first mailbox (sorted by mailbox number) is used.
If the person is the owner of any telephone lines which forward to mailboxes on no answer, and any of the mailboxes have names recorded, the recorded name of the first mailbox (sorted by mailbox number) is used.
If the person is the owner of any telephone lines that are set to monitor mailboxes for message waiting, and any of the mailboxes have names recorded, the recorded name of the first mailbox (sorted by mailbox number) is used.
The name of the person is spelled out letter by letter.
Dial-by-Name Menu Set Up
By default, your account will have a Dial-by-Name menu created for use. If you are wanting to allow your callers to use this automated menu, you can ensure it is set up for use using your Enswitch web portal.
To make sure your Dial-by-Name menu is ready for use, you will need to…
- Add users to the Dial-by-Name menu.
- Upload or record audio names for the users.
- Set up a way to allow callers to contact the Dial-by-Name menu.
Step 1: Add Users to the Dial-by-Name Menu
In order to have users searchable in the menu, their settings will need to be adjusted. This can be done using the Enswitch web portal.
To allow a user to be searched by callers in the Dial-by-Name menu…
- Navigate to Features → People.
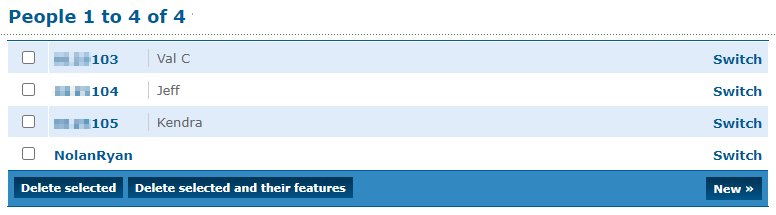
- Click the 7-digit extension number of the User.

- In the Dial by name forwards to box, type in one of the following as a destination for calls routed to this person through the dial-by-name menu.
- A user's 7-digit or 3-digit extension number.

- A person's telephone number.

- A function's feature code.

- A user's 7-digit or 3-digit extension number.
- Click the Save button.

- Repeat these steps for any other people that need to be reachable by the dial-by-name menu.
Step 2: Set a User's Audio Name
The name that is announced to callers when they use the Dial-by-Name menu is called the Audio Name. The Audio Name is a greeting that is stored in a user's mailbox. As such, the mailbox of the user can be used to update the name that is announced by the Dial-by-Name menu when a caller types the person's first name using their dial pad.
Call the User's Mailbox
One way to change an audio name is by calling into the mailbox of the person whose name needs to be adjusted and using its menu options to record a new name.
To do so…
1. Press the Message button on the phone of the user to dial their voicemail.
Quick Tip: Alternatively, you can call that user or call your business and ask to be transferred to that user's phone/voicemail.
You can also use your own desk phone to dial into another user's mailbox to help re-record their audio name.
Edit Another User's Mailbox Settings from a Desk Phone
If you are using a desk phone, you can dial into another person's mailbox using a feature code. This can be useful if the user's phone is not available at the moment.
1. Dial the mailbox feature code of the user's mailbox.
Note: By default, this code is usually 1 and then the user's 3-digit extension number. For example, dialing 101's mailbox would be done by dialing 1101.
2. While the mailbox is playing its greeting, press star (*).
3. When prompted, enter the mailbox's extension number (e.g., the user's 7-digit extension number) and the mailbox's voicemail PIN.
For example… If user 101's 7-digit extension is 0123101, I would dial 0123101 and then enter their mailbox's voicemail PIN when prompted.
4. From here, you can follow the steps below to record the user's new audio name.
2. When prompted, press 0 to access the mailbox's menu options.
3. Press 4 to record a new Name.
4. Follow the mailbox's instructions to record a new name.
5. When you are done, place a test call to the dial-by-name menu to confirm your audio name sounds correct.
Use the Web Portal
The Enswitch web portal can also be used to edit a user's audio name.
To do this…
1. Log into your Enswitch web portal.
2. Navigate to Features → Mailboxes.
3. On the Mailboxes page, click the 7-digit extension number of the user's mailbox.
4. Scroll down to the Greeting and audio name section and use the Greeting or name dropdown to select Audio name.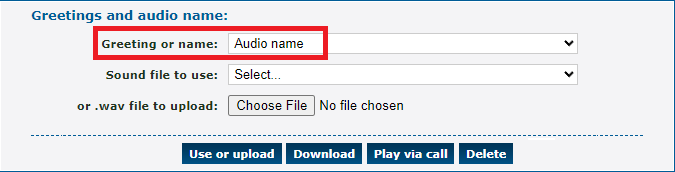
5. Add in the audio file that will replace the audio name using one of the following methods:
• Use the Sound file to use dropdown to select an audio file that has been added to the Sounds page.
OR
• Click the Choose File button to select and upload a properly formatted 16-bit .wav file (8Khz, Mono, 16-Bit PCM).
6. Click the Use or upload button. 
7. Place a test call to the dial-by-name menu to confirm the audio name sounds correct.
8. Repeat steps 2-6 for any other people that need their audio name adjusted.
Step 3: Set Your Dial-by-Name Menu as a Destination
Now that the Dial-by-Name Menu has users and their names set up, the Dial-by-Name menu can be set up as a destination for a function.
Reference the information below to learn more about the most common functions that route calls to a Dial-by-Name Menu.
IVR Menu Option
This is the most common method used to allow callers to access and use the Dial-by-Name menu.
✔ Many businesses will use this method to allow callers from outside of their organization to call representatives that they know the name of.
To set a dial pad menu option of an IVR menu to route calls to the Dial-by-Name menu…
1. Navigate to Features → IVR menus.
2. Click the name of the IVR menu that should have the Dial-by-Name menu as an option.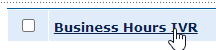
3. In the Destinations section, use the dropdown next to a dial pad menu option to select Dial by name menu.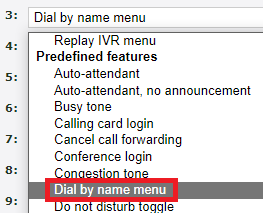
4. Make sure that the greeting of the IVR menu mentions the option for using the Dial-by-Name menu.
Update an IVR Menu's Greeting
1. Scroll down to the Message file section.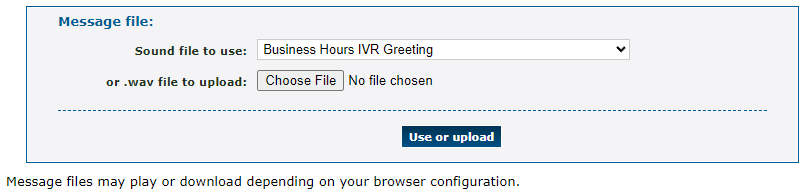
2. Add in the audio file that will replace the greeting of the IVR menu using one of the following methods:
• Use the Sound file to use dropdown to select an audio file that has been added to the Sounds page.
OR
• Click the Choose File button to select and upload a properly formatted 16-bit .wav file (8Khz, Mono, 16-Bit PCM).
3. Click the Use or upload button.
5. Click the Save button.
6. Place a test call to this IVR menu to confirm that you can access the Dial-by-Name menu. It is also recommended to test out dialing in the menu and check that the audio names played are correct.
Phone Number
One of the most common ways to route callers to a Dial-by-Name menu is by setting the destination of an extra phone number to do so.
✔ Many businesses will use this method to allow users to call into an employee-only phone number and use the Dial-by-Menu to contact their coworkers.
To route a phone number's calls to the Dial-by-Name menu…
1. Navigate to Features → Numbers.
2. Click the phone number that should be dedicated to the Dial-by-Name menu.
3. Scroll down to the Route calls to section and use the Default destination dropdown to select Dial by name menu.
4. Click the Save button.
5. Place a test call to this phone number to confirm that you can access the Dial-by-Name menu. It is also recommended to test out dialing in the menu and check that the audio names played are correct.
Feature Code
A feature code can be created to route calls directly to the Dial-by-Name menu.
✔ Using this method can be helpful by allowing internal users to use the Dial-by-Name menu to get in contact with other users.
Setting up a feature code for the Dial-by-Name directory can also be useful for when users need to place test calls to the dial-by-name menu to ensure any changes are correct.
To create a code that users can dial to reach the Dial-by-Name menu…
1. Navigate to Features → Feature codes.
2. On the Feature codes page, scroll down and click the New >> button. 
3. In the New feature code menu, fill out the following information in the Feature code settings section.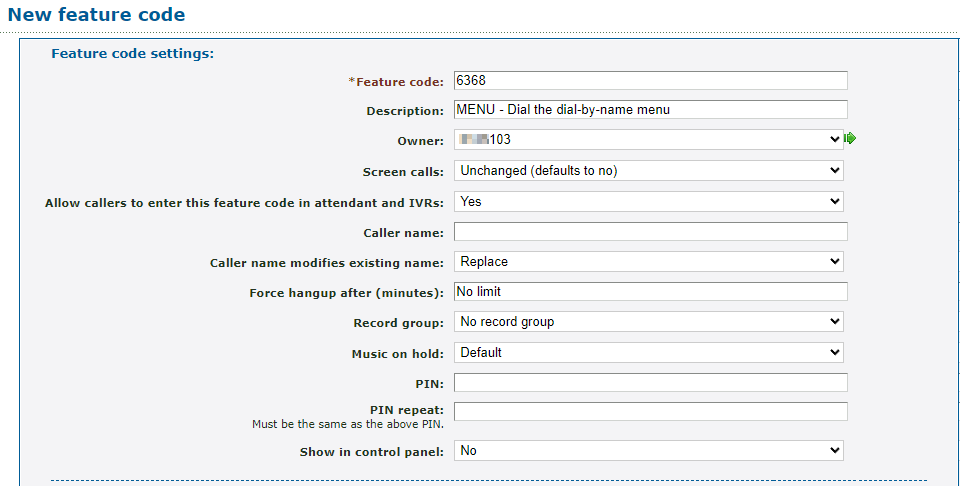
| Option | Description |
|---|---|
| * Feature Code | Type a unique series of numbers that users should dial on their desk phone to reach the Dial-by-Name menu. |
| Description | Type a note describing what this feature code is used for. |
| Owner | If needed, select a user that should be able to view and edit this feature code in the web portal. |
| Allow callers to enter this feature code in attendant and IVRs | Select whether or not callers in auto attendants or IVR menus should be able to dial this code. |
| Show in control panel |
Select whether or not this feature code should be shown on the Control Panel page. Quick Tip: Showing this feature code will allow users that use the Control Panel to drag and drop calls onto the conference bridge for transferring. |
4. In the Route calls to section, use the Default destination dropdown to select Dial by name menu.
5. Click the Save button.
6. Place a test call to this feature code on a desk phone to confirm that you can access the Dial-by-Name menu. It is also recommended to test out dialing in the menu and check that the audio names played are correct.