Yealink Conference Phone User Guide
Discover how to use your Yealink CP965 phone and all of its features with this comprehensive user guide.

Written by Val Campos
Updated at October 29th, 2025
Table of Contents
The Layout of a Yealink CP965


| # | Component |
Description |
|---|---|---|
| 1 | Mute Key | Toggles mute on and off. This key also shows the status of the phone and its calls using a LED. |
| 2 | Touch Screen | Displays information about calls, time, date, and other relevant information. |
| 3 | Volume (-) Touch Key | Lowers the volume of the speaker, ringer, and other media. |
| 4 | Volume (+) Touch Key | Increases the volume of the speaker, ring, and other media. |
| 5 | Home Touch Key | Return to the main/idle screen. |
| 6 | USB Type-A Port |
• Connect a USB flash drive (optional) to record calls/conferences and play back recorded audio files. • Charge a DECT Wireless Microphone (CPW65). • Connect expansion PSTN box(es) if needed. Up to two cascaded expansion PSTN boxes can be connected. |
| 7 | Security Slot | Connect a universal security cable to immobilize the phone. The phone can only be moved when the security cable is unlocked. |
| 8 | USB Type-C Port | Connect a PC to turn your CP965 into an external speaker and microphone for your PC. |
The CP965's Different Icons
While you are using your CP965 conference phone, you will see many types of icons that will indicate different statuses and information.
Status Bar Icons
Status Bar icons will help you monitor the statuses of calls, messages, and your phone itself.
| Icon | Description | Icon | Description |
|---|---|---|---|
 |
Wired network is unavailable or unreachable. |  |
Phone Warning |
 |
Extension/Account is registered successfully. |  |
Mute is active. |
 |
Auto Answer is active. |  |
Ringer volume is 0. |
 |
Do Not Disturb (DND) is active. |  |
Missed Calls |
 |
Always Forward |  |
Voicemail |
 |
No Answer Forward |  |
PSTN box is detected. |
 |
Busy Forward |  |
USB flash drive is detected. |
 |
Wi-Fi is enabled. |  |
Bluetooth is enabled. |
 |
Wi-Fi connection is unreachable. |  |
Bluetooth-enabled mobile phone paired and connected. |
 |
Phone Lock is active. |
Line Key Icons
By viewing the icons of your different line keys, you can reference what that line key does and its status.
Feature Icons
| Icon | Description | Icon | Description |
|---|---|---|---|
 |
Speed Dial |  |
Multicast Paging/Paging List |
 |
Directory |  |
Phone Lock |
 |
Voice Mail |  |
Record |
 |
Hold |  |
Recording in progress |
 |
DND |  |
Direct Pickup |
 |
Forward |  |
Group Pickup |
 |
Recall/Redial |  |
Hot Desking |
Line Icons
| Icon | Description | Icon | Description |
|---|---|---|---|
 |
Registered line/extension |  |
Register failed. |
 (Flashing) |
Registering |  |
Registered shared line. |
 |
DND is enabled on this line. |  |
Call forward is enabled on this line. |
Mobile Account Icons
| Icon | Description |
|---|---|
|
Bluetooth-enabled mobile phone is paired and connected. |
 (Flashing) |
Bluetooth-enabled mobile phone is connecting. |
 |
Bluetooth-enabled mobile phone has failed to connect. |
Intercom Icons
| Icon | Description | Icon | Description |
|---|---|---|---|
 |
Intercom is idle |  |
Intercom is talking. |
 |
Intercom is in callout state. |  |
Intercom failed. |
 |
Intercom is ringing. |
The CP965's Different Screens
The CP965's screens can help you navigate to different features and reference important information.
The Idle Screen
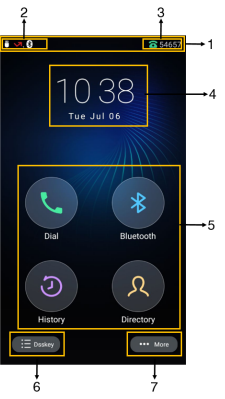
| No. | Name | Description | |
|---|---|---|---|
1 |
Status Bar | Displays the label of the phone's extension and icons. | |
2 |
Icons | Icons are displayed on the left of the status bar. | |
3 |
Current Account |
Displays the current registered account. No service will show if there is not a registered account. |
|
4 |
Digital Clock Widget | Display's the time and date. | |
5 |
Programmable Keys | Dial | Tap to enter the dialing screen. |
| Bluetooth | Tap to enter the Bluetooth settings screen. | ||
| History | Tap to enter the History screen to view call logs. | ||
| Directory | Tap to enter the Directory screen to view contacts. | ||
6 |
Dsskey | Tap to enter the Dsskey screen. | |
7 |
More | Tap to view the Control Center menu. | |
The Control Center Menu
The Control Center allows you to access features and settings quickly.
To view the Control Center menu, swipe down from the top of the screen or tap More on the idle screen.
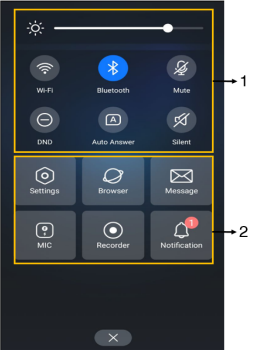
| No. | Name | Description | |
|---|---|---|---|
1 |
Control Center | Backlight Slider | Drag the slider to adjust the screen's brightness. |
| Wi-Fi | • Tap to turn Wi-Fi on or off. • Long tap to enter the Wi-Fi setting screen. |
||
| Bluetooth | • Tap to turn Bluetooth on or off. • Long tap to enter the Bluetooth setting screen. |
||
| Mute | Tap to mute or unmute the device. | ||
| DND | Tap to turn DND on or off. | ||
| Auto Answer | Tap to turn auto answer on or off. | ||
| Silent | Tap to turn silent mode on or off. | ||
2 |
Menu |
Settings | Tap to enter the Settings menu. |
| Browser | Tap to browse web pages. | ||
| Message | Tap to enter the Message setting menu. | ||
| MIC | Tap to enter the MIC setting menu. | ||
| Recorder | Tap to use the Recorder to record audio and manage recordings. | ||
| Notification | Tap to view notification messages. | ||
The Dsskey Screen
The Dsskey Screen allows you to view and customize your phone's line keys.

| No. | Application | Description |
|---|---|---|
| 1 |  |
Tap to add a line key. |
| 2 | Line Key List | Displays your phone's line keys and their labels. Press a line key to customize it. |
| 3 | Page Keys | Tap a page key to switch to that page. |
The Calls Screen
Every active and held call will be displayed on the Calls Screen:
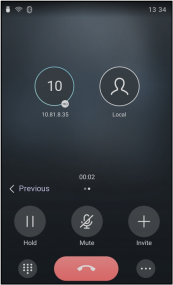
While you are on an active call, you can…
- Place the caller on Hold.
- Mute yourself.
- Invite another person to the call for conferencing.
- Open the DTMF dial pad.
- End the Call
- Press Previous or Next to switch between multiple calls.
Mute Touch Key LED Indicators
You can view the Mute touch keys' LEDs to reference the status of a call and the phone itself.
| LED Status | Description |
|---|---|
| Solid Red | The phone is turning on or muted. |
| Flashing Red | The phone is ringing. |
| Solid Green | The phone is placing a call or on an active call. |
| Off | The phone is powered off or idle. |
Place a Call
Whenever you are ready to, you can place outbound calls to your contact. There are several ways that a call can be initiated.
Use the Dialer
The Dialer allows you to dial a phone number or extension number to call. It also displays a list of previously placed calls or contacts in your directory.
- On the Idle screen, tap Call

- Enter an extension or phone number.
- Tap Send
 .
.
Use a Speed Dial or BLF Key
You can quickly dial a number by using a configured speed dial or BLF key.
To place a call to someone using a speed dial or BLF key, simply press the key on your screen.
Before you place a call using a BLF, you can view that user's status by referencing the icon indicators.
| Icon | Description | Icon | Description |
|---|---|---|---|
 |
The user is idle and available for a call. |  |
The user is ringing. |
 |
The user is dialing. |  |
The user is busy or on a call. |
 |
The user has placed a call on hold. |  |
A call is parked for that user. |
 |
The user's line has failed to register, their phone is unplugged, or the user does not exist. |
Place a Call from the Call History
Since your Yealink CP965 keeps a record of your calls, you can easily call a person you have spoken to in the past.
To do so…
- On the Idle screen, tap History
 .
. - Tap Local Calls and select the history list.
- Tap the desired entry.
Redial a Caller
You can easily recall the last person you have spoken to using your CP965's call logs.
To redial a previous caller…
- On the Idle screen, tap Call
 .
. - Tap the desired caller from the list.
Redial a Call Automatically
Your CP965 phone can be set to automatically redial a phone number when you call a contact and the contact is unavailable.
- Navigate to More → Settings → Features → Auto Redial.
- Turn on Auto Redial.
- Use the Redial Interval option to set how long (between 1 and 300 seconds) the phone should wait in between redial tries.
- Use the Redial Times option to set how many times (between 1 and 300) that the phone should redial.
- Tap
 .
.✔ Now when you dial a phone number and fail to establish a call, the phone will show the failure reason and ask if it should redial the contact. Press OK to activate auto redial.
Call a Contact
You can easily contact the people you have a contact created for in the Directory.
To dial a contact from your Directory…
- On the Idle screen, tap Directory
 .
. - If the contact was added to a specific contact group, tap Local Directory and select the contact group.
- Tap
 .
.
Place Multiple Calls
While you are in an active call, you can place your current caller on hold and place a new call.
To do so…
- Do one of the following:
- Select
 → New Call. The active call will be placed on hold.
 - Tap Hold to place the original call on hold and select
 → New Call.
- Select
- Type a phone number or select a contact.
- Tap Send .
If you would not like this phone to allow additional calls to ring, Call Waiting can be disabled.
Answer a Call
When you are receiving an incoming call, the phone will ring and the screen will display the information of the caller.
To answer the call, you can tap Answer.
You can also choose to…
- Answer a second call.
- Set your phone to answer calls automatically.
Answer a Call While in a Call
When you are handling an active call, you can answer another call if needed.
When you are in an active call and an incoming call is received on the phone, you will hear a call waiting tone beep with the caller's information displaying on the screen.
To answer that additional call, simply tap Answer  .
.
✔ Doing so will place the first caller on hold to allow you to speak to the second caller.
Auto Answer
The Auto Answer feature allows your phone to automatically answer a call on speakerphone (hands-free) mode when your phone is idle (not on an active call).
To enable auto answer…
- Navigate to More → Settings → Features → Auto Answer.
- Turn on Auto Answer.
- If you would like the phone to mute the phone's microphone when a call is automatically answered, turn on Auto Answer Mute.
- Tap .
✔ Once Auto Answer is enabled, the Auto Answer
icon will appear on the status bar:
Silence or Reject a Call
If you are unavailable to take a call, you have several different ways of rejecting a call.
Silence a Call
You can silence an incoming call to stop your phone from ringing.
To silence an incoming call, tap Silence  .
.
✔ When a call is silenced, the incoming call notification will continue to be displayed on the phone's screen.
Manually Reject a Call
When you are receiving an incoming call that you cannot take, you can reject the call.
To reject an incoming call, tap Reject.
✔ The rejected call will be shown in the Received Calls list in the phone's History.
Forward a Call
While a call is ringing, you can manually forward the call to another person.
To forward a ringing call…
- While the phone is ringing, tap
 .
. - Enter the extension number or phone number that the call should be forwarded to.
- Tap Forward.
Divert a Call from a Contact to Another Contact
If needed, you can divert all incoming calls from a particular contact to another contact.
- Tap Directory .
- Select the desired contact.
- In the Auto Divert field, type the extension or phone number to divert calls to.
- Tap Done.
✔ All calls from this contact will be diverted or forwarded to the phone number in the Auto Divert field.
Disable Call Waiting
If the call waiting feature is disabled, the phone will automatically reject incoming calls when you are on an active call.
To disable Call Waiting…
- Navigate to More → Settings → Features → Call Waiting.
- Turn off Call Waiting.
- If needed, use the Off Code box to type a dialable code that can turn off call waiting.
- Tap
 .
.
Reject Anonymous Calls
If needed, you can set your phone to automatically reject calls from callers that have hidden their caller ID information.
To enable the Anonymous Rejection feature…
- Navigate to More → Settings → Features → Anonymous.
- Select the line/extension number that needs the feature enabled.
- Turn on Local Anonymous Rejection (Anonymous Rejection).
- Tap
 .
.
The Anonymous Rejection feature can also be enabled/disabled using a dialable feature code.
For Stratus users…
- Dial *77 to enable the Local Anonymous Rejection feature.
- Dial *87 to disable the Local Anonymous Rejection feature.
For Enswitch users, set up custom On and Off Codes in the phone's settings that can be dialed. To do so…
- On the Anonymous screen in Features, turn on Send Anonymous Code.
- Use the On Code box to type a dialable code that will enable anonymous call rejection.
- Use the Off Code box to type a dialable code that will disable anonymous call rejection.
Quick Tip: It is recommended to check your account's feature codes to make sure you are not creating an On or Off Code that is already in use for a different feature.
Reference the Feature Codes for Your Users as an Admin
Admins of the ES web portal can check the Feature Codes shown for all of their users using the web portal.
To check the feature codes for the whole account…
1. Log into the ES web portal.
2. Navigate to Features → Feature codes.
3. View and take note of the feature codes for your users.
4. If needed, click the Export as .csv button to download this list of feature codes as a spreadsheet that you can keep record of and share with your team.
If you do not have access to the ES web portal, feel free to contact our technical support team to learn more about the dialable codes you can use.
- Tap
 .
.
Active Call Features
Using your Yelaink CP965 phone, you can easily handle calls coming in using several different features.
Mute Yourself
You can mute your phone's microphone during an active call so that the other person cannot hear you.
- To mute yourself on an active call, tap the Mute
 touch key or tap Mute.
 - To unmute your microphone, tap the Mute
 touch key or tap Mute again.
Keep Mute
If incoming calls are answered automatically by this phone, some callers may hear background noise or discussions taking place. You can keep the phone muted to prevent this.
- To activate the phone's mute state, tap the Mute
 touch key.
 ✔ The mute key LED will glow red and the mute
icon will appear on the status bar.
The phone will stay muted until the microphone is unmuted manually, or the phone is restarted.
- Tap the Mute
 touch key again to deactivate the mute state.
Hold and Resume a Call
While you are handling calls, you can place multiple calls on hold and resume a call when you are ready. When a call is placed on hold, the held party will hear your organization's music on hold.

- To place a caller on hold, tap Hold during an active call.
- If there are multiple calls on hold, select a call by pressing Previous or Next and then tap Resume to continue that call.
Park a Call
As an alternative to placing a call on hold, you can park a call in a park to allow other users to retrieve the parked call.
- To park an active call, tap
 and then Dsskey. Select the Call Park key.
 - To retrieve a parked call, dial the extension number of the call park (701, 702, 703, etc.).
Transfer a Call
While you are handling a call, you may find it necessary to send your caller to a different destination.
There are four different ways you can transfer calls to users:
- Blind Transferring
- Semi-Attended Transferring
- Attended Transferring
- Transferring to Voicemail (for internal users)
Perform a Blind Transfer
If you need to transfer call to someone else, you have the option to send the call straight to that other person without speaking to them using a blind transfer.
To perform a blind, or cold, transfer…
- Tap
 and then Transfer during a call.
 - Do one of the following:
- Type the extension or phone number you want to transfer the call to and tap Transfer.
- Tap
 and select the contact to transfer to.
 - Tap
 and select the desired list. Tap the desired call log to complete the transfer.
Perform a Semi-Attended Transfer
When you are performing an attended transfer, you may find that person you are attempting to transfer a call to is unavailable. When the person taking the transfer is unavailable, you can do a semi-attended transfer by sending the caller “blindly” to the other party's mailbox or forwarding destination.
To perform a semi-attended transfer…
- Tap and then Transfer during a call.
- Do one of the following:
- Type the extension or phone number you want to transfer the call to and tap Send.
- Tap and select the contact to transfer to.
- Tap and select the desired list. Tap the desired call log to complete the transfer.
- When you hear the ringback tone, tap Transfer to finish the semi-attended transfer.
Perform an Attended Transfer
If you would like to speak with the person you will be transferring a call to, you can use an attended transfer.
To perform an attended, or warm, transfer…
- Tap and then Transfer during a call.
- Do one of the following:
- Type the extension or phone number you want to transfer the call to and tap Send.
- Tap and select the contact to transfer to.
- Tap and select the desired list. Tap the desired call log to complete the transfer.
- After the contact answers the call, speak with them and then tap Transfer to finish the attended transfer.
Transfer to a User's Voicemailbox
During an active call, you can transfer a caller to another user's voicemailbox. This can be useful when you know that user is out of the office, or if the caller only wants to leave that user a voicemail.
To transfer a call to the voicemailbox of an internal user…
- Tap and then Transfer during a call.
- Dial the mailbox code for the other user and tap Transfer.
- For Stratus users, dial 03 and the extension number of the user.
- For Enswitch users, dial the feature code associated with the mailbox.
Quick Tip: Most accounts use 1+EXT (e.g., 1103 for dialing extension 103's mailbox) as the code for dialing into the mailboxes of other users.
Find Your Mailbox's Dialable Code
If you are not sure what your mailbox's feature code is, you can check this and the other feature codes you are set as the Owner for by logging into the ES web portal as a basic user.
To find your mailbox's feature code…
1. Log into the ES web portal.
2. Navigate to Features → Feature codes.
3. Take note of the Feature Code shown that is marked for your extension's Mailbox.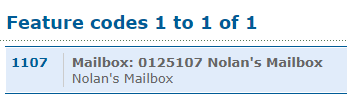
Reference the Feature Codes for Your Users as an Admin
Admins of the ES web portal can check the Feature Codes shown for all of their users using the web portal.
To check the feature codes for the whole account…
1. Log into the ES web portal.
2. Navigate to Features → Feature codes.
3. View and take note of the feature codes for your users.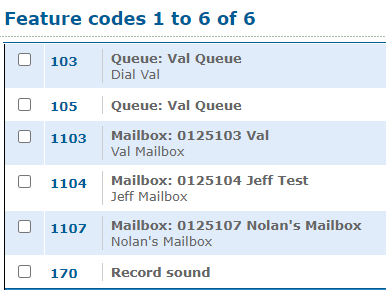
4. If needed, click the Export as .csv button to download this list of feature codes as a spreadsheet that you can keep record of and share with your team.If you do not have access to the ES web portal, feel free to contact our technical support team to learn more about the dialable codes you can use. You can also read this article to learn how you can create a code for dialing a mailbox.
End a Call
You can end an active call at any time. To do so, tap  .
.
Host a Conference Call
Whenever you need to, you can host a conference call using the phone's conferencing features.
Initiate a Conference
A Yealink CP965 can support up to 10 participants (including yourself) in a conference call.
You can start a conference call by either…
- Dialing multiple numbers.
- Inviting participants.
- Merging multiple calls into a conference.
Dial People
A convenient way to start a conference is by dialing multiple phone numbers or extensions at once.
To initiate a conference call in this way…
1. Tap  .
.
2. Select Call multiple members? Click here >>.
3. Enter the phone number or extension of the first participant and tap Add Members.
4. Repeat step 3 until all parties have been added.
Quick Tip: The value under the icon indicates the number of people added and the maximum number that can be added.

5. Tap  to call all parties at the same time.
✔ The conference will be set up once the participants answer the call.
Invite Participants
Another easy way to start a conference call is by inviting one or more members to an active call.
To initiate a conference call in this way…
1. Place a call to the first party.
2. After the first party answers the call, tap Invite.
3. Do one of the following:
• Enter the extension or phone number of the second party and tap Invite. Repeat for each participant.
• Tap  and select a contact to dial.
• Tap  and select the call log to dial.
• Tap Call multiple members? Click here >>. Enter the phone number or tap the contact, select Add Member, and tap .
Merge Calls
When there are multiple calls, you can merge them into a single conference call.
To merge calls, tap  and then Merge.
Hold and Resume a Conference Call
If you need to pause a conference call, you can place every participant on hold. While the conference is on hold, other participants will not hear each other until the held conference call is resumed.
- Tap Hold to place a conference call on hold.
- Tap Resume to resume a held conference call.
Mute and Unmute a Conference Call
Whenever you need to, you can mute your own microphone to prevent the other participants from hearing you. Muting yourself will still allow other participants to hear each other.
- Tap Mute to mute the conference call.
- Tap Mute again to unmute the conference.
Manage Participants
During a conference call, you can manage each participant to make the conference more flexible.
You can manage a conference's participants in the following ways:
- Mute a participant.
- Hold a participant.
- Remove a participant.
- Split the participant into their own call.
- View a participant's information.
To manage a specific participant, tap the avatar of the desired participant and do one of the following:
- Tap Far Mute to mute the participant. The muted participant will be able to hear everyone but no one else can hear them.
- Tap Remove to remove the participant from the conference.
- Tap Split to split the participant into their own call.
- Tap Hold to place that specific participant on hold.
- Tap Cancel to return to the conference screen.
Split a Conference Call
Once you are done with a conference call, you can split the call into individual calls. Once a conference call is split, the conference call will end with every participant on hold in their own calls. You can resume these calls to speak with each party separately.
Tap  and then Split to split the conference calls into individual calls on hold.
Pick Up Another User's Call
You can use your phone's call pickup feature to answer someone else's incoming call.
The Yealink CP965 phone supports two types of call pickup:
- Directed Call Pickup - Pick up an incoming call going to a specific phone.
- Group Call Pickup - Pick up incoming calls coming into any phone within your Department (Stratus users) or Pickup Group (Enswitch users).
Directly Pick Up a Call
When other users are receiving calls, you can help them handle their calls by picking them up for them.
To directly pick up another user's call…
- Tap
 .
. - Select DPickup (Pick Up).
- Enter the extension number that is receiving an incoming call.
- Select DPickup (Pick Up) again.
Pick Up a Group Call
When your Department (Stratus) or Pickup Group (Enswitch) receives a call, you can pick up a call using your phone. If there are multiple incoming calls to that group, you would pick up the first incoming call.
To pick up a group call…
- Tap .
- Select GPickup when a call is being received by your Department or Pickup Group.
Manage a Paging Call
During a paging call, you can manage it manually at any time.
- Select Hold to place the current paging call on hold.
The paging call is placed on hold and the receiver releases the session. - Select Resume to resume the held paging call.
- Select DND to enable or disable DND mode.
- Select Mute to mute the multicast RTP session.
- Select End Call to end the paging call.
Use Do Not Disturb
When you need to step away from the phone, you can enable DND (Do Not Disturb) Mode.
While the phone is on DND, the phone will be set as Busy and calls that are received will automatically be sent to voicemail or the destination of a Busy Forward.
Enable DND Mode
To enable DND mode on your Yealink CP965, do one of the following:
- Swipe down from the top of the screen to show the Control Center and toggle DND on.
- Navigate to More → Settings → Features → DND.
- Turn on DND Status and tap
 .
.
- Turn on DND Status and tap
- Select DND during a call.
✔ When DND is enabled, the phone will show a prompt saying “DND mode is enabled” with the DND  icon showing in the status bar.
Calls will either be rejected and sent to voicemail or forwarded to the destination set in a Busy Forward configured on the CP965.
Disable DND Mode
When you are ready to begin receiving calls again, do one of the following to disable DND mode:
- Select Exit DND mode from the idle screen.
- Swipe down from the top of the screen to show the Control Center and toggle DND off.
- Navigate to More → Settings → Features → DND.
- Turn off DND Status and tap .
- Turn off DND Status and tap
Use Feature Codes to Enable/Disable DND
For Stratus users…
- Dial *78 to enable DND mode.
- Dial *79 to disable DND mode.
For Enswitch users, either…
- Dial the feature code that has been set up for your account.
Reference the Feature Codes for Your Users as an Admin
Admins of the ES web portal can check the Feature Codes shown for all of their users using the web portal.
To check the feature codes for the whole account…
1. Log into the ES web portal.
2. Navigate to Features → Feature codes.
3. View and take note of the feature codes for your users.
4. If needed, click the Export as .csv button to download this list of feature codes as a spreadsheet that you can keep record of and share with your team. - If there is not yet a feature code created for your account, you can either…
- Contact our technical support team.
- Read this article to create a DND toggle feature code as an Enswitch admin.
Call Forwarding
Your Yealink CP965 phone will give you three options of forwards to configure to ensure your calls are being answered when your phone is not available to be answered in certain conditions. Setting a forward can be useful when you need your calls to be handled someone instead of having the caller leave a voicemail.
These forwards include…
- An always forward (unconditional)
- A busy forward
- An unanswered forward
Configure a Call Forward
To set up a Call Forward for your phone to follow…
- Navigate to More → Settings → Features → Call Forward.
- Select the desired forwarding type:
- Always Forward - Forward all incoming calls until disabled.
- Busy Forward - Forward incoming calls when you are in a call or on DND mode.
- No Answer Forward - Forward all unanswered incoming calls.
- Turn on the forwarding type.
- Do one of the following:
- Use the Forward to option to enter the phone number or extension number to forward to
- Tap and select a contact.
- If you selected No Answer Forward, use the After Ring Time option to set how long (in seconds) the phone should wait before forwarding calls.
- Tap .
Deactivate a Call Forward
- Navigate to More → Settings → Features → Call Forward.
- Tap the desired forwarding type.
- Turn off the forwarding type.
- Tap .
Manually Forward a Call
While a call is ringing, you can manually forward the call to another person.
To forward a ringing call…
- While the phone is ringing, tap .
- Enter the extension number or phone number that the call should be forwarded to.
- Tap Forward.