Create and Manage Call Queues
Learn how to easily set up a call queue to smoothly route callers to agents.

Written by Val Campos
Updated at August 5th, 2025
Table of Contents
What is a Call Queue?
A Call Queue, also known as a hunt group, is a function that dispatches calls to multiple agents. These call queues can ring agents simultaneously or in a specific order. There are different types of call queues that can be used to ensure agents are receiving and handling calls as intended.
Once a call queue reaches its Queue Ring Timeout (the set amount of a time a call will ring all agents, the call is marked as unanswered. Unanswered calls can be set to either stay in the queue, go to the queue's own voicemail, or forward to a different destination using its If Unanswered setting. Callbacks can be set up for call queues if needed.

Explore the Call Queues Page
All call queue tasks are performed from the Call Queues page. 
On the Call Queues page, you can view your created call queues, add more call queues, and edit existing call queues and their agents.

Quick Tip: The Refresh button at the top-right side of the page refreshes the information on the page to match recent changes.
Create a Call Queue
Your organization can have as many call queues as needed for dispatching calls. Many companies will have separate call queues for different purposes or departments. To create a new call queue…
- Navigate to the Call Queues page.

- Click the Add Call Queue button.

- Complete the fields in the Basic tab.

Basic Options
Option Description Name Give a unique name to the newly created call queue without any special characters. Extension Type in the next available extension number to use for this queue.
Quick Tip: It is recommended to use an extension number in the 8000s.
DANGER: Please be sure to not use an extension number already in use by a different function or user.
Department / Site If necessary, a call queue can be sorted into a certain Department and Site.
✔ Doing this can be useful for call center environments that rely heavily on call reporting and statistics since using departments and sites can be helpful for filtering.
Type Select what kind of call queue this new queue will be.
After selecting the queue's Type, more settings will become available for adjustment in the Basic tab.Phone Number If needed, select an available phone number to designate to the call queue.
When a call queue is saved with a number, Stratus will automatically route that phone number in the Inventory to route to the call queue.
Record Calls Select whether or not this queue should record calls.
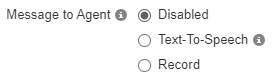
By default, the recording feature will be set to No.Statistics Select whether or not this queue should record the call statistics of each call and agent. Message to Agent Once the queue has been completely created, you can edit this queue and add in a message to be played to agents when they accept a call from this queue.
- Do one of the following:
- If you are creating a Park, click Save to complete this procedure.
- Otherwise, click Next to display the Pre-Queue Options tab and proceed to the next step.
- Complete the fields in the Pre Queue Options tab.

Pre Queue Options
While adding a call queue, there will be a Pre Queue Options tab full of settings that configure the selected call queue. The Pre-Queue Options determine what happens for callers before they are placed in the queue.
Setting Description Require agents Select whether or not an agent needs to be Online in the queue before callers can enter the queue. Queue Audio • If callers should only hear ringing, select Ringback.
• If callers should hear your business' music or any created messages, select Music on Hold.
Require intro MOH If there is a recording warning or any other introductory greeting created for the queue that should be played, select Yes. Max Expected Wait (sec) Set how long callers can wait before being placed into a queue that was full.
• Once this time limit is exceeded, the caller will follow the Forward if unavailable option.Max Queue Length Set the maximum number of callers that can wait in the queue.
• When the queue is full, callers will follow the max expected wait before forwarding to any set Forward if unavailable destination.Allow Callback option If needed, enable the callback feature of the queue for callers that have been waiting in the queue longer than the time set by the Queue Ring Timeout setting of the call queue. Forward if unavailable Acts as the exit option for callers that have been waiting for a spot in a full queue that has max limits set in the pre-queue options.
• This option only routes calls from callers that have exceeded a set Max Expected Wait and Max Queue Length. - Click the Next button.

- Complete the fields in the In Queue Options tab.

In Queue Options
In the process of creating a call queue, there is a tab of settings that come becomes available for users managing call queues. This tab is called the In Queue Options.
Setting Description Queue Ring Timeout (sec) Set how long the queue will try to ring agents before following an exit option. This exit option is configured as the If unanswered setting.
• This timeout is measured in increments of 5 seconds. Every 5 seconds is the length of 1 ring.Agent Ring Timeout (sec) If the queue being created is not a Ring All queue, then you can set how long the queue should attempt to ring each agent. Logout agent on missed call If the queue being created is not a Ring All queue, then you can select whether or not the queue should set agents as Offline when they miss a call in the queue. Enable Voicemail This setting enables or disables the call queue's own voicemail.
• While available as an option, the call queue's voicemail is not commonly used in the routing for voicemails.If unanswered Select where the call queue should send calls that exceed the value set for the Queue Ring Timeout.
• Stay in queue - Have the caller stay in the queue until an agent can answer their call.
– If the queue has its voicemailbox enabled, the queue will prompt the caller to either leave a voicemail or return to the queue.
– If the queue has callbacks enabled, the queue will prompt the user to either leave a voicemail, set up a callback, or return to the queue.
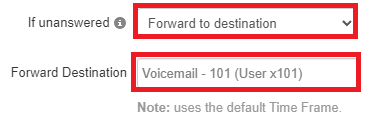
• Forward to destination - Route unanswered calls to a call queue, auto attendant, user, or external phone number.✔ This option is commonly used for sending calls to a general voicemail or to a secondary queue called an Overflow Queue.
• Send to voicemail - If the queue has its voicemail enabled, calls can be sent to its voicemail using this option.
- To set a where unanswered calls should route, set the If unanswered dropdown to Forward to Destination and type in the extension number, name, or 10-digit phone number of the destination.
- Click the Add button to apply these details.

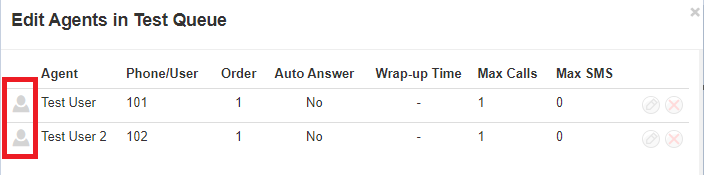
Manage Agents in a Queue
The Call Queues page allows you to add, edit, and delete agents for call queues.
To view and edit the agents in a queue, navigate to the Call Queues page, hover over the call queue, and click the Edit Agents ![]() icon.
icon.
Add an Agent
- Click the Edit Agents
 icon next to the queue that needs its agents adjusted.
 - Click the Add Agent button.

- In the Edit Agents menu, input the following:

-
Add Agent(s) by - Use the dropdown to select whether to either add an agent by their User or by their specific Phone.
- Add by User - Adding an agent by their User will ensure the call queue follows their answering rules.
- Forwards will be followed.
- The user's other devices will ring if set in a rule.
- Add by Phone - Adding an agent by their phone will have the call queue ignore their answering rules and ring just the device selected.
- If needed, select more of the user's devices to ensure their other phones ring as well.
- Add by User - Adding an agent by their User will ensure the call queue follows their answering rules.
- Agent Extension - Type and select the name(s) or extension number(s) of the agent(s) to be added.
- Status - Use the dropdown to set the agent(s) to be Online or Offline in the queue.
-
Add Agent(s) by - Use the dropdown to select whether to either add an agent by their User or by their specific Phone.
- Adjust the remaining settings for the agent(s) as needed.
Agent Settings
Setting Description Wrap up time Use the slider to specify the amount of time the agent is allocated to complete paperwork after finishing a call and before a new call is dispatched. Max Simultaneous calls Use the slider to specify the maximum number of calls an agent can take at one time. This will almost always be 1. Order in Linear Hunt Sets the dispatch order. If a call is dispatching, it will go to the available agent with the lowest order. Queue priority for agent Sets weighting for an agent that is servicing multiple queues. If you have an agent servicing two queues and both queues have a person waiting, for example, the agent will get the call from the queue whose priority is highest (lowest number). Request Confirmation Enables or disables request confirmation.
Choices are:
· Enabled = Requires the agent to confirm that they want to receive a call each time a call is dispatched to them in the queue.
· Disabled = Agent does not have to confirm the call.Auto Answer Enables or disables auto answer. This feature can only be used in Linear Hunt and Round Robin queues.
Choices are:
· Enabled = Agent's phone answers automatically (not all phones support this feature).
· Disabled = Agent's phone will not answer automatically. - When the agent is ready to be added, click the Save Agent button.

- Once all agents have been added, click the Done button.

Edit an Agent
While viewing a queue's agents, you can edit the settings of an agent. To do so…
- Click the Edit Agents icon next to the queue that needs its agents adjusted.
- Hover over an agent and click the Edit Agent
 icon.
icon. - Edit the Settings for the agents as needed.
Agent Settings
Setting Description Wrap up time Use the slider to specify the amount of time the agent is allocated to complete paperwork after finishing a call and before a new call is dispatched. Max Simultaneous calls Use the slider to specify the maximum number of calls an agent can take at one time. This will almost always be 1. Order in Linear Hunt Sets the dispatch order. If a call is dispatching, it will go to the available agent with the lowest order. Queue priority for agent Sets weighting for an agent that is servicing multiple queues. If you have an agent servicing two queues and both queues have a person waiting, for example, the agent will get the call from the queue whose priority is highest (lowest number). Request Confirmation Enables or disables request confirmation.
Choices are:
· Enabled = Requires the agent to confirm that they want to receive a call each time a call is dispatched to them in the queue.
· Disabled = Agent does not have to confirm the call.Auto Answer Enables or disables auto answer. This feature can only be used in Linear Hunt and Round Robin queues.
Choices are:
· Enabled = Agent's phone answers automatically (not all phones support this feature).
· Disabled = Agent's phone will not answer automatically. - Click the Save Agent button when adjustments are complete.
Remove an Agent
If you have an agent that is no longer needed in a call queue, you can easily remove them. To do so…
- Hover over an agent and click the Remove Agent
 icon.
icon. - Repeat this process for additional agents needing to be removed.
- Click the Done button.
Convert Agents
It is highly recommended to have agents in a queue added as either Users or Phones. If you have agents added by User and by Phone, you can click the Convert Agents button to set your queue's agents to all be added by User. This can help prevent any unusual dispatch issues for calls.
To convert your agents to Users…
- Click the Convert Agents button.

- In the confirmation message that appears, click the Convert button.

- Wait for the agents to fully convert.

✔ Agents added by phone will convert to Users.

If these agents have answering rules, the call queue will follow any answering rules that have been created for them.
NOTE: If you are having issues converting the phones to users, check to make sure the phones that are not converting do not have “#NAME” in their user information as it will not work. You will need to update that user's profile and replace “#NAME” with anything you want without special characters.
Check an Agent's Status
The color-coded status (person icon) will change color depending on the User's status:
- Green = Available
- Gray = Offline
- Red = Busy on a call
If an agent is showing as Offline but should be Online, or vice versa…
- Click the Edit Agent
 icon.
icon. - Use the Status drop-down to select the agent's status.

- Click the Save Agent button.

- If needed, repeat this process for any other agents.
- Click the Done button.
