Have Iris Handle Afterhours Calls
Learn more about how you can use your Iris AI Assistant during your company's afterhours.

Written by Val Campos
Updated at May 27th, 2026
Table of Contents
Some companies may prefer that Iris only be used during their afterhours so that their staff can directly speak with callers during normal office hours while callers outside of office hours can have basic questions answered by Iris. This can be done by adjusting the answering rules of a user or Inbound Routing User, which are utilized to perform time-of-day routing.
This guide will explore how Iris can be set as the destination for afterhours calls for a whole business or location. This guide will provide the following steps:
- Adjust Iris' settings to match your needs.
- Set Iris as the destination for calls during the afterhours through either an afterhours auto attendant or an Inbound Routing User.
- Create call routing schedules for users receiving transfers from Iris by adding answering rules for each user.
More Info: The steps above will explain how you can set Iris as a destination for calls and update its settings if Iris should be able to transfer calls or use its directory. If Iris will be facilitating call transfers, you can use this guide to review how you can set a schedule for users if they need call transfers after hours to go to specific destinations, such as their own mailbox.
IMPORTANT: Before Iris can be implemented into your call routing, an admin user (Office Manager) for your Stratus account will need to enable Iris and make sure Iris is created.
If this still needs to be done, follow the guide below to learn more about starting an Iris subscription:
Try Out the Iris AI Assistant with a Trial
Iris will also need to be created already in order for it to show up as a destination for calls. To learn more about how you can deploy Iris, follow the guide linked below:
Deploy Your Iris AI Assistant
If you have any billing questions or would like to speak with our Billing team, you can do so by calling (469) 429-2500 and selecting Option 2 or emailing billing@spectrumvoip.com.
Our Billing team also offers a Billing web portal for managing your billing information and invoices. For help logging into the web portal, let our Billing team know.
Submit a Request to Have Iris Deployed for Your Afterhours
If you would prefer that our Technical Support team deploy Iris for your afterhours instead, an authorized Point of Contact (POC) can contact our technical support team by calling (469) 429-2500, emailing support@spectrumvoip.com, or sending in a ticket using our support website:
https://www.spectrumvoip.com/support/.
In your request for support setting up Iris, include the following information:
• Your name and a good contact number to call for any questions or updates.
• If Iris will be set for the afterhours of the whole business, a specific location, or a specific user.
– If Iris will only be used for a specific location, provide the phone number of the location(s) that needs this change.
– If Iris will only be used for specific users, provide a list of those users' name and extension numbers.
• Should Iris be able to transfer callers to specific departments and users?
– If so, provide a list of the users/call queues that should receive the transfer and the keyword that should said.
– For example, Iris should send callers to the Sales queue when the word “Sales” is said by a caller.
• Will the Directory of Iris need to be enabled so that Iris can transfer calls to users a caller asks for by name?
– If so, should any users be hidden from this directory?
all queue or user is receiving transfers, should calls be sent to a specific destination during the afterhours for the user?
– If so, provide the time that calls should be forwarded and the destination calls should be forwarded to.
– For example, Iris transfers for Bob should go to his personal mailbox outside of his normal office hours (Mon-Fri 8-5).
Step 1: Review Iris' Settings
Before setting Iris in place, it is recommended to check Iris' settings ahead of time. Use the module below to review some settings that may be the most imperative to review.
Opening Hours
On the Business Information tab, verify that the Opening hours listed are correct.
If you notice that these hours need to be updated, click the Update button and use the Update opening hours menu to select the days and times your business is open for.
Welcome Message
If you have a preferred script that Iris should use for its introductory greeting, you can type out what you would prefer Iris to say in the Welcome message box.

For the welcome message you create, it is recommended to include the following:
• The name of your business.
• Your company's motto if you would like to include it.
• If you are a medical office, include a reminder for callers to hang up and dial 9-1-1 for any emergencies.
• If you are only using Iris for office closures, mention that your business is currently closed.
• A description of how Iris, an AI Assistant, can help handle their call.
• An ending sentence that prompts the caller to respond with what they are looking to accomplish, such as “How can I help you today?".
Note: After this welcome message plays, Iris will pause and listen for what the caller is requesting. To avoid confusion, make sure Iris asks what they need.
Call Transfers
Some callers that interact with Iris may ask to speak with a specific department or person. You can set where calls should be forwarded when a specific person/department is mentioned.
1. In the Call transfers section of the Settings, click the Add transfer button to add a destination for transferred calls.
2. In the Add transfer menu, input the following:
• Extension - Type the name or extension number of the name, call queue, or auto attendant that would receive the transferred call.
• Name - Type a name for this transfer that Iris would listen for to transfer to this person/department.
3. Click the Save button.
4. Repeats steps 1-3 for each keyword and transfer that needs to be added.
5. To make sure the transfers work as you intended, click the Make a test call button at the top-right of the Settings menu and ask for these people/departments by name.
. 
Iris' Directory
Many auto attendants may use the Dial-by-Name Directory to allow callers to search for and contact a team member directly. This can also be done within Iris using its Directory feature.
If you would like to try out this feature, click the Enable directory tool toggle.

You can click the Make a test call button at the top-right of the Settings menu, to test the functionality of the Directory in an active call with Iris.
Hide Someone from the Directory
Some users may not need to be searchable by customers within Iris' directory. You can hide a user from the Directory feature by doing the following:
1. Navigate to the Users page.![]()
2. Use the search bar to find the user that should be hidden.
3. Click the name of the user.
4. In the Profile section of the user's settings, go to the Directory Options and deselect Announce in Audio Directory. 
5. Scroll down and click the Save button. 
Some Users are Not Searchable by Iris
If you are noticing that a particular user is not able to be reached by a caller after they ask for that user by name to Iris, that user's “Announce in Audio Directory” setting may be disabled.
More Info: The “Announce in Audio Directory” setting allows a user to be searchable within audio directories.
These directories include the Dial-by-Name Directory that can be set as an option for an auto attendant and Iris' Directory.
If this setting needs to be adjusted for multiple users, you can bulk edit those users so that you do not have to update this setting for users one-by-one.
1. On the Users page, select the users that need this change.
2. Click the Bulk Edit button that appeared. 
3. In the Bulk User Edit menu, scroll down and select Announce in Audio Directory. Make sure its toggle is set to Yes. 
4. Click the Save button to confirm these changes. 
Step 2: Set Iris as the Destination for Afterhours Calls
With Iris' settings adjusted, Iris is now ready to have afterhours calls routed to it. Figuring out where to implement Iris in your afterhours call routing will depend on your company's preferences and needs. Two, more commonly used methods are as an option for an Afterhours Auto Attendant and as the destination of an Inbound Routing User's Default/Afterhours rule.
To compare and contrast these two methods, review the table below:
| Where to Implement Iris | Potential Benefits |
|---|---|
| Afterhours Auto Attendant |
• Keep using an afterhours auto attendant that callers may be used to. • Allow callers to select from other options, such as speaking with an emergency/on-call contact before speaking with Iris. • Allow callers to hang up ahead of time once they hear the business is closed to avoid Iris' history showing calls where the caller immediately hangs up. • More control over the verbiage of the greeting that lets callers know why the office is closed, especially if Iris will be handling calls for other out of office events, such as holidays. • Use the afterhours auto attendant as an office closure notice if Iris will be used during normal business hours as well. |
| Inbound Routing User |
• Avoid having callers interact with any additional menus, like auto attendants. • Use Iris' Welcome Message to tell callers your office is closed if Iris is not going to be used during normal business hours or any events that require their own greetings. • Use Iris' Directory as an alternative to an auto attendant's Dial-by-Name Directory. • Keep track of all caller interactions with your business outside of business hours. |
To learn more about implementing Iris using one of these methods, review the dropdowns below.
Method 1: For an Afterhours Auto Attendant
Why Use This Method?
Some companies may prefer that their callers continue to use their afterhours auto attendant but have Iris as one of its options. This can be useful for scenarios like…
• The company prefers for a specific greeting to play that states that the office is closed.
This can be beneficial for companies that plan on using Iris as the destination for all out of office events where different auto attendants will be used as special greetings.
• The company wants to allow callers without urgent needs to hang up before interacting with Iris.
This can help reduce Iris calls where a caller immediately hangs up after hearing the office is closed from Iris. Without these extra calls showing in Iris' History, it can be easier to find and review call logs and transcripts from productive interactions between callers and Iris.
• Callers need to have an emergency option they can press in the menu to dial the telephone number of on-call personnel.
To set Iris as the destination for calls that reach an afterhours auto attendant, do the following:
1. Navigate to the Auto Attendants page.
2. Click the name of the auto attendant used during the afterhours.
3. In the Dial Pad Menu section, click the number that callers should press to reach Iris. 
4. Update the Menu Prompt of the auto attendant to ensure it mentions that the caller can follow an option to interact with an AI Assistant.
To do so, click the Edit ![]() icon in the Menu Prompt section.
icon in the Menu Prompt section.
5. In the Manage Audio menu, adjust the greeting to mention that callers can press an option to speak with Iris.
Quick Tip: If you would like the auto attendant to send callers to Iris without the caller needing to press a button, you can say “please stay on the line” instead.
6. Click the Save button. ![]()
7. In the Choose a new application section, select User. 
8. In the Choose the user box, type “Iris” or “40000” and select the 40000 (Iris AI Assistant) user.
9. Click the Save button. ![]()
10. To have the auto attendant send callers to Iris automatically, click the Options button. ![]()
11. In the Options menu, adjust these two options based off preference:
• If no key is pressed - If the caller should be sent directly to Iris if they caller does not press any keys.
• If unassigned key is pressed - If the caller should be sent to Iris if they press any key that is not set to send callers to a destination.
Quick Tip: This option may get set to send callers to Iris anyways if Iris will be the only option for the auto attendant and as a backup, just in case the caller is confused and not sure what to press.
12. Click the Done button and click the Save button again.
Method 2: For an Inbound Routing User
Why Use This Method?
Iris can be set as the destination for an Inbound Routing User's out of office rules so that callers are immediately forwarded to Iris. This can be useful for scenarios like…
• The company wants to avoid having callers interact with an additional menu, like an auto attendant.
• Use Iris' Welcome Message and Directory as a replacement for an auto attendant's Menu Prompt and Dial-by-Name Directory.
• Caller's do not need any extra options to use in a menu besides Iris' information and transfers.
• Make sure all calls during the afterhours are within Iris' Call History.
To set Iris as the destination for afterhours calls…
1. Navigate to the Users page.![]()
2. Use the search bar to find the user that receives calls from your main phone number, such as an Inbound Routing User.
Quick Tip: For a whole business or a specific site/location, an Inbound Routing User is usually the first destination for calls to a phone number. This routing user's sole purpose is to handle the time-of-day routing of the business/site.
To review your phone numbers and check the destinations for calls going to them, navigate to the Inventory page.

3. Click the Edit  icon next to the user and select Answering Rules.
4. Click the Edit icon next to the answering rule of a specific time frame where Iris should handle calls.
5. In Call Forwarding section of the Edit menu, select User - 40000 (Iris AI Assistant) for the Always box.
NOTE: If you do not see User - 40000 (Iris AI Assistant) as an option, then your Iris user may not have been created yet.
To have Iris created and deployed, you can contact our technical support team by calling (469) 429-2500, emailing support@spectrumvoip.com, or sending in a ticket using our support website:
https://www.spectrumvoip.com/support/.
If you would like to create and deploy Iris yourself, you can follow the guide below to do so:
Deploy Your Iris AI Assistant
6. Click the Save button. ![]()
7. Repeat steps 4-6 for any other answering rules that need to be updated.
8. Place a test call to your company's phone number during the time Iris is active to confirm calls are routing as intended.
Step 3: Create a Schedule for Users Receiving Iris Transfers
Similar to Inbound Routing Users, regular users have answering rules. Answering rules determine where calls should be forwarded when a user's extension number is dialed during specific times and dates.
If you want callers to be sent to someone's mailbox when Iris is prompted to transfer to that user by a caller, you can create a call routing schedule for them using answering rules.
Note: Callers can be transferred by Iris to a specific user in the following scenarios:
• Iris has a Call Transfer option for that user within its settings.
For example, Iris has a call transfer option for user 107 that is triggered when a caller asks for “Sales”.
• Iris has its Directory feature enabled.
For example, a caller asks for “Bob Smith” while talking with Iris, which has the Directory enabled.
Step 1: Create an “Office Hours” Time Frame
To tell the system the day and times that the user should receive calls, you can create a time frame on the Time Frames page of the Stratus web portal.
- Navigate to the Time Frames page.

- Do one of the following:
- If the time frame you are creating will be used by multiple users, select Domain.

- If the time frame will only be used by a specific user, find and select the user using the list or search bar.

Note: If you are not able to see the user in the list, unselect Hide Users Without Time Frames.

- If the time frame you are creating will be used by multiple users, select Domain.
- Click the Add Time Frame button.

- In the Add a Time Frame menu, do the following:

- Name - Type a unique, identifiable name for the time frame.
- When - Select Days of the Week.
- On the Days of the Week tab, select the days and times the user(s) should receive calls.

Quick Tips: You can add a break/lunch period by clicking the Add
 icon.
icon.
If you need to apply a change you have made to the rest of the selected days, click Copy to all.

If you need this time frame to start being active on a future date, you can set a custom start date by using the Recurrence dropdown to select Custom. Using the Starts box, select the date.
If this schedule should happen at a different frequency (e.g., every 2 weeks, every other month, etc.) use the Recur Every options to select that frequency.

- Click the Save button.

- Repeat steps 3-6 for each additional time frame a user will need.
Step 2: Add an “Office Hours” Rule for the User
To set where calls should go for a user when their extension number is dialed outside of their work schedule, an answering rule will need to be created that uses their new "Office Hours" time frame.
- Navigate to the Users page.

- Scroll down or search for the user that needs their hours set.

- Click the Edit
 icon next to the user and select Answering Rules.
- Click the Add Rule button.

- In the Add an Answering Rule menu, use the Time Frame dropdown to select the user's new time frame.

- If this time frame should be ready to use immediately, leave Enabled selected.

- Do one of the following to set where calls should go depending on what the user prefers
To All Devices
If every device registered to a user's extension number should ring, select Simultaneous ring. Make sure that Ring all user's phones is selected.

Use the table below to learn more about the different options available for configuring Simultaneous Ring:
Option Description Include user’s extension Ring the phone that uses the user's main extension number. Ring all user’s phones Ring all of the user's phones (i.e., mobile apps, softphones, and desk phones) at the same time. Answer confirmation for offnet numbers Request that the person answering press 1 to accept the call to ensure that the answering party is a person instead of voicemail. Extension, number or phone Type the extension number or phone number of another device to ring. Ring Delay (sec) 
Set a how long (in seconds) the system should wait before calling the device set in the Extension, number or phone box. Add 
Click to add additional phones to the simring. To Their Desk Phone
If only the user's desk phone should ring, select Just ring user's extension.

To a Softphone
If the user only wants a specific softphone (e.g., StratusHUB, StratusWEB PHONE, or Stratus mobile app) to ring, you can use the Call Forwarding section to set the device the calls should route to. Select Always and type and select the extension of the device/softphone that should ring.

You can select other forwarding rules to fine-tune how a call should be handled when certain conditions are met.
For this example… Calls will be forwarded to x121's StratusHUB desktop app. When calls are rejected or unanswered, the call will be forwarded to x121's desk phone. Calls not answered on the desk phone will go to x121's voicemail.

Use the table below to learn more about these other call forwarding options:
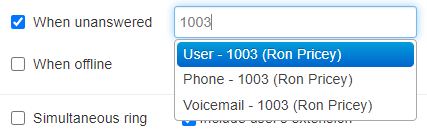
Option Description On Active Forward calls to the destination if the user's phone is already on a call. When busy Forward calls to the destination if the reject button is pressed on an incoming call. When unanswered Forward calls to the number specified in the text field if the call is not answered after the specified ring timeout. When offline Automatically forward calls to the number specified in the text field when no devices are registered. This can be helpful if all of a user's devices are offline due to an internet or power outage. To a Different User
If the user's calls should be forwarded to a different extension number, you can use the Call Forwarding section to set this user's calls to forward to a different user's extension number or a telephone number.

Option Description Always Forward calls to the number specified in the text field. No other forward rules will be followed On Active forward calls to the destination if the user's phone is already on a call. When busy Forward calls to the destination if the reject button is pressed on an incoming call. When unanswered Forward calls to the number specified in the text field if the call is not answered after the specified ring timeout. When offline Automatically forward calls to the number specified in the text field when no devices are registered. This can be helpful if all of a user's devices are offline due to an internet or power outage. Destination Options for Forwarding
When the destination field is being filled with Text, Stratus will show possible destinations based on the input.
The different destination options that may appear for a name/extension number include the following:
• User - Forward calls to the user at the specified extension and follow their answering rules.
• Phone - Bypass the answering rules and forward calls to the device associated with the specified user.
• Voicemail - Forward calls to voicemail at the specified extension.
• Queue - Forward calls to a call queue associated with that extension.
dant - Forward calls to the auto-attendant associated with this user.
• Off-Net Number - Forward calls to a 10-digit Phone Number, such as a cellphone or answering service. - Click the Save button.

✔ You should now see an “office hours” answering rule that shows the time frame and destination for calls that you selected.

Step 3: Update the User's Default Rule
Now that an “office hours” answering rule has been added for the user, the user's Default answering rule will need to be adjusted to ensure after hours calls are routed according to the user's preference.
What is the Default Answering Rule?
The Default answering rule is an answering rule that is created each time a user is created. By default, this rule is usually set to Simultaneously ring all of the user's registered devices.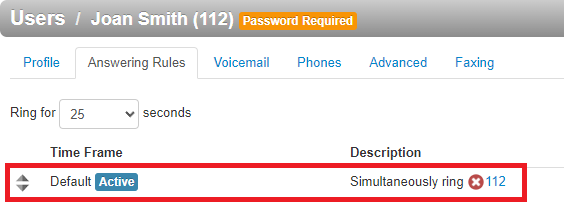
The Default answering rule acts as a “catch all” and stays active 24/7 unless there are answering rules above it that are active. Since this rule exists by default and is constantly active, it is usually used for routing After Hours calls, especially if there is a business hours answering rule that has been created.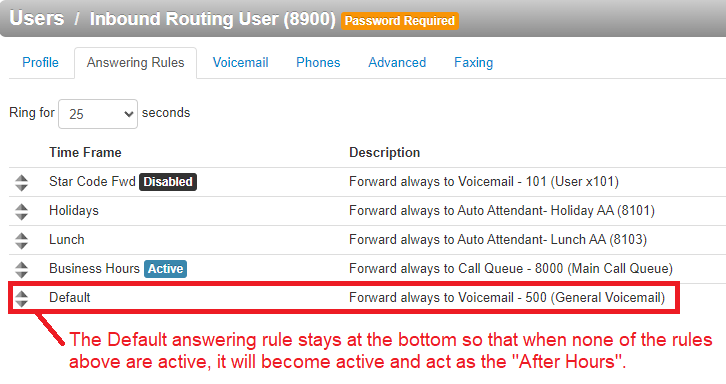
By clicking the Edit  icon next to the Default answering rule, you can adjust the destination for calls that are received while the Default answering rule is active.
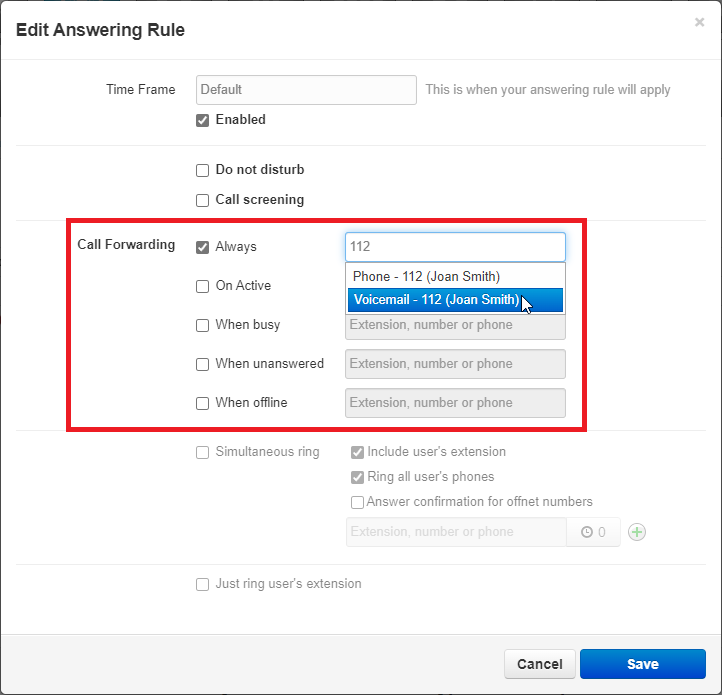
This can be useful to do when you have added more answering rules for things such as your business hours or lunch. 
To adjust the user's afterhours routing by editing the Default answering rule…
- Click the Edit icon next to the Default answering rule.

- In the Call Forwarding section, select Always.

- In the box, type the name, extension number, or phone number of the user or mailbox that after hours calls should forward to.

Quick Tip: If you need to send after hours calls directly to a voicemail, select the Voicemail option that appears.

- Click the Save button.
✔ The user should now have answering rules that route calls for their office hours and after hours (Default).
