Set Up a Grandstream Handset for the First Time
Check how to set up and connect your new Grandstream WP handset so that you can start placing and receiving calls.

Written by Val Campos
Updated at July 1st, 2025
Table of Contents
Assemble the Phone
The first step to setting up a Grandstream handset is assembling it. In the packaging your handset arrives in, you will have the handset itself, a charging station, a power adapter, and a handset belt clip

Insert the Battery
The Grandstream WP816 handset model comes with a rechargeable 1500mAh battery. The Grandstream WP836 handset model comes with a rechargeable 3000mAh battery. To ensure these handsets charge when connected to their charging station, their batteries will need to be inserted. 
To insert the battery for a handset…
- Remove the battery cover using a thin card or your fingers.
- For Grandstream WP836 phones, remove the battery door that covers the battery compartment.
- Insert the battery making sure the battery's terminals touch the handset's terminal.
- If you want to use the belt clip, press the belt clip into the back of the phone so that the round prongs of the clip insert into the oval notches on the sides of the handset.
Power the Charging Station
For the handset's battery to charge, the charging station will need to be connected to power. To do so, plug the provided 5V power adapter into a power source and the USB-C port on the bottom of the charging station.
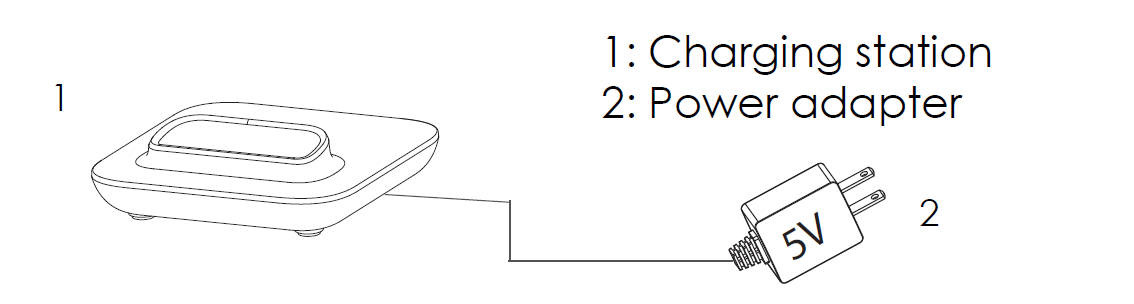
Once the power adapter is connected to a power source and the charging station, you can seat the handset in it to start charging the handset.
Get Connected to the Internet
Once you insert the battery of the phone, you can hold down the red Power/Hang Up button to turn on the handset. Once the handset powers on, you will be prompted to configure the handset's network information so that it can connect to your Wi-Fi network.
On the Quick Network Configuration screen, you will be prompted to select either Via Local Device or Via Mobile Browser. Read the modules below to learn more about these two ways to initially connect your handset to your Wi-Fi network:
Via Local Device
If you select Via Local Device, the handset will pull up its own Wi-Fi Network menu. Select your network's SSID and enter your network's password.
Quick Tip: You can change the format of your typing using the 1Bc softkey. The input methods that you can switch between include the following:
• 123 - Numbers only
• abc - Lowercase letters
• ABC - Uppercase letters
• Ab2 - Numbers, lowercase letters, and uppercase letters
To get the letter you need, press the number on the dial pad that is associated with that letter until you see that letter pop up.
• For example, if your password starts with an uppercase “V”, you will want your input mode to be set to ABC before pressing the number 8 on the dial pad 3 times.
While typing using the handset's dial pad, the following buttons are important to remember:
| Button | Input/Function |
|---|---|
| 1 | Common symbols: 1 . , ' ? !"- |
| * | All symbols |
| 0 | Change the typing format to either Ab2, ABC, abc, or 123 |
| # | Press to add a space. Press twice to type a 0. |
Via Mobile Browser
If you select Via Mobile Browser, the handset will display a QR code youcan scan with the camera of your cellular device.
Once the QR code is scanned, the cellular device should prompt you to connect to the handset's local Wi-Fi network. 
Once connected, open your cellular device's browser app. You will be taken to a webpage to enter your Wi-Fi network's SSID and password. 
If you do not see the Quick Network Configuration screen, you can do the following to connect your handset to Wi-Fi:
- Press the OK button to pull up the Menu.
- Navigate to Settings → Wi-Fi Settings.
- Select Wi-Fi Network.
- Select the SSID or name of your Wi-Fi network.

- Press the down arrow to hover over the Wi-Fi Password field and enter your Wi-Fi network's password using the dial pad.

Quick Tip: You can change the format of your typing using the 1Bc softkey. The input methods that you can switch between include the following:
• 123 - Numbers only
• abc - Lowercase letters
• ABC - Uppercase letters
• Ab2 - Numbers, lowercase letters, and uppercase lettersTo get the letter you need, press the number on the dial pad that is associated with that letter until you see that letter pop up.
• For example, if your password starts with an uppercase “V”, you will want your input mode to be set to ABC before pressing the number 8 on the dial pad 3 times.While typing using the handset's dial pad, the following buttons are important to remember:
Button Input/Function 1 Common symbols: 1 . , ' ? !"- * All symbols 0 Change the typing format to either Ab2, ABC, abc, or 123 # Press to add a space. Press twice to type a 0. - Press the Connect softkey.

✔ The handset should now show its connected to that network.

Now that the handset is connected, you should be able to place and answer calls.
- You can adjust the Warning Threshold setting to set how low the handset's connection to your Wi-Fi can be before a warning is generated.

✔ It is recommended to set this threshold so that it is easier to monitor how well the handset's connection is. Doing so can help avoid internet connection issues causing call quality issues.
- Place a test call to confirm your handset is now functioning as intended.