Enswitch - Manage a Hunt Group
Learn how you can edit a hunt group's settings, default destination, and agents using your Enswitch web portal.

Written by Val Campos
Updated at August 7th, 2024
Table of Contents
A Hunt Group can distribute calls to multiple agents set in a Level. Hunt Groups can be an amazing tool to help manage the call flow for your business/call center. One thing to remember is that hunt groups cannot be monitored with the Queue Panel; only queues are shown in the Queue Panel.
Adjust a Hunt Group's Settings
As a basic Enswitch user, you can edit any hunt groups that you have been set as the Owner for.
When you click the name of a hunt group that you want to edit, there are several settings that can be adjusted. Use the table below to learn more about these settings.
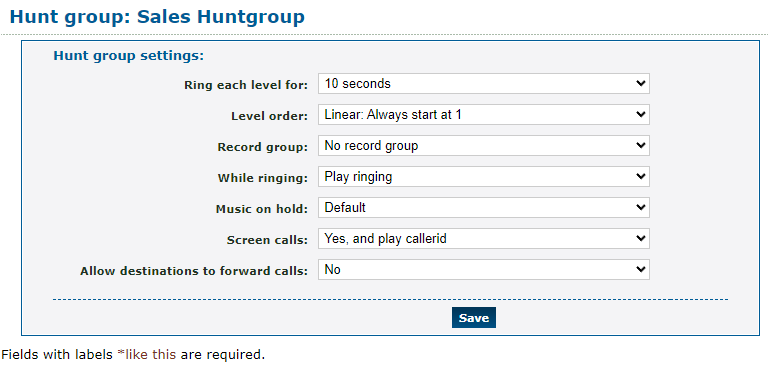
| Option | Description |
|---|---|
| Ring each level for | Select how many seconds a call will ring to each destination. When a destination does not answer, the call will start ringing the next level. |
| Level order | Select what type of hunt group this hunt group will be, which decides how the levels are rung. • Linear - The queue will ring agents in Level 1 first. • Smart linear - The queue will ring the last level that answered before ringing linearly. • Circular - The queue will ring starting at the next level from the level that handled the previous call. • Smart Circular - The queue will ring the last level that answered and then continue ringing circular. |
| Record Group | If needed, select a Record Group that should record and store this hunt group's calls. |
| While ringing | Choose if the system will play ringing or music on hold for callers waiting in the hunt group. |
| Music on hold | Select the music that will be played to callers waiting.
|
| Screen calls |
Choose whether or not to screen calls. ✔ When set to yes, the destination will be told the caller ID of the caller and asked if they will accept the call. This can help mitigate ghost and spam calls. |
| Allow destinations to forward calls | Select whether or not agents should be able to forward calls elsewhere if needed. |
Update the Default Destination
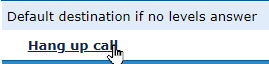
Now that the queue's settings have been configured, a Default Destination should be set. The Default Destination is where calls will be routed if an agent is unable to answer.
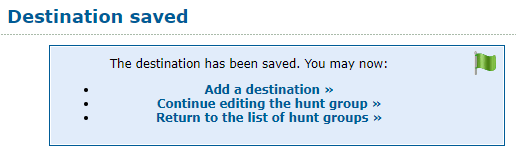
- In the Hunt group saved notice, click the Set the default destination option.
Quick Tip: Alternatively, you can click the destination shown under Default destination if no levels answer.
- In the Destination Settings page, use the Destination drop-down to select a feature that will act as the default destination for unanswered calls.
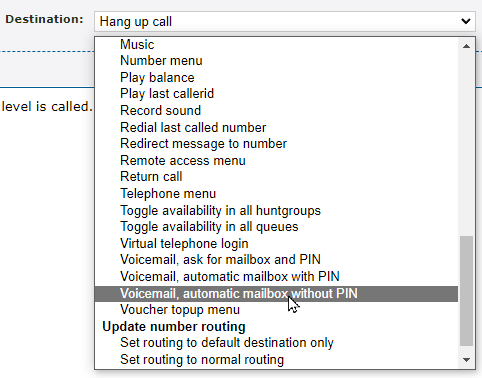
Note: To learn more about Destination Features, read this article.
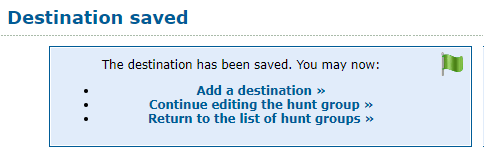
- Once the destination feature has been selected, click Save.
Add Agents
Once the new hunt group has been saved, you can add in the destinations that callers will ring to. These destinations can be telephone lines, phone numbers, and SIP URIs.
To add a destination for the queue…
- Navigate to Features → Hunt groups.
- Click the name of the hunt group.
- In the Destinations section, click Add a destination.
- On the New destination page, use the Level drop-down to select which group of agents this user will be in for the order that they ring.

- Use the Destination drop-down to select if a Telephone line or Number will be the destination.
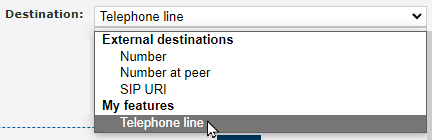
- Once the Destination has been selected, use the box to type in the phone number, input the SIP URI, or select the telephone line that will be rung.


- If necessary, use the Append to callerid box to type in a note that will appear alongside the phone number in the caller ID.

WARNING: The portal will only accept numbers for this setting.
- If needed, use the Screen calls drop-down to enable call screening for this agent.

✔ When call screening is enabled, the agent will be told who is calling (based on their caller ID) and if they would like to accept the call.
- Click Save.
- To add additional destinations, click Add a destination and repeat steps 4-9.