Enswitch - Set All Devices for a User to Ring Using a Queue
Discover how you can have all of the devices for a user to ring by creating a call queue for that user.

Written by Val Campos
Updated at October 24th, 2025
Table of Contents
Set Up a Queue to Ring a User's Devices
If one of your users has multiple devices that should ring, a queue can be created that rings their devices. Creating queues for your users can be useful since each device a user uses is registered to its own 7-digit extension number (i.e. the Telephone Line).
To implement a queue that rings the devices of a user, the following will need to be completed:
- Create a queue for the user.
- Add the user's devices to the queue as destinations.
- Check the status of the devices in the queue.
- Route calls to the queue.
Step 1: Create a Queue
As an Enswitch Admin, you can add call queues for your users that can be used to ring multiple devices for a user. To do so…
- Navigate to Features → Queues.
- Click the New >> button.

- In the Queue settings section, fill in the following information for this queue:
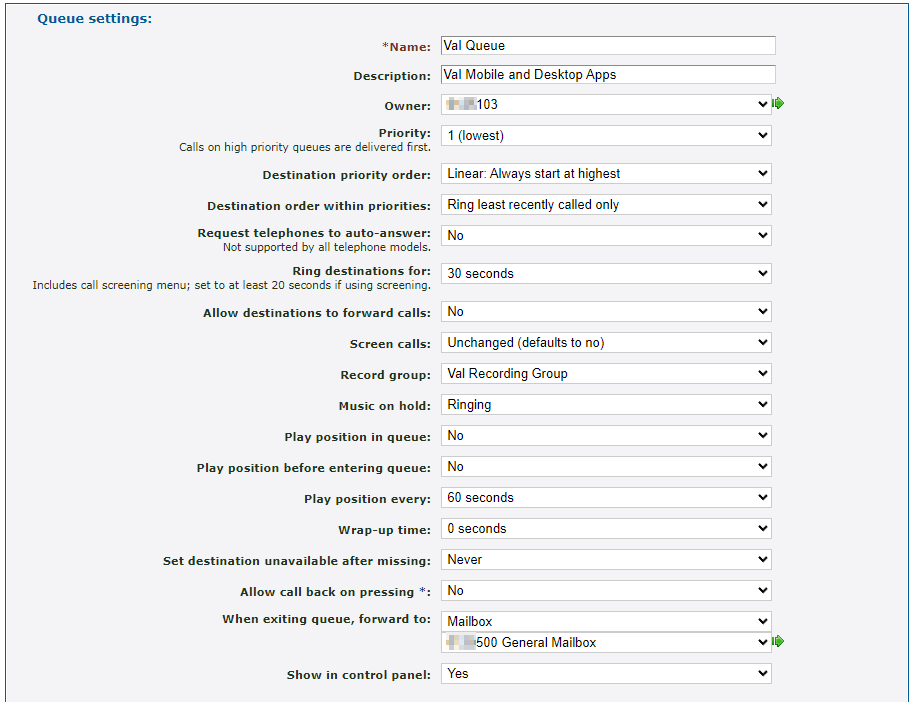
| Setting | Description |
|---|---|
| * Name | Type a unique name for identifying the queue. |
| Description | Type a note to display alongside the queue's name in the list of queues. |
| Owner |
If needed, select a user that should be able to view and edit this queue. Quick Tip: This call queue can be owned by that user so that they can add more devices' telephone lines to the queue when they have a new device added and registered. |
| Destination priority order | Determine how the queue will ring agents. These options include… • Linear - The queue will ring agents with the highest level of priority. • Smart linear - The queue will ring the last level that answered before ringing linearly. • Circular - The queue will ring starting at the next level from the level that handled the previous call. • Smart Circular - The queue will ring the last level that answered and then continue ringing circular. |
| Destination order within priorities | Choose to either ring the next available line in a priority grouping or ring all available lines in a grouping at once. |
| Ring destinations for |
Select how many seconds a call will ring to each destination. When a destination does not answer, the call is returned to the queue to ring the next destination. Note: If call screening will be enabled, set this time to at least 20 seconds. |
| Allow destinations to forward calls | It is recommended to leave this set to No to avoid causing loops. |
| Screen calls |
Choose whether or not to screen calls. ✔ When set to Yes, the destination will be asked if they will accept the call. This can help mitigate ghost and spam calls. |
| Record group | If the calls in this queue should be recorded, select the name of the recording group that should record and store these recordings. |
| Music on hold | Use this option to select if callers should hear music or ringing while waiting in the queue. |
| When exiting queue, forward to |
Use the dropdowns to select where calls should be forwarded when they exit the queue according to the Exit queue when settings.
|
| Show in control panel | Choose whether or not to show this queue and its status in the Control panel page of the web portal. |

- In the Exit queue when section, use the following options to set when callers will follow the queue's When exiting queue, forward to setting.

| Option | Description |
|---|---|
| There are already calls in the queue |
Choose how many callers can wait in the queue at a time. When additional calls try to enter the queue when it is full, the extra callers will be sent to the destination set in the When exiting queue, forward to option. |
| Maximum hold time is reached | Set how long (in seconds) that callers will be able to wait before the queue exits them out of the queue according to the When exiting queue, forward to option. |
| No destinations are logged in or entering the queue | Decide if callers should follow the When exiting queue, forward to option when there are not any destinations logged in to the queue when a call is made to the queue. |
- Click the Save button.

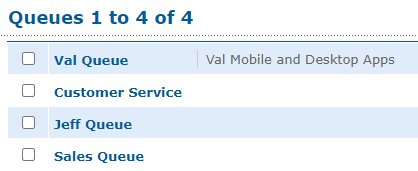
✔ Now you should be able to see the user's queue listed in the Queues page.
Step 2: Add Destinations to the Queue
Now that a user has a queue of their own, the devices that ring will need to be added. Since each device is registered to its own telephone lines, those telephone lines will need to be added as destinations for the queue.
As an Enswitch Admin, you can easily add more telephone lines to ring in a call queue. To do so…
- Navigate to Features → Queues.
- Click the name of the queue.
- In the Destinations section, click Add a destination.
- In the New destination menu, do the following:
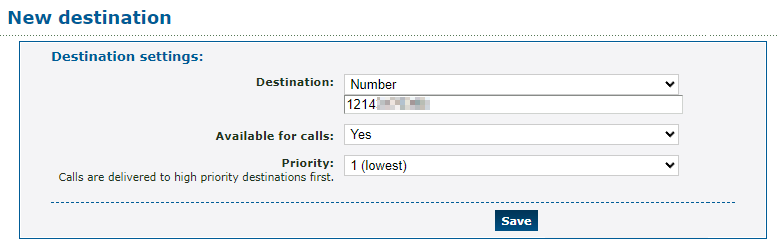
| Setting | Description |
|---|---|
| Destination |
If you are adding a user's device, select Telephone line and select the 7-digit extension number of the device. If you are adding a phone number, select Number and type the 11-digit telephone number. |
| Available for calls | Select if the destination should immediately be available for calls. |
| Priority | Select the priority of this destination. By default, the priority is 1, so each agent can receive an equal number of calls. |
- Click the Save button.

- If needed, click Add another destination and repeat steps 4-8 to add more agents for the queue.
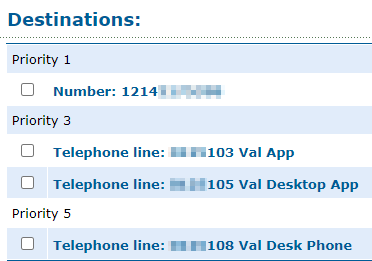
✔ In the Destinations section, you should see the devices to be rung listed.
Step 3: Check the Statuses of the Destinations
When you add a new agent to a call queue, it is best practice to check that their status is showing correctly using the Queue Panel.
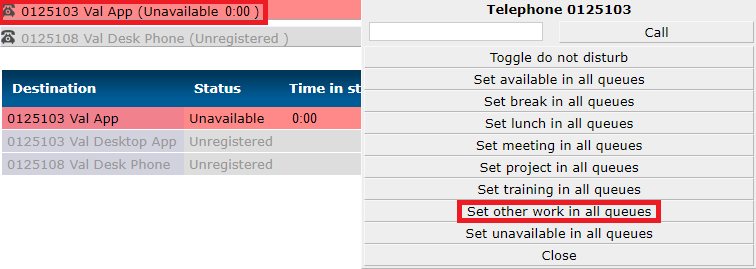
One of the most commonly reported issues for newly added agents is their status being stuck as Unavailable 0:00.
To check and correct your new agents' statuses in the Queue Panel…
- Navigate to Control panel → Queue panel.

- Click the Options
 icon to open the Panel options menu.
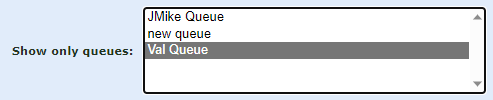
 - To show only a specific queue and its agents, use the Show only queues option to select the queue(s) to show in the queue panel.
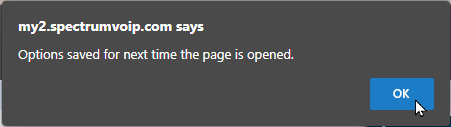
- Click the Save options button.

- In the confirmation prompt, click OK.
-
Minimize the menu by clicking the arrow icon.

- Click the agent whose status is showing incorrectly and select Set other work in all queues.
- Click the agent again and select the status the agent should show with.

Step 4: Route Calls to the Queue
Now that this user has a call queue that will ring their devices for calls, the call queue will need to be able to be contacted.
One of the main ways of contacting a user internally is by calling their feature code, which is usually a 3-digit version of their extension number. Another way of contacting a user is by calling their Direct Inward Dialing (DID) number. Using either of these methods, we can make the new call queue accessible for callers.
Create a Feature Code that Dials the User's Call Queue
To create a new feature code that will route internal calls to the user's new call queue…
1. Navigate to Features → Feature codes.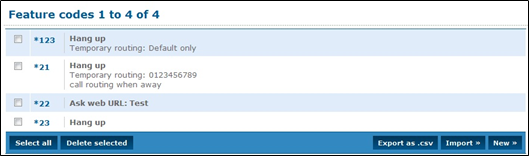
2. Click the New >> button.
3. Fill in the following boxes: (fields marked with * are required)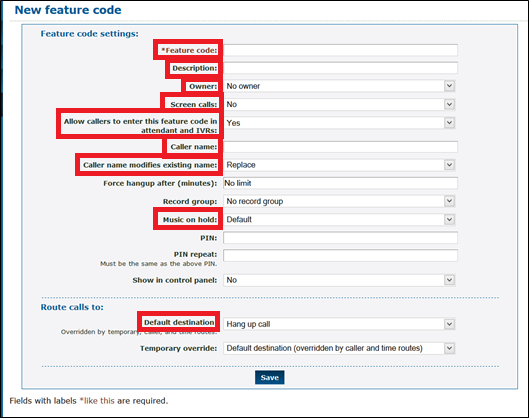
– * Feature code: This must be a combination of numbers and/or * (for example, *123 or 123).
Quick Tip: The most commonly used feature code for contacting a user is a 3-digit version of that user's 7-digit extension.
For example, user 0125101 may prefer to use 101 as their feature code.
DANGER: Do NOT use a N11 number, such as 911, 211, or 411.
– Description: This text is displayed next to the code in the list of feature codes.
– Owner: This person may edit the feature code even if they are not an administrator.
– Screen calls: When set to Yes, the person answering is asked if they want to accept the call.
– Allow callers to enter this feature code in attendant and IVRs: When set to yes, this feature code can be entered in the auto-attendant and IVR menus.
– Caller name: Allows users on a SIP telephone to see which feature code the call came from. If not set, the caller name supplied by the caller will be used.
– Caller name modifies existing name: Determines whether the caller name setting above replaces the caller name supplied by the caller, prepends to it, or appends to it.
– Music on hold: When selected, users who dialed this code and are on hold will have music played back to them.
– Default destination: Use the drop-down to select Queue.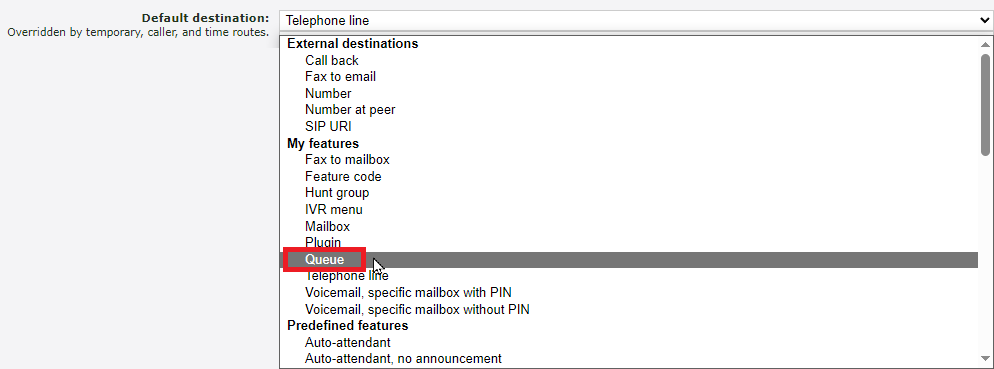
– Queue - Use the second drop-down that appears to select the user's call queue.
4. Click the Save button.
Edit an Existing Feature Code that Dials a User
If this user already has a feature code, we can adjust where their feature code routes calls. To do so…
1. Navigate to Features → Feature codes.
2. Click the Feature Code that needs to be edited.
3. Edit the following options:
– Description: This text is displayed next to the code in the list of feature codes.
– Default destination: Use the drop-down to select Queue.
– Queue - Use the second drop-down that appears to select the user's call queue.
4. Click the Save button.
✔ Now when that feature code is dialed, the call queue will receive the call and ring the user's devices.

Reroute the User's DID Number
One option for routing a user's call is a Direct Inward Dialing (DID) number. If a user already has one, you can reroute that DID to route calls to the user's call queue instead of a specific device's telephone line.
1. Navigate to Features → Numbers.
2. Click the user's phone number.
3. In the Route calls to section, use the Default destination drop-down to select Queue.
4. Use the second drop-down to select the user's new queue.
5. Click the Save button.
✔ You should now see that user's DID number listed with it routing to the new queue.
